Nissan Murano: Removal and Installation / Telematics Antenna

 |
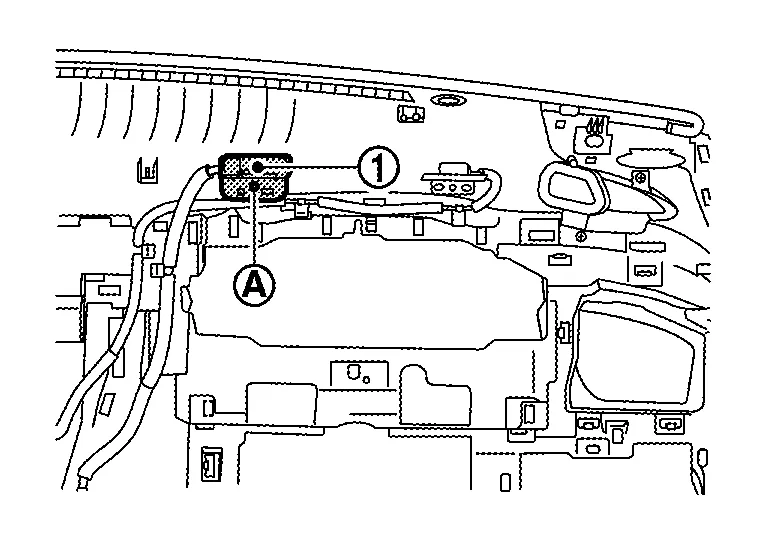
Telematics antenna |  |
Connector | ||
 |
: Clips |
REMOVAL
Remove the instrument panel assembly. Refer to Removal and Installation.
Remove the screw  , and then remove the telematics antenna .
INSTALLATION
Installation is in the reverse order of removal.
 Telematics Switch
Removal and Installation
REMOVALRemove the map lamp assembly. Refer to Removal and Installation.
Remove the connector and screws .
Remove the telematics switch with the map lamp assembly finisher as a single unit from the map lamp assembly...

Other information:
Nissan Murano (Z52) 2015-2024 Service Manual: Heater & Air Conditioning System :: Service Data and Specifications (sds). Service Data and Specifications (sds)
Compressor Type Variable displacement swash plate Displacement 175 cm3 (10.7 cu in)/rev Number of cylinders 10 Cylinder bore diameter × stroke 30.5 x 24 mm (1.2 x 0.9 in) Direction of rotation Clockwise (viewed from clutch) Drive belt Poly V 7 grooves Disc to pulley clearance Standard 0...
Nissan Murano (Z52) 2015-2024 Service Manual: P014c A/f Sensor 1
DTC Description DTC DETECTION LOGICTo judge malfunctions, this diagnosis measures response time of the A/F signal computed by ECM from the A/F sensor 1 signal. The time is compensated by engine operating (speed and load), fuel feedback control constant, and the A/F sensor 1 temperature index...
Categories
- Manuals Home
- Nissan Murano Owners Manual
- Nissan Murano Service Manual
- How to enable/disable the LDW system
- Checking engine oil level
- Passenger compartment
- New on site
- Most important about car
LATCH (Lower Anchors and Tethers for CHildren) system

LATCH system lower anchor locations - bench seat
Your vehicle is equipped with special anchor points that are used with LATCH system compatible child restraints. This system may also be referred to as the ISOFIX or ISOFIX compatible system. With this system, you do not have to use a vehicle seat belt to secure the child restraint unless the combined weight of the child and child restraint exceeds 65 lbs. (29.5 kg). If the combined weight of the child and child restraint is greater than 65 lbs. (29.5 kg), use the vehicle’s seat belt (not the lower anchors) to install the child restraint. Be sure to follow the child restraint manufacturer’s instructions for installation.