Nissan Murano: Repairing Procedures and Precautions / Use of Body Filler (putty) and Grinding
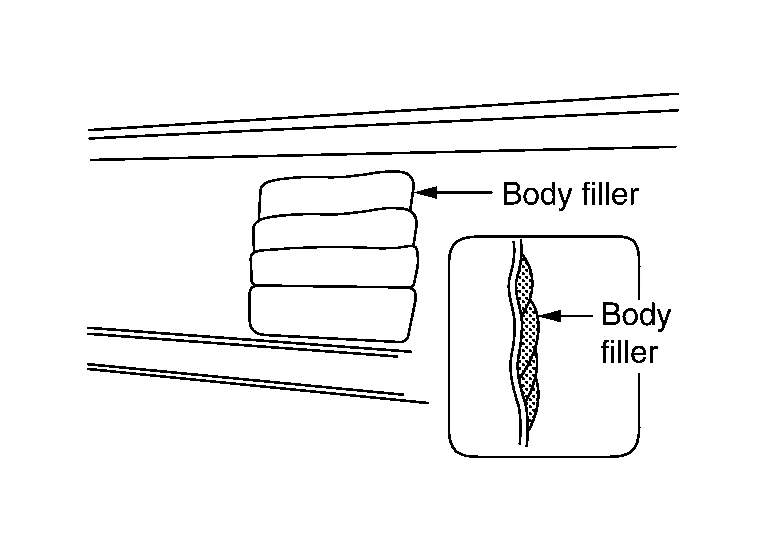
Panel irregularities may be corrected with a hammer and dolly. However, exact restoration of the original shape with these tools takes a long time. Body filler may be used to restore the original panel profile. For this purpose, the panel surface is finished slightly lower than the original surface.
Filler is applied to finish the shape and also to reduce the time needed for repair.
In body repair shops, the most commonly used materials are body filler, polyester putty, and detail putty.
This section mainly describes the body filler.
Polyester putty is described in the paint manual.
| Type (Standard thickness limits) | Characteristics | |
|---|---|---|
|
Body Filler Putty (For repairing of large dents or scratches) [10 mm (0.39 in)] |
Surform type |
|
| Light Type |
|
|
| Glass Fiber or Aluminum Powder Type |
|
|
|
Intermediate Filler Putty [10 mm (0.39 in)] (For repairing of large dents or scratches) |
|
|
|
Polyester Putty (For filling pores and sand scratches in body filler) |
Spatula Type [3 mm (0.12 in)] |
|
|
Spray Type [1 mm (0.04 in)] |
|
|
|
Lacquer Putty [0.1 mm (0.004 in)] (Detail putty) |
|
|
| Ultraviolet Curing Putty |
|
|
 NOTE:
NOTE:
Putty film thickness limits should be decided with putty manufacturer because limits vary from maker to maker.
(1) REMOVAL OF PAINT
Using an air sander, remove old paint and "scuffing" the panel surface for better filler adhesion. Form a featheredge on the panel surface approximately 20 mm (0.79 in) wider than the correction area in order to eliminate traces of body filler application.
(2) CHEMICAL CONVERSION COATING
Body skin panels of NISSAN vehicles use anti-corrosive steel. These panels should be coated with a self etching primer coating before applying common body filler.
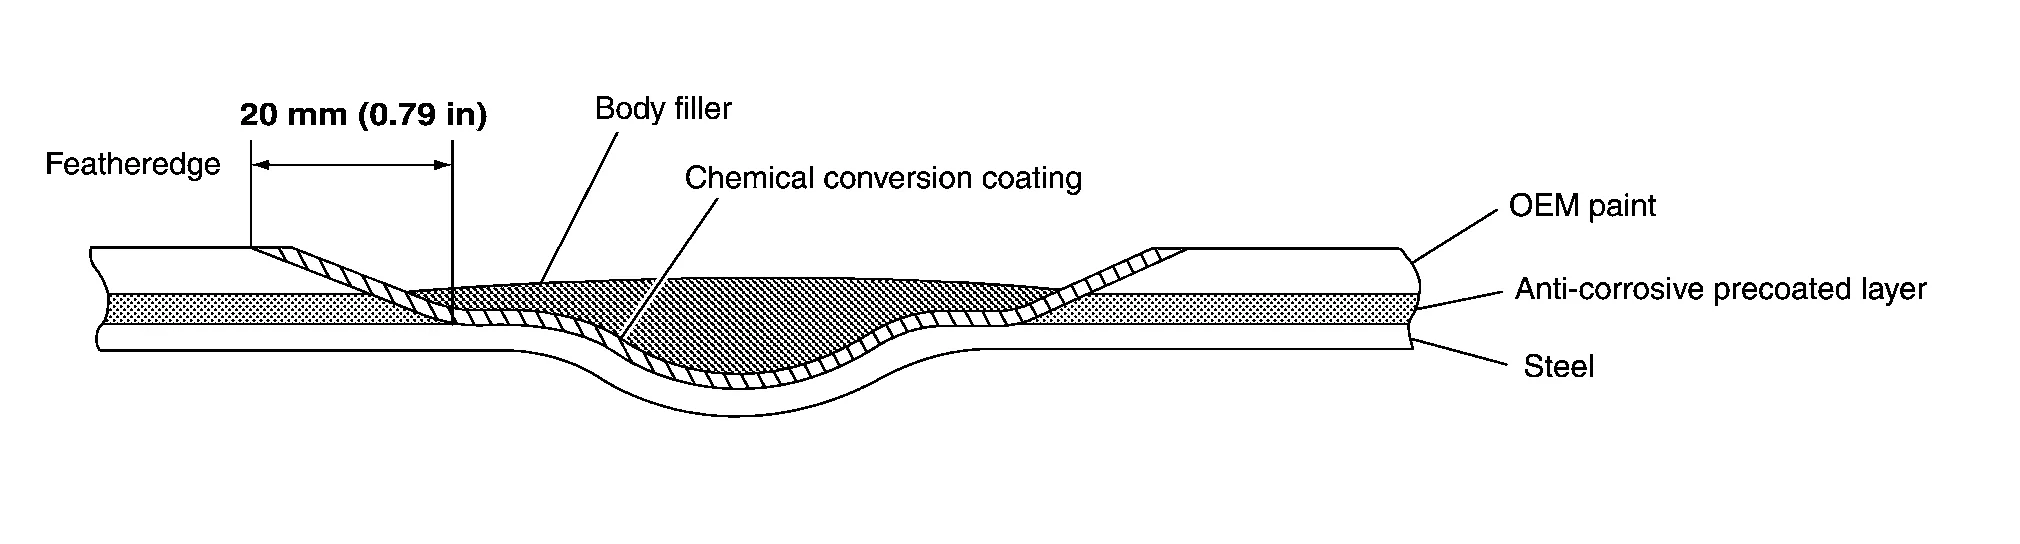
If body filler has been developed for anti-corrosive steel, chemical conversion coating will not be needed. (Please confirm this with the body filler supplier.)
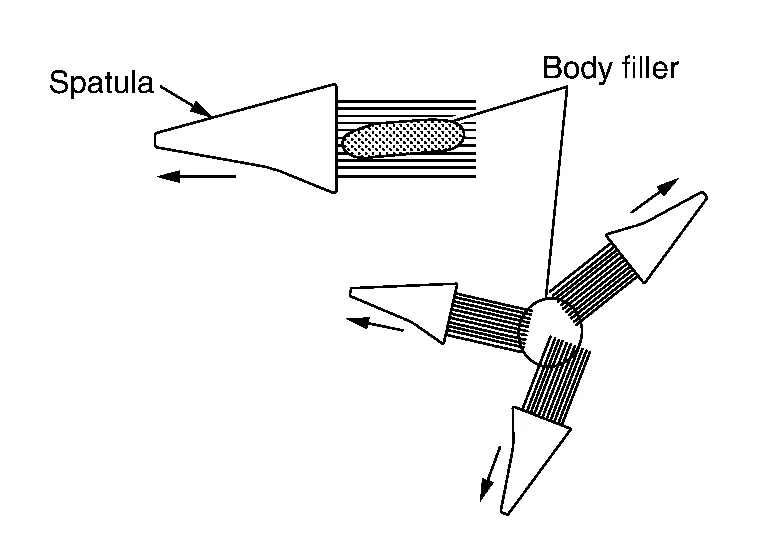
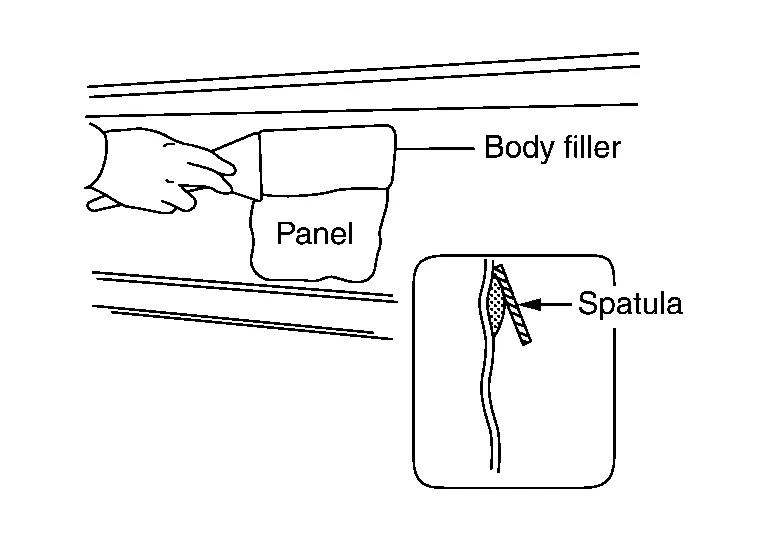
(3) SPATULA MOVEMENT
Move the spatula lengthwise when applying to an oval shaped area. If applying to a round area, move the spatula in many directions as shown in the figure.
(4) APPLYING TECHNIQUE
Apply body filler in several thin layers.
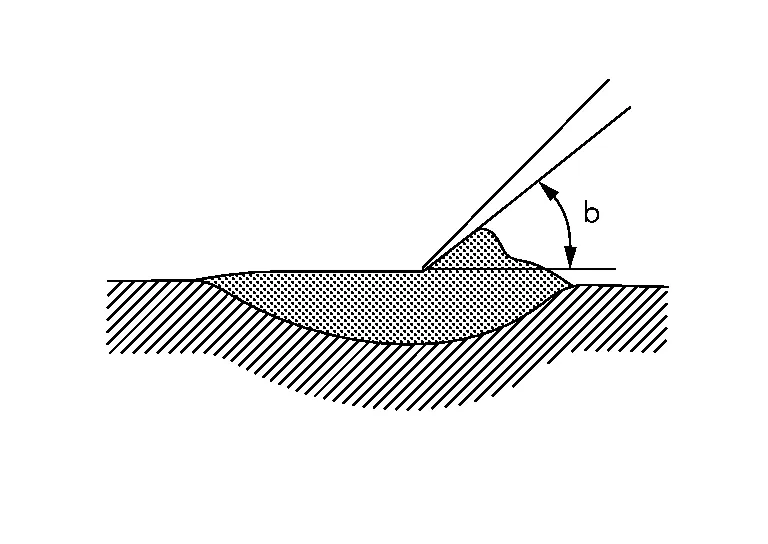
(a) Hold spatula well balanced and hold slightly standing position, then squeeze putty into scratches.
| a | : 60°– 90° |
(b) Put a large amount of filler on the spatula.
Hold spatula slightly lean, then apply several times (do not put much in once) until covered above datum level.
| b | : 30°– 45° |
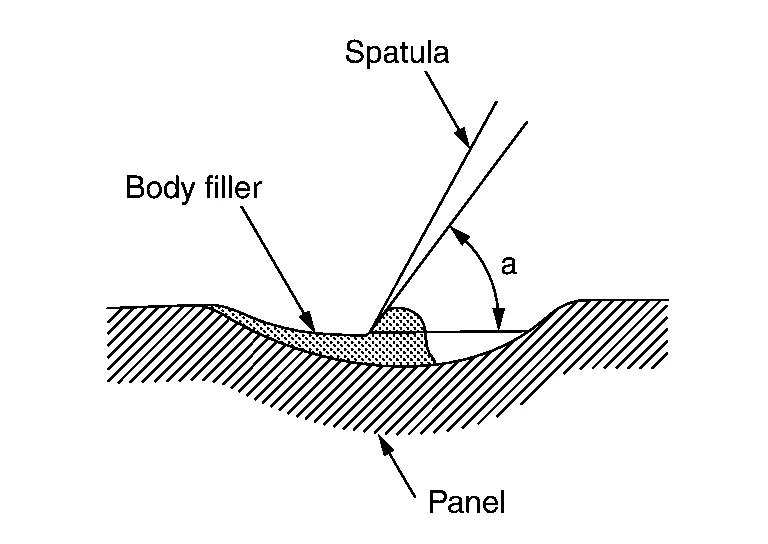
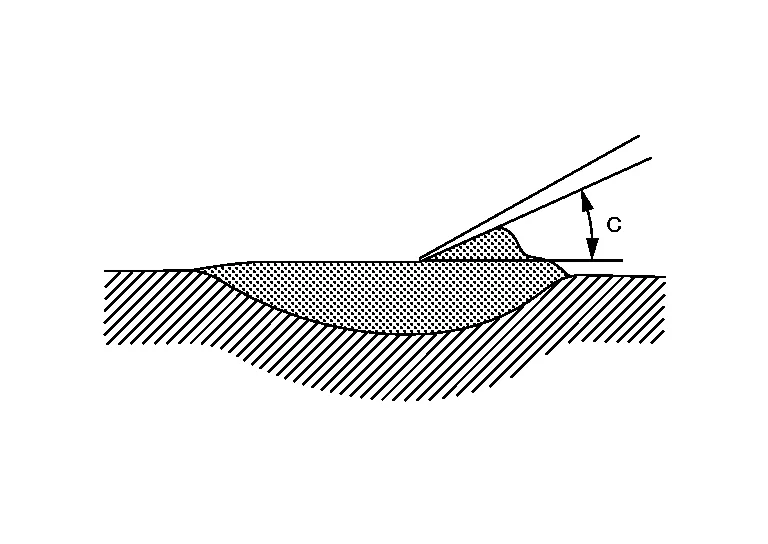
(c) Use the spatula to smooth the applied filler.
Perform finishing work for smoothening the surface. The filler surface should be slightly higher than the panel surface.
| c | : Less than 30° |
(5) PRECAUTION FOR APPLYING
Be careful not to place body filler over the basecoat edge. This will soften the basecoat and cause repair mapping and visible ring around the repair area. The filler edge should end on bare metal or e-coat to avoid this condition.
(6) APPLICATION OF BODY FILLER TO FLAT SURFACE
(a) Apply filler so that the corrected surface is flush with the surrounding panel surface.
(b) Apply another layer of filler to overlap 1/3 - 2/3 of the previous application to eliminate the step.
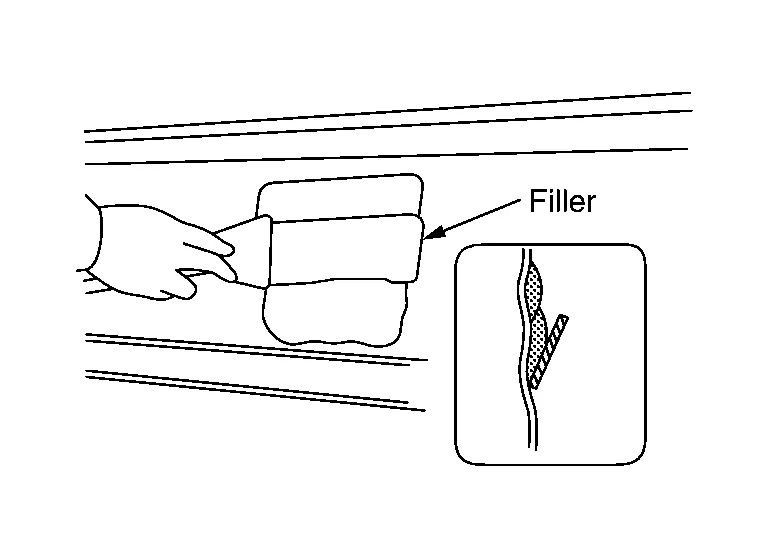
(c) Repeat (b) until the filler is correctly applied to the desired portion.
(7) APPLICATION OF BODY FILLER TO CURVED SURFACE
Use of a flexible rubber spatula is recommended for application to curved surfaces.

(8) APPLICATION OF BODY FILLER TO PRESS LINE
(A) Apply tape along the press line. Then apply filler to only one side of the press line.
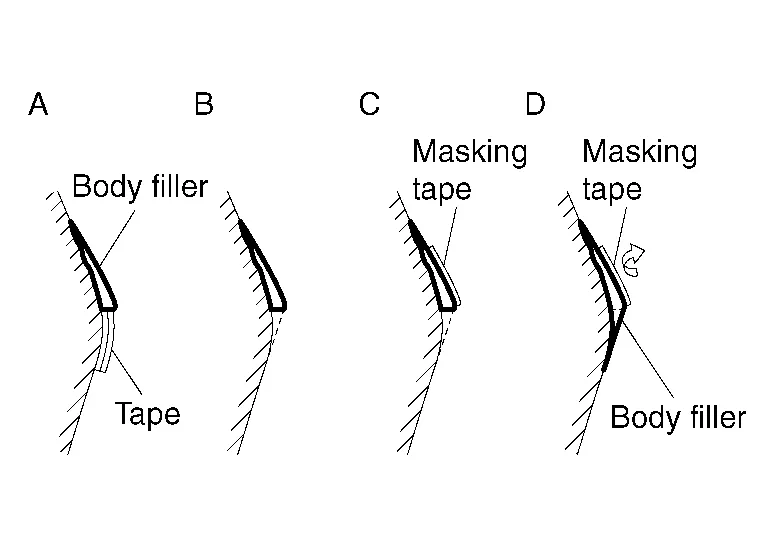
(B) Peel the tape from the half-dried filler.
(C) Apply tape along the filled and half-dried filler line.
(D) Apply filler to the other side of the press line.
When the hardener is mixed with the base, the filler begins to harden. Heat is also generated, which accelerates hardening. For this reason, filler drying speed varies with maximum thickness allowed..
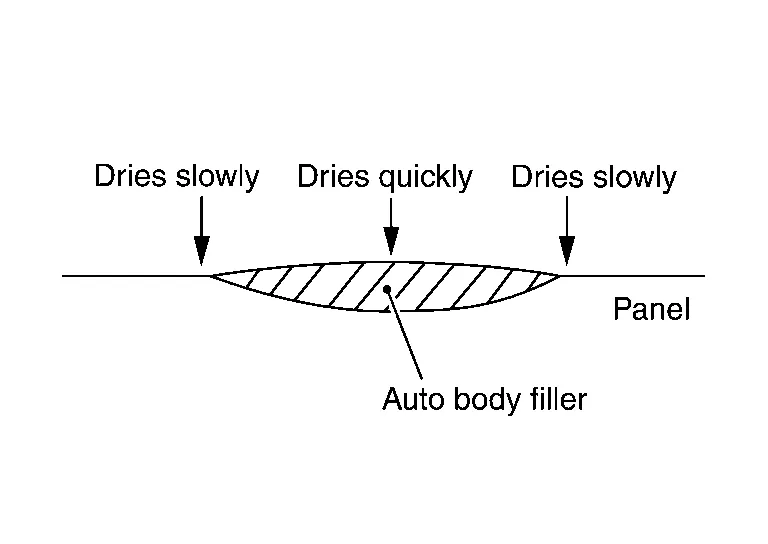
If a thick coat of filler is applied, the generated heat remains inside, hence it hardens quickly.
Where the filler is not so thick, it hardens rather slowly because heat dissipates to the outside.
Approximately 10 - 20 minutes (at 20°C or 68°F) after application, the filler becomes hard enough to permit grinding with a surform. When the ambient temperature is low, use a panel heater or adjust the drying time. To check whether the filler is dry or not, press a thin portion with finger. If it is dry, then it is suitable for grinding.
Grind the filler when it is half-dried. Half-dried filler means the condition where the surface, if ground lightly with a surform, will produce continuous linear chips. Grinding with the surform will be difficult after the filler hardens completely.
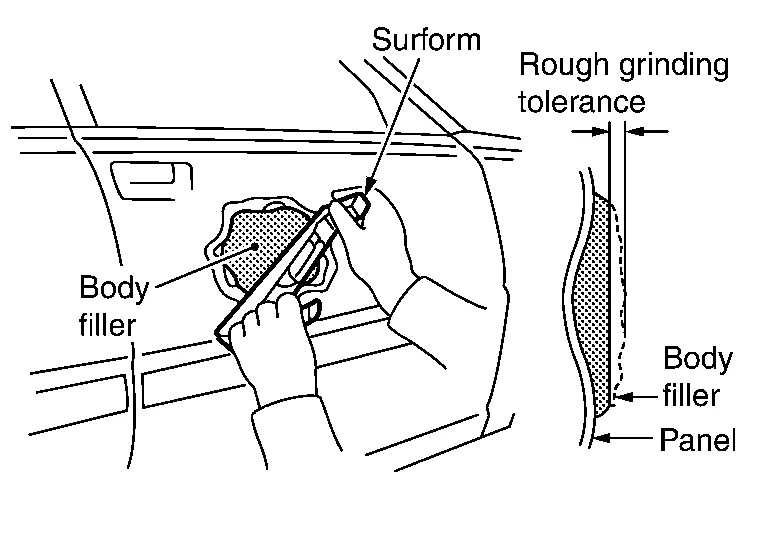
(1) ROUGH GRINDING BY SURFORM
Smooth the filler surface by grinding with the surform or the like. Grind in many different directions. Better results may be obtained if the surform is inclined 30° - 40° with respect to the direction of movement. Be careful not to damage the surrounding panel surface.
(2) ROUGH GRINGING BY AIR SANDER
Smooth the filler surface by grinding with the dual action sander or orbital sander. Grind in many different directions.
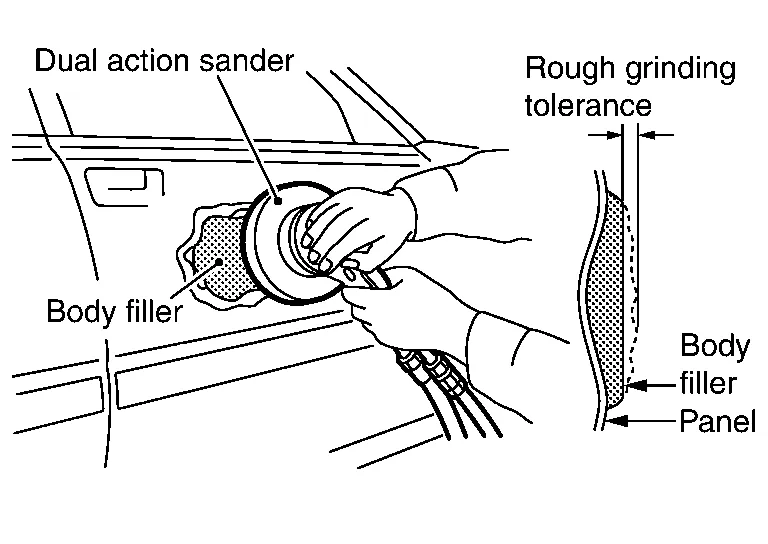
This grinding method is faster than the method using a surform. However, if the worker is not accustomed to performing this type of grinding, an uneven surface may result from excessive grinding. #80 - #120 sandpaper is used.
(3) SHAPING THE ENTIRE PANEL
Using an orbital sander or dual action sander, trim the shape of the filled panel. Leave the amount required for final finishing. #120 - #180 sandpaper is used.
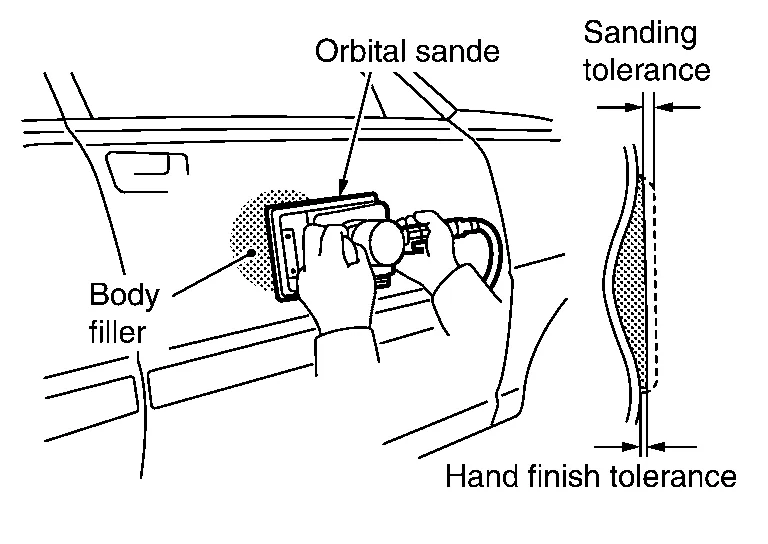
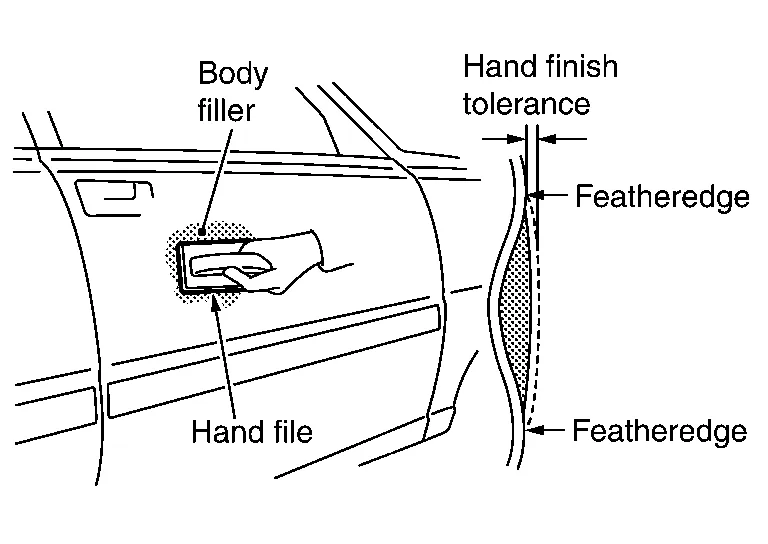
(4) FINAL FINISH BY HAND FILE
Using a hand file, orbital sander or dual action sander, smooth and form featheredge on the filler surface until it is flush with the surrounding panel. #240 - #320 sandpaper is used.
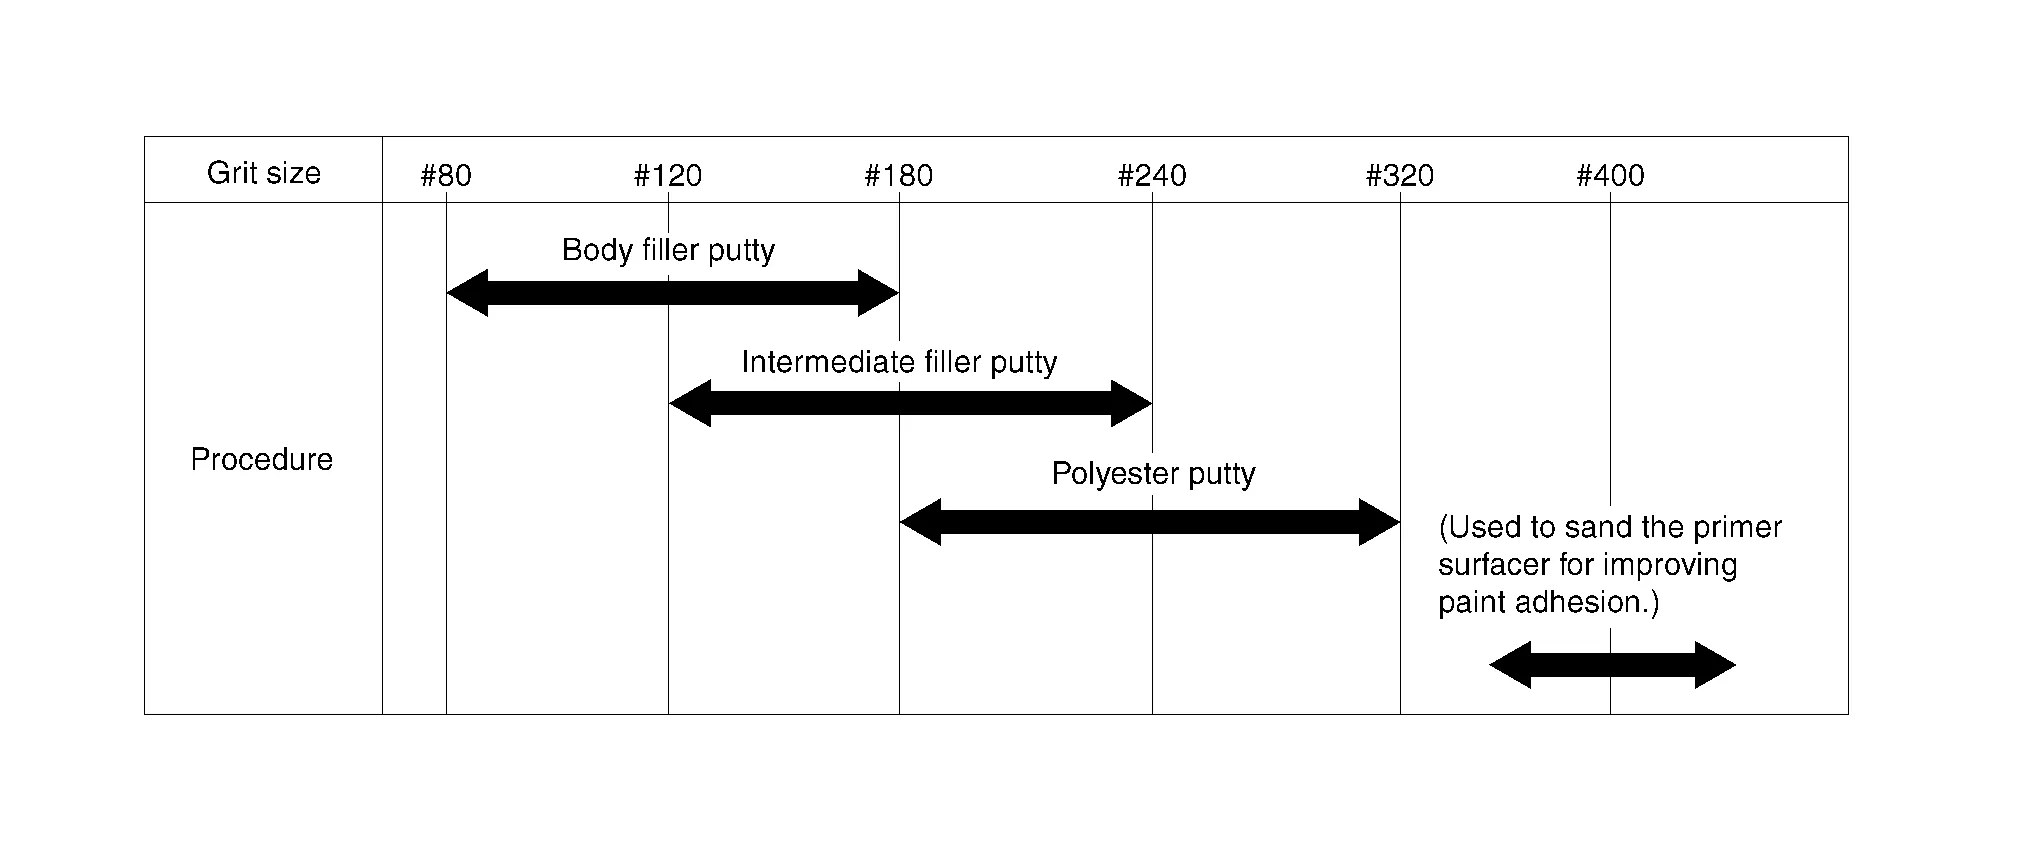
Select a sandpaper with a grit, appropriate to the putty used. Sanding marks that occur due to sanding are removed with further sanding.
SWITCHING TO A SANDPAPER OF A DIFFERENT GRIT
Sanding marks that occur during sanding are sanded with a sandpaper of the next finer grit. When doing this, do not sand using a sandpaper of a grit two grades or more finer than the previously applied sandpaper.
| NG | : #80 ⇒ #180 ⇒ #320 ⇒ #400 |
*: Note that, if sanding with a sandpaper of a grit two grades or more finer than the last one used, removing deep sanding marks that occur during sanding with a coarser sandpaper, as well as removing any remaining deep sanding marks may take longer.
| OK | : #120 ⇒ #180 ⇒ #240 ⇒ #320 ⇒ #400 |
The diameter (shown in the figure) of a circle traced by a part of the dual action sander and the orbital sander is called an orbit diameter. The larger the area shown with diagonal lines, the greater the grinding power is.
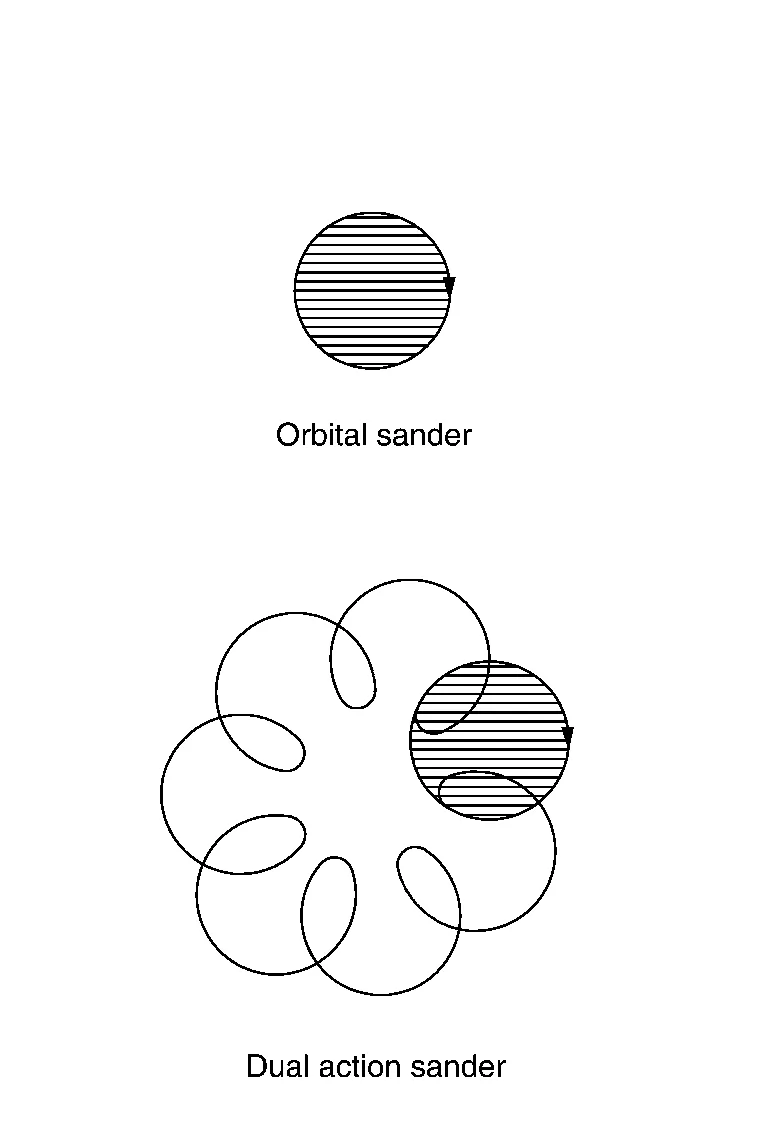
When surface accuracy is required, a sander with a smaller orbit diameter should be selected. When grinding power is required, a sander with a larger orbit diameter should be selected.
| Work content | Orbit diameter |
| Sanding a body filler | 7 mm - 10 mm (0.28 in - 0.39 in) |
| Sanding a primer surfacer | 4 mm - 5 mm (0.16 in - 0.20 in) |
| Roughing surface before topcoating | 3 mm - 4.5 mm (0.118 in - 0.177 in) |
 Partial Replacement of Panel (welded Panel)
Partial Replacement of Panel (Welded Panel)
If damage occurs in a welded panel, it can be entirely replaced by a service panel or partial replacement can be done by cutting and replacing damaged portion with a service panel...
 Repair of Rust and Corrosion
Repair of Rust and Corrosion
Rust on sheet metal is the result of the chemical reaction of steel to oxygen in the air, which is called oxidation. This rust, if left untreated, will increase and finally corrode and damage the sheet metal...
Other information:
Nissan Murano (Z52) 2015-2024 Service Manual: System. Hydraulic Pump Electric Power Steering System
System Description The system is composed primarily of the power steering oil pump assembly (power steering control module, power steering motor, power steering oil pump, and reservoir tank), hydraulic pipes, and steering gear assembly. The power steering control module controls the speed of the power steering motor according to the Nissan Murano vehicle speed and steering angle speed...
Nissan Murano (Z52) 2015-2024 Service Manual: Mood Lamp
Removal and Installation FRONT CONSOLERemovalRemove center console upper side finisher. Refer to Exploded View. Remove mood lamp (front console) (1) screw (B). Release harness connector (A) clip using a suitable tool and disconnect the harness connector from the mood lamp (front console)...
Categories
- Manuals Home
- Nissan Murano Owners Manual
- Nissan Murano Service Manual
- Indicator lights
- Intelligent Forward Collision Warning (I-FCW)
- Passenger compartment
- New on site
- Most important about car
Unfastening the seat belts. Checking seat belt operation
Unfastening the seat belts
To unfasten the seat belt, press the button
on the buckle  . The seat belt
automatically
retracts.
. The seat belt
automatically
retracts.