Nissan Murano: Repairing Procedures and Precautions / Repair of Rust and Corrosion
Rust on sheet metal is the result of the chemical reaction of steel to oxygen in the air, which is called oxidation. This rust, if left untreated, will increase and finally corrode and damage the sheet metal. If the Nissan Murano vehicle is used for a long time under severe environmental conditions, rust or corrosion may form on body surfaces. When repairing rust and corrosion, it is necessary to keep rust from spreading from the repaired portion.
Grind the rusted portion with an air sander or the like.
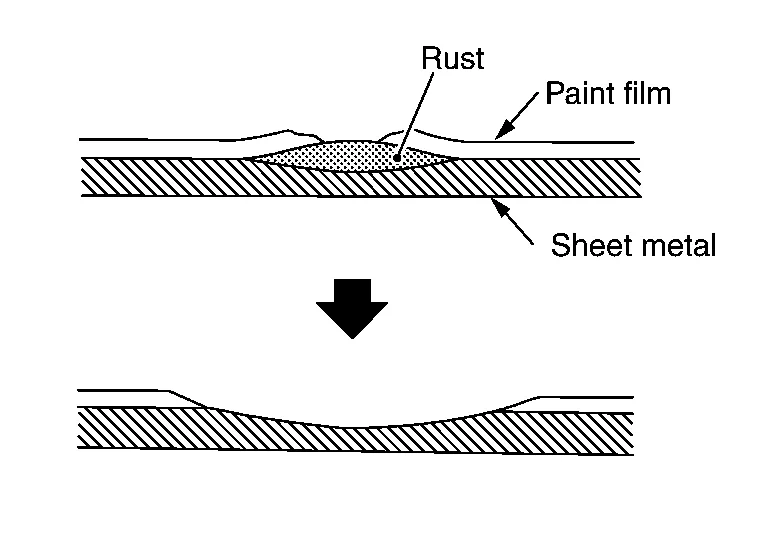
Rust may be more extensive than it appears from the outside. Therefore, it is necessary to grind the area around rusted portion. Repair the ground out portion using body filler.
(1) FILLING WITH FIBERGLASS
(a) Grind off the corroded portion of the panel with an air sander. If corrosion is severe, cut off the affected portion with a chisel or tinman's shears. Remove the paint from the surrounding areas.

(b) Hollow the area surrounding the repair hole by tapping with a hammer and bending the panel.

(c) Cut a piece of fiberglass cloth. The cloth should be large enough to overlap the repair hole.

Apply fiberglass putty to the cloth using a spatula until the mesh is filled. Prepare the fiberglass putty by mixing 100 parts of base with 2 to 3 parts of hardener.
(d) Apply a thin coat of fiberglass putty to the panel where the piece of fiberglass cloth is to be attached.

Apply putty also to the edge and back of the repair hole.
(e) Apply the piece of fiberglass cloth to the surrounding portion and the back of the repair hole.

This is necessary to prevent rust.
(f) Apply the piece of fiberglass cloth prepared in step (c) above to the repair hole. Press the periphery of the cloth to the panel for better adhesion. If the repair hole is large and the cloth sags in the center, support the cloth with tape applied behind the panel.

(g) Apply the fiberglass putty to the piece of fiberglass cloth. The fiberglass putty surface should be below the surrounding panel surface. If the area to be repaired is deep, use two or more piece of fiberglass cloth. In such a case, avoid thick application of fiberglass putty. Thick fiberglass putty will crack after drying.

(h) Dry the fiberglass putty, and grind the surface with an air sander. Then trim the entire panel using body filler.

When force drying fiberglass putty, allow the putty to sit for approximately 20 minutes. Then heat at a temperature below 60°C (140°F). Rapid heating which causes the putty to change color must be avoided, as it will lead to cracked putty. Fiberglass putty forms blowholes easily. Body filler must be used to finish the surface of fiberglass putty.
(2) PATCHING
(a) Remove the corroded portion of the panel.

Remove paint from the panel around the repair hole.
Make a flange by bending the surrounding panel with pliers and hammer, then apply anti-corrosive treatment (Metallic solution).
(b) Using tinman's shears, cut a patch large enough to overlap the repair hole. Apply the anti-corrosive treatment to the portion to be welded. Use of stainless steel is recommended to avoid rusting. If the repair hole is large, use a panel having the same thickness as the original panel to retain the original strength.

(c) Weld the patch to the repair hole. If stainless steel is used, use the MAG welding or spot welding method.

 NOTE:
NOTE:
When welding the patch by MAG welding, use the plug welding method.

(d) Apply the body filler to the repaired portion of the panel.

(e) Apply the anti-corrosive treatment to the back of the panel. If accessible from behind, apply a sealer to the panel-to-patch mating section.

(f) If inaccessible from behind, apply an anti-corrosive wax from an inner panel opening or the like. It is also important to apply the anti-corrosive treatment to other portions in addition to the repaired portion.

 Use of Body Filler (putty) and Grinding
Use of Body Filler (Putty) and Grinding
Panel irregularities may be corrected with a hammer and dolly. However, exact restoration of the original shape with these tools takes a long time...

Other information:
Nissan Murano (Z52) 2015-2024 Owners Manual: Drinking alcohol/drugs and driving
WARNING Never drive under the influence of alcohol or drugs. Alcohol in the bloodstream reduces coordination, delays reaction time and impairs judgement. Driving after drinking alcohol increases the likelihood of being involved in an accident injuring yourself and others...
Nissan Murano (Z52) 2015-2024 Service Manual: Door Does Not Lock/unlock with Intelligent Key
Diagnosis Procedure All doors do not lock/unlock using Intelligent Key button.NOTE: Before starting diagnosis check that vehicle condition is as shown in “Conditions of Nissan Murano vehicle”, and check each symptom. SYMPTOM TABLE (BOTH INTELLIGENT KEYS HAVE THE SAME SYMPTOMS) Door lock operation (remote keyless entry) Door lock operation (request switch) or back door open operation (opener switch of back door panel) Engine started with ignition switch operation (registered Intelligent Key is within the detection area of inside key antenna) Engine started with ignition switch operation (registered Intelligent Key placed next to ignition switch) NG OK OK OK CONDITIONS OF VEHICLE (OPERATING CONDITIONS)Registered Intelligent Key is within the detection area of remote keyless entry receiver...
Categories
- Manuals Home
- Nissan Murano Owners Manual
- Nissan Murano Service Manual
- System malfunction
- Turning the AEB system on/off
- Fuel recommendation
- New on site
- Most important about car
Luggage hooks
When securing items using luggage hooks located on the back of the seat or side finisher do not apply a load over more than 6.5 lbs. (29 N) to a single hook.
The luggage hooks that are located on the floor should have loads less than 110 lbs. (490 N) to a single hook.