Nissan Murano: NISSAN Intelligent Key® Operation / Unlocking doors
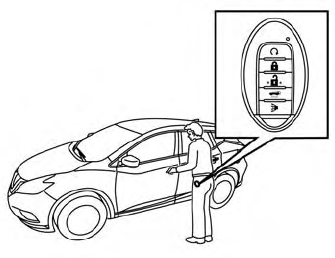
- Carry the Intelligent Key.
- Push the door handle request switch or power liftgate request switch.
- The hazard indicator lights flash once and the outside chime sounds once.
- Push the door handle request switch again within 1 minute to unlock all doors.
NOTE:
Request switches for all doors and liftgate can be deactivated when the I-Key Door Lock setting is switched to OFF in the “Vehicle Settings” of the vehicle information display. For additional information, refer to “Vehicle information display” in the “Instruments and controls” section of this manual.
If a door handle is pulled while unlocking the doors, that door may not be unlocked. Returning the door handle to its original position will unlock the door. If the door does not unlock after returning the door handle, push the door handle request switch to unlock the door.
All doors will be locked automatically unless one of the following operations is performed within 1 minute after pushing the request switch.
- Opening any door.
- Pushing the ignition switch.
The interior light timer illuminates for a period of time when a door is unlocked and the room light switch is in the DOOR position.
The interior light can be turned off without waiting by performing one of the following operations:
- Placing the ignition switch in theONposition.
- Locking the doors with the remote control.
- Switching the room light switch to the OFF position.
- Switching the Auto Room Lamp to the OFF position in “Vehicle Settings” of the vehicle information display. For additional information, refer to “Vehicle information display” in the “Instruments and controls” section of this manual.
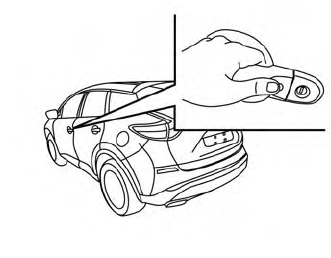
 Locking doors
Move the shift lever to the P (Park) position,
place the ignition switch in the
LOCK position and make sure you carry
the Intelligent Key with you...
 How to use the remote keyless entry function
The remote keyless entry function can operate
all door locks using the remote keyless
function of the Intelligent Key. The remote
keyless function can operate at a
distance of 33 ft (10 m) away from the vehicle...
Other information:
Nissan Murano (Z52) 2015-2024 Service Manual: C1b5d-97 Feb Ope Count Limit
DTC Description DTC DETECTION LOGIC DTC CONSULT screen items (Trouble diagnosis content) DTC detection condition C1B5D-97 FEB OPE COUNT LIMIT (Forward Emergency Braking operation count limit) Diagnosis condition When ignition switch is ON Signal (terminal) — Threshold Automatic Emergency Braking system operated 3 times within ignition switch ON...
Nissan Murano (Z52) 2015-2024 Service Manual: Charging System :: Removal and Installation. Generator
Exploded View 1. Generator bracket 2. Generator 3. "B" terminal nut Front Removal and Installation REMOVALRemove radiator assembly. Refer to Removal and Installation. Remove cooling fan assembly. Refer to Removal and Installation...
Categories
- Manuals Home
- Nissan Murano Owners Manual
- Nissan Murano Service Manual
- Settings
- Intelligent Forward Collision Warning (I-FCW)
- GAS STATION INFORMATION
- New on site
- Most important about car
Unfastening the seat belts. Checking seat belt operation
Unfastening the seat belts
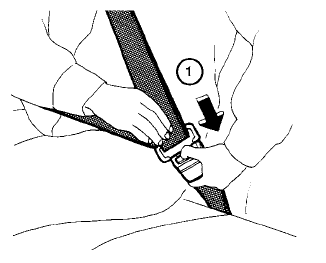
To unfasten the seat belt, press the button
on the buckle  . The seat belt
automatically
retracts.
. The seat belt
automatically
retracts.