Nissan Murano: Dtc/circuit Diagnosis / U1302 Camera Power Volt
DTC DETECTION LOGIC
| DTC No. |
CONSULT screen terms (Trouble diagnosis content) | DTC detection condition | |
|---|---|---|---|
| U1302 |
CAMERA POWER VOLT (Camera power voltage) |
Diagnosis condition | When ignition switch is ON |
| Signal (terminal) | Camera power supply circuits | ||
| Threshold | Camera power supply voltage is 5.9 V-6.5 V when ON, or 0 V when OFF | ||
| Diagnosis delay time | — | ||
POSSIBLE CAUSE
-
Camera power supply output circuit
-
Around view monitor control unit
-
Front camera
-
Rear camera
-
Side camera LH
-
Side camera RH
FAIL-SAFE
Camera power output is stopped.
PERFORM DTC CONFIRMATION PROCEDURE
 CONSULT
-
Ignition switch ON.
-
Select “Self Diagnostic Result” mode of “AVM”.
-
Check DTC.
Is DTC U1302 detected?
YES>>Proceed to DTC Diagnosis Procedure.
NO>>To check malfunction symptom before repair: Intermittent Incident.
NO>>Confirmation after repair: Inspection End.
CHECK CAMERA DATA MONITOR
CONSULT
Check CAMERA IMAGE SIG for each camera in “Data Monitor” of “AVM”.
Is “OK” displayed for all cameras?
YES>>Refer to Intermittent Incident.
NO>>Front camera – GO TO 2.
NO>>Rear camera – GO TO 4.
NO>>LH side camera – GO TO 6.
NO>>RH side camera – GO TO 8.
CHECK FRONT CAMERA POWER SUPPLY AND POWER SUPPLY GROUND CIRCUIT CONTINUITY
-
Ignition switch OFF.
-
Disconnect around view monitor control unit connector and front camera connector.
-
Check continuity between around view monitor control unit connector and front camera connector.
Around view monitor control unit Front camera Continuity Connector Terminal Connector Terminal M96 6 E226 2 Yes 5 1 -
Check continuity between around view monitor control unit connector and ground.
Around view monitor control unit Ground Continuity Connector Terminal M96 6 — No
Is the inspection result normal?
YES>>GO TO 3.
NO>>Repair or replace harness or connectors.
CHECK AROUND VIEW MONITOR CONTROL UNIT VOLTAGE (FRONT CAMERA)
-
Connect around view monitor control unit connector and front camera connector.
-
Ignition switch ON.
-
Check voltage between around view monitor control unit connector terminals.
Around view monitor control unit M96 Condition Voltage
(Approx.)(+) (−) Terminal Terminal 6 5 CAMERA switch is ON or shift position is “D”. 6.2 V
Is the inspection result normal?
YES>>Replace front camera. Refer to Removal and Installation.
NO>>Replace around view monitor control unit. Refer to Removal and Installation.
CHECK REAR CAMERA POWER SUPPLY AND POWER SUPPLY GROUND CIRCUIT CONTINUITY
-
Ignition switch OFF.
-
Disconnect around view monitor control unit connector and rear camera connector.
-
Check continuity between around view monitor control unit connector and rear camera connector.
Around view monitor control unit Rear camera Continuity Connector Terminal Connector Terminal M96 18 D564 2 Yes 17 1 -
Check continuity between around view monitor control unit connector and ground.
Around view monitor control unit Ground Continuity Connector Terminal M96 18 — No
Is the inspection result normal?
YES>>GO TO 5.
NO>>Repair or replace harness or connectors.
CHECK AROUND VIEW MONITOR CONTROL UNIT VOLTAGE (REAR CAMERA)
-
Connect around view monitor control unit connector and rear camera connector.
-
Ignition switch ON.
-
Check voltage between around view monitor control unit connector terminals.
Around view monitor control unit M96 Condition Voltage
(Approx.)(+) (−) Terminal Terminal 18 17 CAMERA switch is ON or shift position is “R”. 6.2 V
Is the inspection result normal?
YES>>Replace rear camera. Refer to Removal and Installation.
NO>>Replace around view monitor control unit. Refer to Removal and Installation.
CHECK LH SIDE CAMERA POWER SUPPLY AND POWER SUPPLY GROUND CIRCUIT CONTINUITY
-
Ignition switch OFF.
-
Disconnect around view monitor control unit connector and LH side camera connector.
-
Check continuity between around view monitor control unit connector and LH side camera connector.
Around view monitor control unit LH side camera Continuity Connector Terminal Connector Terminal M96 14 D4 10 Yes 13 11 -
Check continuity between around view monitor control unit connector and ground.
Around view monitor control unit Ground Continuity Connector Terminal M96 14 — No
Is the inspection result normal?
YES>>GO TO 7.
NO>>Repair or replace harness or connectors.
CHECK AROUND VIEW MONITOR CONTROL UNIT VOLTAGE (LH SIDE CAMERA)
-
Connect around view monitor control unit connector and LH side camera connector.
-
Ignition switch ON.
-
Check voltage between around view monitor control unit connector terminals.
Around view monitor control unit M96 Condition Voltage
(Approx.)(+) (−) Terminal Terminal 14 13 CAMERA switch is ON or shift position is “D” or “R”. 6.2 V
Is the inspection result normal?
YES>>Replace side camera LH. Refer to Removal and Installation.
NO>>Replace around view monitor control unit. Refer to Removal and Installation.
CHECK RH SIDE CAMERA POWER SUPPLY AND POWER SUPPLY GROUND CIRCUIT CONTINUITY
-
Ignition switch OFF.
-
Disconnect around view monitor control unit connector and RH side camera connector.
-
Check continuity between around view monitor control unit connector and RH side camera connector.
Around view monitor control unit RH side camera Continuity Connector Terminal Connector Terminal M96 10 D107 10 Yes 9 11 -
Check continuity between around view monitor control unit connector and ground.
Around view monitor control unit Ground Continuity Connector Terminal M96 10 — No
Is the inspection result normal?
YES>>GO TO 9.
NO>>Repair or replace harness or connectors.
CHECK AROUND VIEW MONITOR CONTROL UNIT VOLTAGE (RH SIDE CAMERA)
-
Connect around view monitor control unit connector and RH side camera connector.
-
Ignition switch ON.
-
Check voltage between around view monitor control unit connector terminals.
Around view monitor control unit M96 Condition Voltage
(Approx.)(+) (−) Terminal Terminal 10 9 CAMERA switch is ON or shift position is “D” or “R”. 6.2 V
Is the inspection result normal?
YES>>Replace side camera RH. Refer to Removal and Installation.
NO>>Replace around view monitor control unit. Refer to Removal and Installation.
 U1232 Steering Angle Sensor
DTC Description
DTC DETECTION LOGIC DTC No.
CONSULT screen terms
(Trouble diagnosis content) DTC detection condition
U1232
ST ANGLE SEN CALIB
(Steering angle sensor calibration)
Diagnosis condition
When ignition switch is ON
Signal (terminal)
—
Threshold
—
Diagnosis delay time
—
POSSIBLE CAUSE
Neutral position adjustment of the steering angle sensor is incomplete
Steering angle sensor
FAIL-SAFEPredictive course line is not displayed
DTC Confirmation Procedure
PERFORM DTC CONFIRMATION PROCEDURE
CONSULT
Ignition switch ON...
 U1304 Camera Image Calibration
DTC Description
DTC DETECTION LOGIC DTC No.
CONSULT screen terms
(Trouble diagnosis content) DTC detection condition
U1304
CAMERA IMAGE CALIB
(Camera image calibration)
Diagnosis condition
When ignition switch is ON
Signal (terminal)
—
Threshold
—
Diagnosis delay time
—
POSSIBLE CAUSECamera calibration is incomplete...
Other information:
Nissan Murano (Z52) 2015-2024 Service Manual: Unit Removal and Installation. Rear Final Drive Assembly
Exploded View 1. Final drive bracket 2. Stopper 3. Rear final drive assembly Removal and Installation NOTE: When removing components such as hoses, tubes/lines, etc., cap or plug openings to prevent fluid from spilling. Before replacing, servicing, or repairing rear final drive assembly due to vibration and/or noise when making low speed turns, refer to TSB to assist in proper diagnosis...
Nissan Murano (Z52) 2015-2024 Service Manual: Spindle Unit
Removal and Installation REMOVALSupport back door using a suitable tool. WARNING: Bodily injury may occur if back door is not supported properly when removing back door spindle unit. Remove luggage side upper finisher. Refer to Removal and Installation...
Categories
- Manuals Home
- Nissan Murano Owners Manual
- Nissan Murano Service Manual
- GAS STATION INFORMATION
- Jacking up vehicle and removing the damaged tire
- Checking engine oil level
- New on site
- Most important about car
Luggage hooks
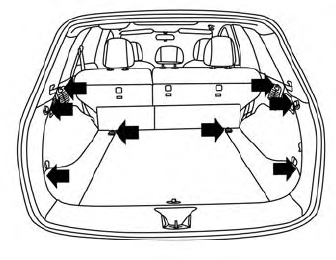
When securing items using luggage hooks located on the back of the seat or side finisher do not apply a load over more than 6.5 lbs. (29 N) to a single hook.
The luggage hooks that are located on the floor should have loads less than 110 lbs. (490 N) to a single hook.