Nissan Murano: Unit Disassembly and Assembly / Transfer Case

 |
Oil seal |  |
Transfer cover |  |
Filler plug |
 |
Gasket |  |
Drain plug |  |
Oil seal |
 |
O-ring |  |
Ring gear bearing adjusting shim (transfer cover side) |  |
Ring gear bearing (transfer cover side) |
 |
Drive shaft oil seal |  |
Ring gear shaft |  |
Ring gear bearing (transfer case side) |
 |
Ring gear bearing adjusting shim (transfer case side) |  |
Ring gear |  |
Baffle plate |
 |
Transfer case |  |
Plug |  |
O-ring |
 |
Oil seal |  |
Dowel pin |  |
Drive pinion |
 |
Drive pinion adjusting shim |  |
O-ring |  |
Pinion bearing assembly |
 |
Oil seal |  |
Dust cover |  |
Companion flange |
 |
Pinion lock nut | ||||
 |
Oil seal lip |  |
Comply with the assembly procedure when tightening. Refer to Disassembly and Assembly. | ||
 : N·m (kg-m, in-lb) : N·m (kg-m, in-lb) |
|||||
 : N·m (kg-m, ft-lb) : N·m (kg-m, ft-lb) |
|||||
 : Always replace after every disassembly. : Always replace after every disassembly. |
|||||
 : Apply gear oil. : Apply gear oil. |
|||||
| *: Apply anti-corrosive oil. |
|||||
 : Apply multi-purpose grease. : Apply multi-purpose grease. |
|||||
 : Select with proper thickness. : Select with proper thickness. |
|||||
DISASSEMBLY
Remove transfer cover. Refer to Disassembly and Assembly.
Remove ring gear shaft assembly. Refer to Disassembly and Assembly.
Remove drive pinion assembly. Refer to Disassembly and Assembly.
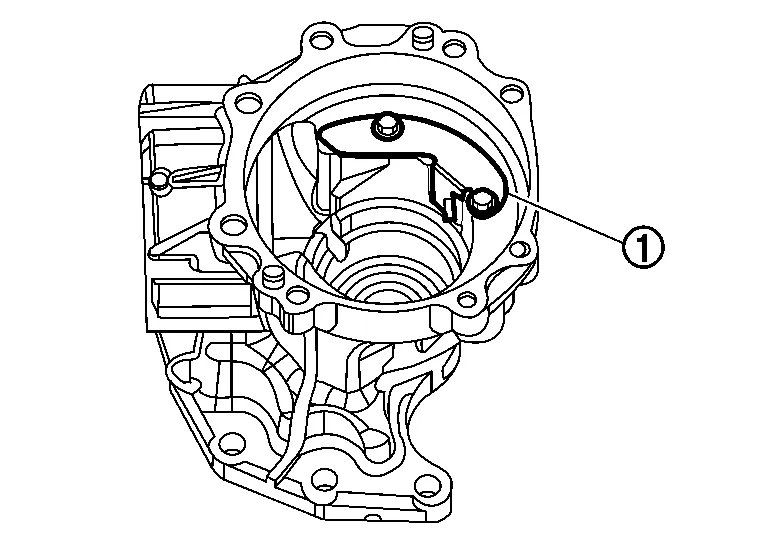
Remove O-ring from transfer case.
CAUTION:
-
Do not use a tool.
-
Do not damage transfer case.
Remove oil seals .

CAUTION:
Do not damage transfer case.
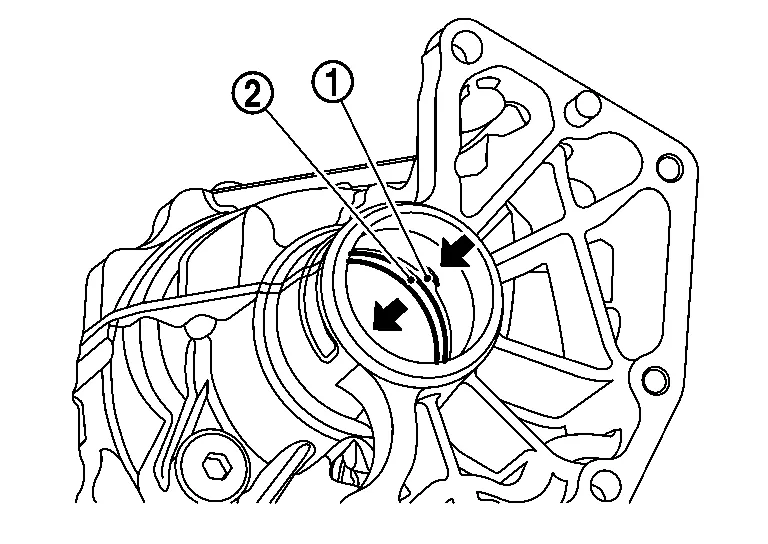
Remove baffle plate .
Remove the ring gear bearing adjusting shim (transfer case side) and ring gear bearing outer race (transfer case side) by tapping from the 2 cutouts ( ) on the transfer case.
CAUTION:
Do not damage transfer case.
Remove plug and gasket.
Perform inspection after disassembly. Refer to Inspection.
ASSEMBLY
Select the ring gear bearing adjusting shim (transfer case side). Refer to Adjustment.
Install the selected ring gear bearing adjusting shim (transfer case side) and ring gear bearing outer race (transfer case side) using drift (A) (commercial service tool).

CAUTION:
-
Do not reuse ring gear bearing.
-
Apply gear oil to the ring gear bearing.
Install baffle plate .
Install ring gear shaft assembly. Refer to Disassembly and Assembly.
CAUTION:
Protect transfer case oil seals beforehand from being damaged by the spline of ring gear shaft.
Install drive pinion assembly. Refer to Disassembly and Assembly.
Install transfer cover to check and adjust each part. Refer to =Disassembly and Assembly.
 NOTE:
NOTE:
At this timing, O-ring installing to transfer cover is not necessary. Install O-ring after backlash and tooth contact are checked.
Check backlash, tooth contact, total preload and companion flange runout. Refer to Adjustment.
CAUTION:
Measure the total preload without oil seals of transfer cover and transfer case.
Reinstall transfer cover for installing O-ring. Refer to Disassembly and Assembly.
Install oil seals with drift (commercial service tool).
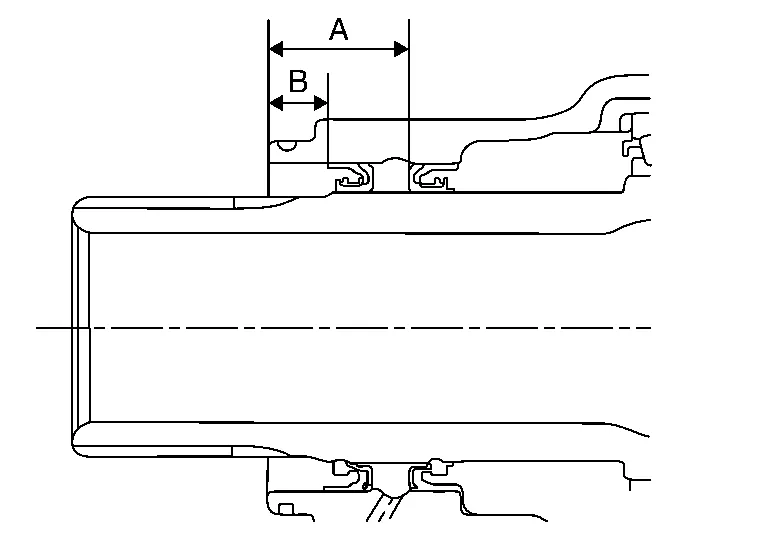
| A | : 24.8 mm (0.976 in) |
| B | : 10.3 mm (0.406 in) |
CAUTION:
-
When checking the total preload torque, measure it without the oil seal, then install the oil seal.
-
Do not reuse the oil seal.
-
When installing, Do not incline oil seal.
-
Apply multi-purpose grease onto oil seal lips, and gear oil onto the circumference of the oil seal.
-
Do not damage oil seals by spline of ring gear shaft.
After installing oil seals to transfer case, remove wrapped vinyl from the spline of ring gear shaft.
Apply multi-purpose grease lightly and evenly onto an O-ring, and install it to the transfer case.
CAUTION:
-
Do not reuse O-ring.
-
When installing O-ring, Do not use a tool.
-
Do not damage O-ring.
INSPECTION AFTER DISASSEMBLY
Check items below. If necessary, replace them with new ones.
Case
Check the bearing mounting surface for wear, cracks and damages.
Replace defective parts as necessary.
 Drive Pinion
Exploded View
Oil seal
Transfer cover
Filler plug
Gasket
Drain plug
Oil seal
O-ring
Ring gear bearing adjusting shim (transfer cover side)
Ring gear bearing (transfer cover side)
Drive shaft oil seal
Ring gear shaft
Ring gear bearing (transfer case side)
Ring gear bearing adjusting shim (transfer case side)
Ring gear
Baffle plate
Transfer case
Plug
O-ring
Oil seal
Dowel pin
Drive pinion
Drive pinion adjusting shim
O-ring
Pinion bearing assembly
Oil seal
Dust cover
Companion flange
Pinion lock nut
Oil seal lip
Comply with the assembly procedure when tightening...
 Service Data and Specifications (sds). Service Data and Specifications (sds)
General Specifications
Applied model Axle AWD
Engine VQ35DE
Transaxle CVT
Transfer model
TY21C
Gear ratio
0.404
Number of teeth
Ring gear
42
Drive pinion
17
Oil capacity
Refer to Fluids and Lubricants...
Other information:
Nissan Murano (Z52) 2015-2024 Service Manual: Glove Box Assembly and Housing
Removal and Installation REMOVALRemove glove box assembly screws (A). NOTE: Open glove box lid to access upper screws. Using a suitable tool, release clips. : Metal clip Disconnect harness connectors from glove box assembly. Remove glove box assembly...
Nissan Murano (Z52) 2015-2024 Service Manual: Mode Door Motor
Removal and Installation REMOVALRemove the center console side finisher (LH). Refer to Exploded View. Remove the instrument lower panel LH. Refer to Removal and Installation. Remove the screws (A) and the front foot duct (LH) (1). Remove the mode door motor screws...
Categories
- Manuals Home
- Nissan Murano Owners Manual
- Nissan Murano Service Manual
- How to enable/disable the LDW system
- Rear bench seat adjustment
- Fuel recommendation
- New on site
- Most important about car
Driver and passenger supplemental knee air bag
Driver’s side
The knee air bag is located in the knee bolster, on the driver’s and passenger’s side. All of the information, cautions and warnings in this manual apply and must be followed. The knee air bag is designed to inflate in higher severity frontal collisions, although it may inflate if the forces in another type of collision are similar to those of a higher severity frontal impact. It may not inflate in certain collisions.
Passenger’s side