Nissan Murano: Unit Disassembly and Assembly / Ring Gear Shaft

 |
Oil seal |  |
Transfer cover |  |
Filler plug |
 |
Gasket |  |
Drain plug |  |
Oil seal |
 |
O-ring |  |
Ring gear bearing adjusting shim (transfer cover side) |  |
Ring gear bearing (transfer cover side) |
 |
Drive shaft oil seal |  |
Ring gear shaft |  |
Ring gear bearing (transfer case side) |
 |
Ring gear bearing adjusting shim (transfer case side) |  |
Ring gear |  |
Baffle plate |
 |
Transfer case |  |
Plug |  |
O-ring |
 |
Oil seal |  |
Dowel pin |  |
Drive pinion |
 |
Drive pinion adjusting shim |  |
O-ring |  |
Pinion bearing assembly |
 |
Oil seal |  |
Dust cover |  |
Companion flange |
 |
Pinion lock nut | ||||
 |
Oil seal lip |  |
Comply with the assembly procedure when tightening. Refer to Disassembly and Assembly. | ||
 : N·m (kg-m, in-lb) : N·m (kg-m, in-lb) |
|||||
 : N·m (kg-m, ft-lb) : N·m (kg-m, ft-lb) |
|||||
 : Always replace after every disassembly. : Always replace after every disassembly. |
|||||
 : Apply gear oil. : Apply gear oil. |
|||||
| *: Apply anti-corrosive oil. |
|||||
 : Apply multi-purpose grease. : Apply multi-purpose grease. |
|||||
 : Select with proper thickness. : Select with proper thickness. |
|||||
DISASSEMBLY
Remove transfer cover assembly. Refer to Disassembly and Assembly.
Remove ring gear bearing outer race (transfer cover side) and ring gear bearing adjusting shim (transfer cover side) from the transfer cover. Refer to Disassembly and Assembly.
Remove ring gear shaft assembly from the transfer case.
Remove ring gear bearing outer race (transfer case side) and ring gear bearing adjusting shim (transfer case side) from the transfer case. Refer to Disassembly and Assembly.
Remove ring gear bearing inner race (transfer cover side) from ring gear shaft with drift (A) (commercial service tool) and bearing separator (commercial service tool).

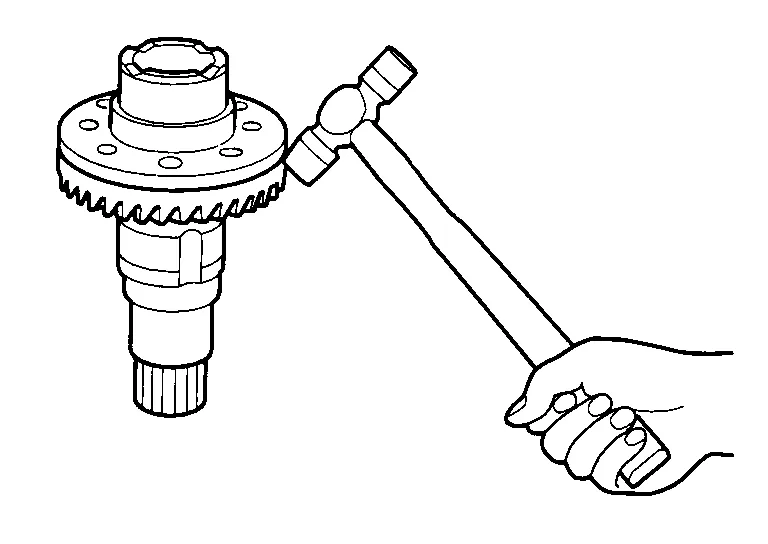
Remove ring gear bearing inner race (transfer case side) from ring gear shaft with Tool (A) and puller (commercial service tool).

| Tool number | : ST33061000 (J-8107–2) |
Remove the ring gear mounting bolts.
Lightly tap ring gear with a plastic hammer to remove ring gear from the ring gear shaft.
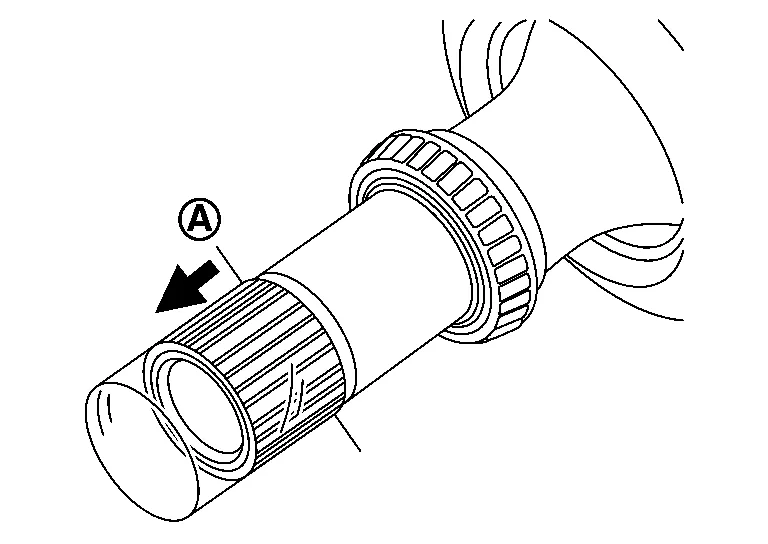
Remove drive shaft oil seal from the ring gear shaft using Tool (A).

| Tool number | : KV381054S0 (J-34286) |
Perform inspection after disassembly. Refer to Inspection.
ASSEMBLY
Using drift (A) (commercial service tool), install drive shaft oil seal within the dimension (L) shown as follows.
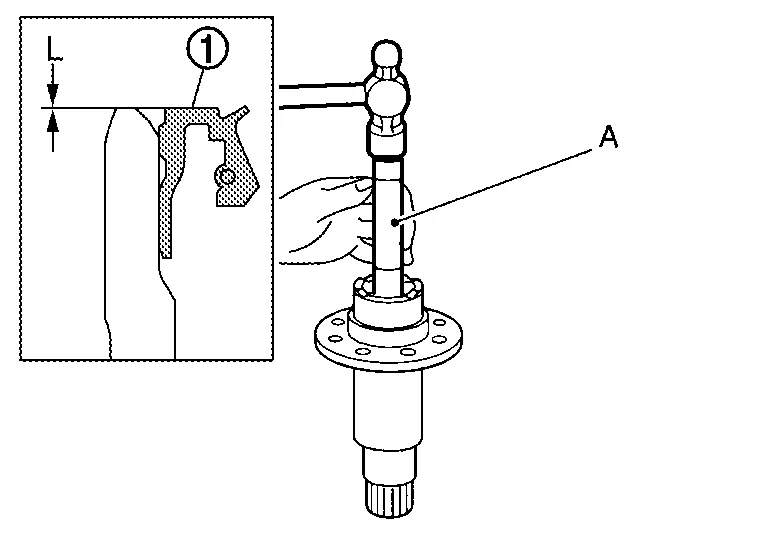
| L | : 2.0 +0.6/−0 mm (0.079 +0.024/−0 in) |
CAUTION:
-
Do not reuse the oil seal.
-
When installing, Do not incline oil seal.
-
Apply multi-purpose grease onto oil seal lips, and gear oil onto the circumference of the oil seal.
Select ring gear bearing adjusting shim (transfer case side) and ring gear bearing adjusting shim (transfer cover side). Refer to Adjustment.
Assemble the selected ring gear bearing adjusting shim (transfer case side) and ring gear bearing outer race (transfer case side) to transfer case. Refer to Disassembly and Assembly.
CAUTION:
-
Do not reuse ring gear bearing.
-
Apply gear oil to the ring gear bearing.
Assemble the selected ring gear bearing adjusting shim (transfer cover side) and ring gear bearing outer race (transfer cover side) to transfer cover. Refer to Disassembly and Assembly.
CAUTION:
-
Do not reuse ring gear bearing.
-
Apply gear oil to the ring gear bearing.
Install the ring gear to ring gear shaft, and tighten mounting bolts to the specified torque.
Install ring gear bearing inner race (transfer cover side) with drift (A) (commercial service tool).
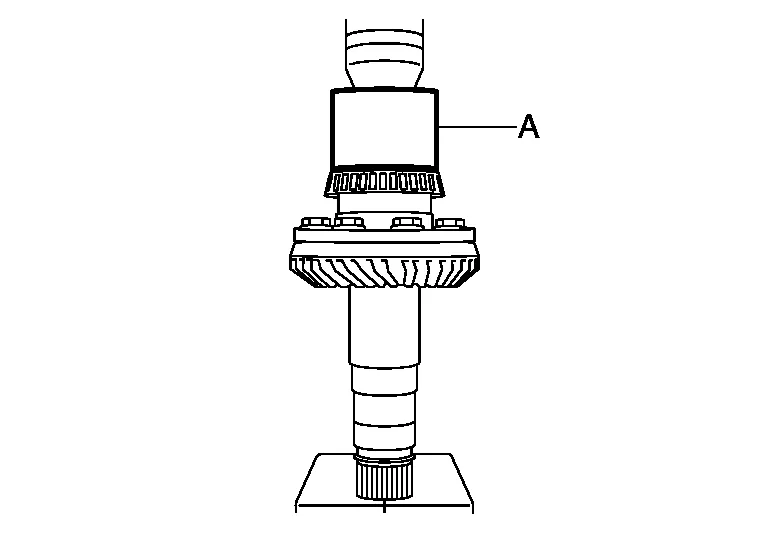
CAUTION:
-
Do not reuse ring gear bearing.
-
Apply gear oil to the ring gear bearing.
Install the ring gear bearing inner race (transfer case side) to ring gear shaft with drift (A) (commercial service tool).
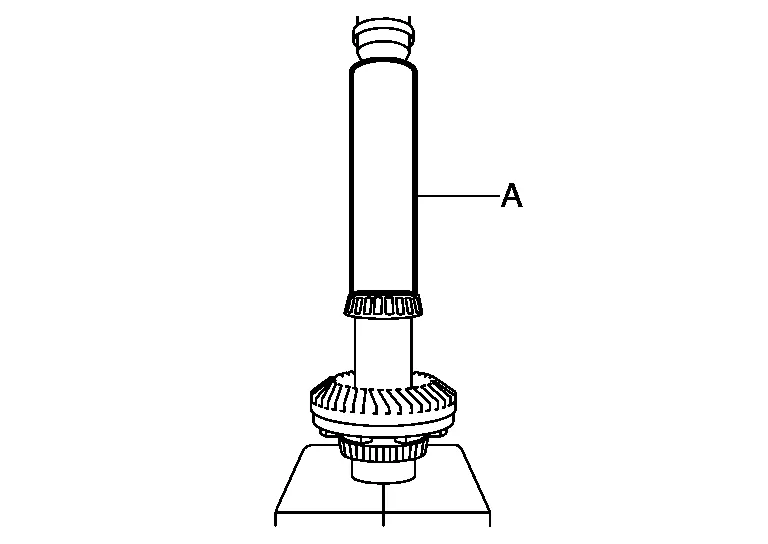
CAUTION:
-
Do not reuse ring gear bearing.
-
Apply gear oil to the ring gear bearing.
Install the ring gear shaft assembly to the transfer case.
CAUTION:
Protect transfer case oil seals beforehand from being damaged by the spline of ring gear shaft below method following.
Apply multi-purpose grease to spline part indicated in the figure.
: limit line)
CAUTION:
Do not wrap sliding surfaces on oil seal.
Install transfer cover to check and adjust each part. Refer to Disassembly and Assembly.
 NOTE:
NOTE:
At this timing, O-ring installing to transfer cover is not necessary. Install O-ring after backlash and tooth contact are checked.
Check backlash, tooth contact, total preload and companion flange runout. Refer to Adjustment.
CAUTION:
Measure the total preload without oil seals of transfer cover and transfer case.
Reinstall transfer cover for installing O-ring. Refer to Disassembly and Assembly.
After installing transfer case oil seals, remove wrapped vinyl from the spline of ring gear shaft.
INSPECTION AFTER DISASSEMBLY
Check items below. If necessary, replace them with new ones.
Gear and Shaft
Check gear face and shaft for wear, cracks, damage, and seizure.
CAUTION:
If malfunction is detected on the ring gear or drive pinion, replace the ring gear and drive pinion as a set.
Bearing
Check for seizure, peeling, wear, corrosion, sticking, unusual noise, roughness in hand turning, and other damage.
CAUTION:
When replacing the bearing, always replace the inner race and outer race as a pair.
Shim
Check for seizure, damage, and unusual wear.
Replace defective parts as necessary.
 Transfer Cover
Exploded View
Oil seal
Transfer cover
Filler plug
Gasket
Drain plug
Oil seal
O-ring
Ring gear bearing adjusting shim (transfer cover side)
Ring gear bearing (transfer cover side)
Drive shaft oil seal
Ring gear shaft
Ring gear bearing (transfer case side)
Ring gear bearing adjusting shim (transfer case side)
Ring gear
Baffle plate
Transfer case
Plug
O-ring
Oil seal
Dowel pin
Drive pinion
Drive pinion adjusting shim
O-ring
Pinion bearing assembly
Oil seal
Dust cover
Companion flange
Pinion lock nut
Oil seal lip
Comply with the assembly procedure when tightening...
 Drive Pinion
Exploded View
Oil seal
Transfer cover
Filler plug
Gasket
Drain plug
Oil seal
O-ring
Ring gear bearing adjusting shim (transfer cover side)
Ring gear bearing (transfer cover side)
Drive shaft oil seal
Ring gear shaft
Ring gear bearing (transfer case side)
Ring gear bearing adjusting shim (transfer case side)
Ring gear
Baffle plate
Transfer case
Plug
O-ring
Oil seal
Dowel pin
Drive pinion
Drive pinion adjusting shim
O-ring
Pinion bearing assembly
Oil seal
Dust cover
Companion flange
Pinion lock nut
Oil seal lip
Comply with the assembly procedure when tightening...
Other information:
Nissan Murano (Z52) 2015-2024 Service Manual: Steering System :: Service Data and Specifications (sds). Service Data and Specifications (sds)
Steering Wheel Steering wheel axial end play 0 mm (0 in) Steering wheel play 0 - 35 mm (0 - 1.38 in) Steering wheel turning force 39 N (4 kg-f, 9 lb-f) or less Steering Angle Unit: Degree minute (Decimal degree) Inner wheel angle (A) Minimum 34° 30′ (34...
Nissan Murano (Z52) 2015-2024 Owners Manual: Conventional (fixed speed) cruise control mode
This mode allows driving at a speed between 25 to 90 mph (40 to 144 km/h) without keeping your foot on the accelerator pedal. WARNING In the conventional (fixed speed) cruise control mode, a warning chime does not sound to warn you if you are too close to the vehicle ahead, as neither the presence of the vehicle ahead nor the vehicle-to-vehicle distance is detected...
Categories
- Manuals Home
- Nissan Murano Owners Manual
- Nissan Murano Service Manual
- Tire rotation
- All-Wheel Drive (AWD) (if so equipped)
- How to enable/disable the LDW system
- New on site
- Most important about car
Fuel gauge
The gauge indicates the approximate fuel level in the tank.
The gauge may move slightly during braking, turning, acceleration, or going up or down hills.
The gauge needle returns to 0 (Empty) after the ignition switch is placed in the OFF position.