Nissan Murano: Removal and Installation / Microphone
REMOVAL
Remove front room\map lamp assembly. Refer to Removal and Installation.
Disconnect the harness connector (A) from front room\map lamp assembly (2).
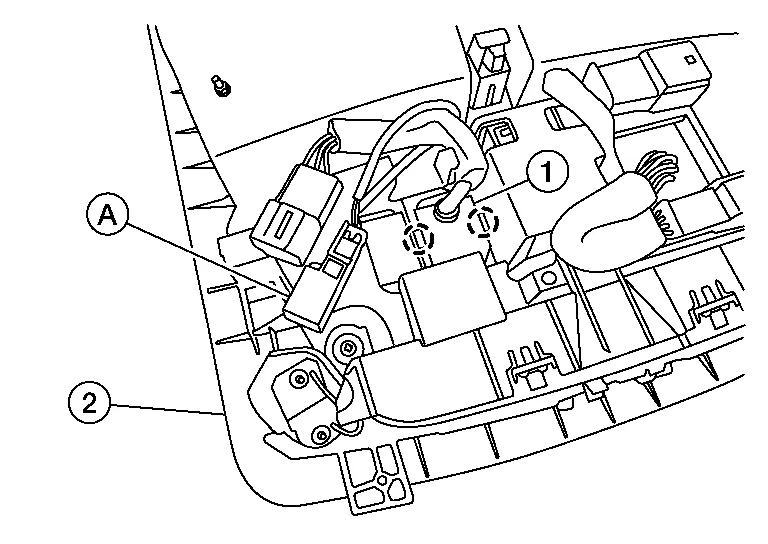
Release pawls and remove microphone (1).
 : Pawl
INSTALLATION
Installation is in the reverse order of removal.
 Gps Antenna
Removal and Installation
REMOVALRemove instrument panel assembly. Refer to Removal and Installation.
Remove screw to remove GPS antenna from instrument panel...

Other information:
Nissan Murano (Z52) 2015-2024 Service Manual: C1201 Controller Failure
DTC Description DTC DETECTION LOGICMalfunction has occurred inside AWD control unit. DTC No. CONSULT screen terms (Trouble diagnosis content) DTC detecting condition C1201 CONTROLLER FAILURE (Control unit failure) Diagnosis condition Ignition switch: ON Signal — Threshold — Diagnosis delay time — POSSIBLE CAUSEInternal malfunction of AWD control unitFAIL-SAFEFront-wheel drive or shifts to 4-wheel drive (rear-wheels still have some driving torque)...
Nissan Murano (Z52) 2015-2024 Owners Manual: Entry/exit function
This system is designed so that the driver’s seat and steering column will automatically move when the shift lever is in the P (Park) position. This allows the driver to easily get in and out of the driver’s seat. The driver’s seat will slide backward and the steering wheel will move up: When the driver’s door is opened and the ignition switch is in the OFF position...
Categories
- Manuals Home
- Nissan Murano Owners Manual
- Nissan Murano Service Manual
- Turning the AEB system on/off
- Jacking up vehicle and removing the damaged tire
- Vehicle Dynamic Control (VDC) OFF switch
- New on site
- Most important about car
LATCH (Lower Anchors and Tethers for CHildren) system

LATCH system lower anchor locations - bench seat
Your vehicle is equipped with special anchor points that are used with LATCH system compatible child restraints. This system may also be referred to as the ISOFIX or ISOFIX compatible system. With this system, you do not have to use a vehicle seat belt to secure the child restraint unless the combined weight of the child and child restraint exceeds 65 lbs. (29.5 kg). If the combined weight of the child and child restraint is greater than 65 lbs. (29.5 kg), use the vehicle’s seat belt (not the lower anchors) to install the child restraint. Be sure to follow the child restraint manufacturer’s instructions for installation.