Nissan Murano: Removal and Installation / Instrument Panel Tweeter
REMOVAL
Remove instrument panel tweeter grille (LH\RH). Refer to Exploded View.
Disconnect the harness connector from instrument panel tweeter and remove screws (A) to remove instrument panel tweeter (1).
(2): Instrument panel assembly
![]() : Front
: Front
INSTALLATION
Installation is in the reverse order of removal.
 Front Auxiliary Input Jacks
Removal and Installation
REMOVALRemove shift selector finisher. Refer to Exploded View.
Release pawls and remove front auxiliary input jacks (1).
: PawlINSTALLATIONInstallation is in the reverse order of removal...
 Front Tweeter
Removal and Installation
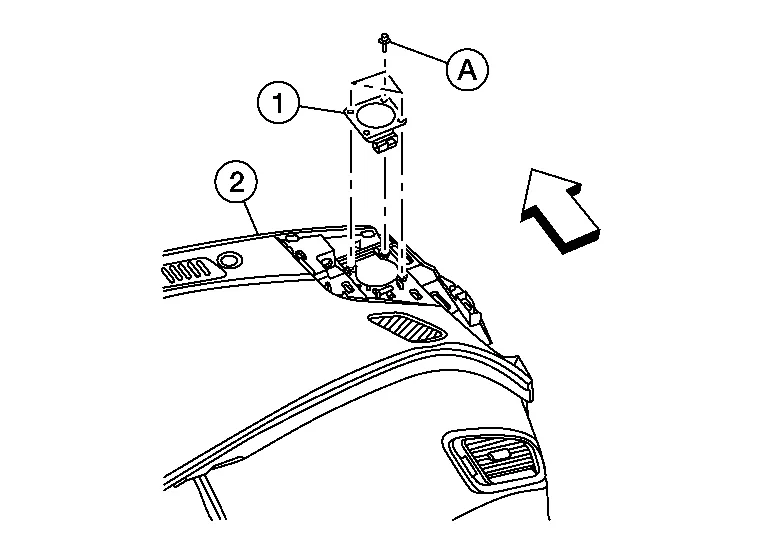
REMOVALRemove front pillar finisher. Refer to Removal and Installation.
Remove screws (A) and remove front tweeter (1) from front pillar finisher (2)...
Other information:
Nissan Murano (Z52) 2015-2024 Owners Manual: Vehicle set-up
Park the vehicle on a level surface and apply the parking brake. Run the engine until it reaches operating temperature. Turn the engine off and wait for 15 minutes. Raise and support the vehicle using a suitable floor jack and safety jack stands...
Nissan Murano (Z52) 2015-2024 Service Manual: C1a12 Laser Beam Off Center
DTC Description DTC DETECTION LOGIC DTC No. CONSULT screen terms DTC detection condition C1A12–78 LASER BEAM OFFCNTR Diagnosis condition When Ignition switch is ON. Signal (terminal) — Threshold Radar of distance sensor (ICC sensor) is off the aiming point...
Categories
- Manuals Home
- Nissan Murano Owners Manual
- Nissan Murano Service Manual
- Jacking up vehicle and removing the damaged tire
- Warning lights
- Tire rotation
- New on site
- Most important about car
LATCH (Lower Anchors and Tethers for CHildren) system

LATCH system lower anchor locations - bench seat
Your vehicle is equipped with special anchor points that are used with LATCH system compatible child restraints. This system may also be referred to as the ISOFIX or ISOFIX compatible system. With this system, you do not have to use a vehicle seat belt to secure the child restraint unless the combined weight of the child and child restraint exceeds 65 lbs. (29.5 kg). If the combined weight of the child and child restraint is greater than 65 lbs. (29.5 kg), use the vehicle’s seat belt (not the lower anchors) to install the child restraint. Be sure to follow the child restraint manufacturer’s instructions for installation.