Nissan Murano: Hood / Hood Assembly
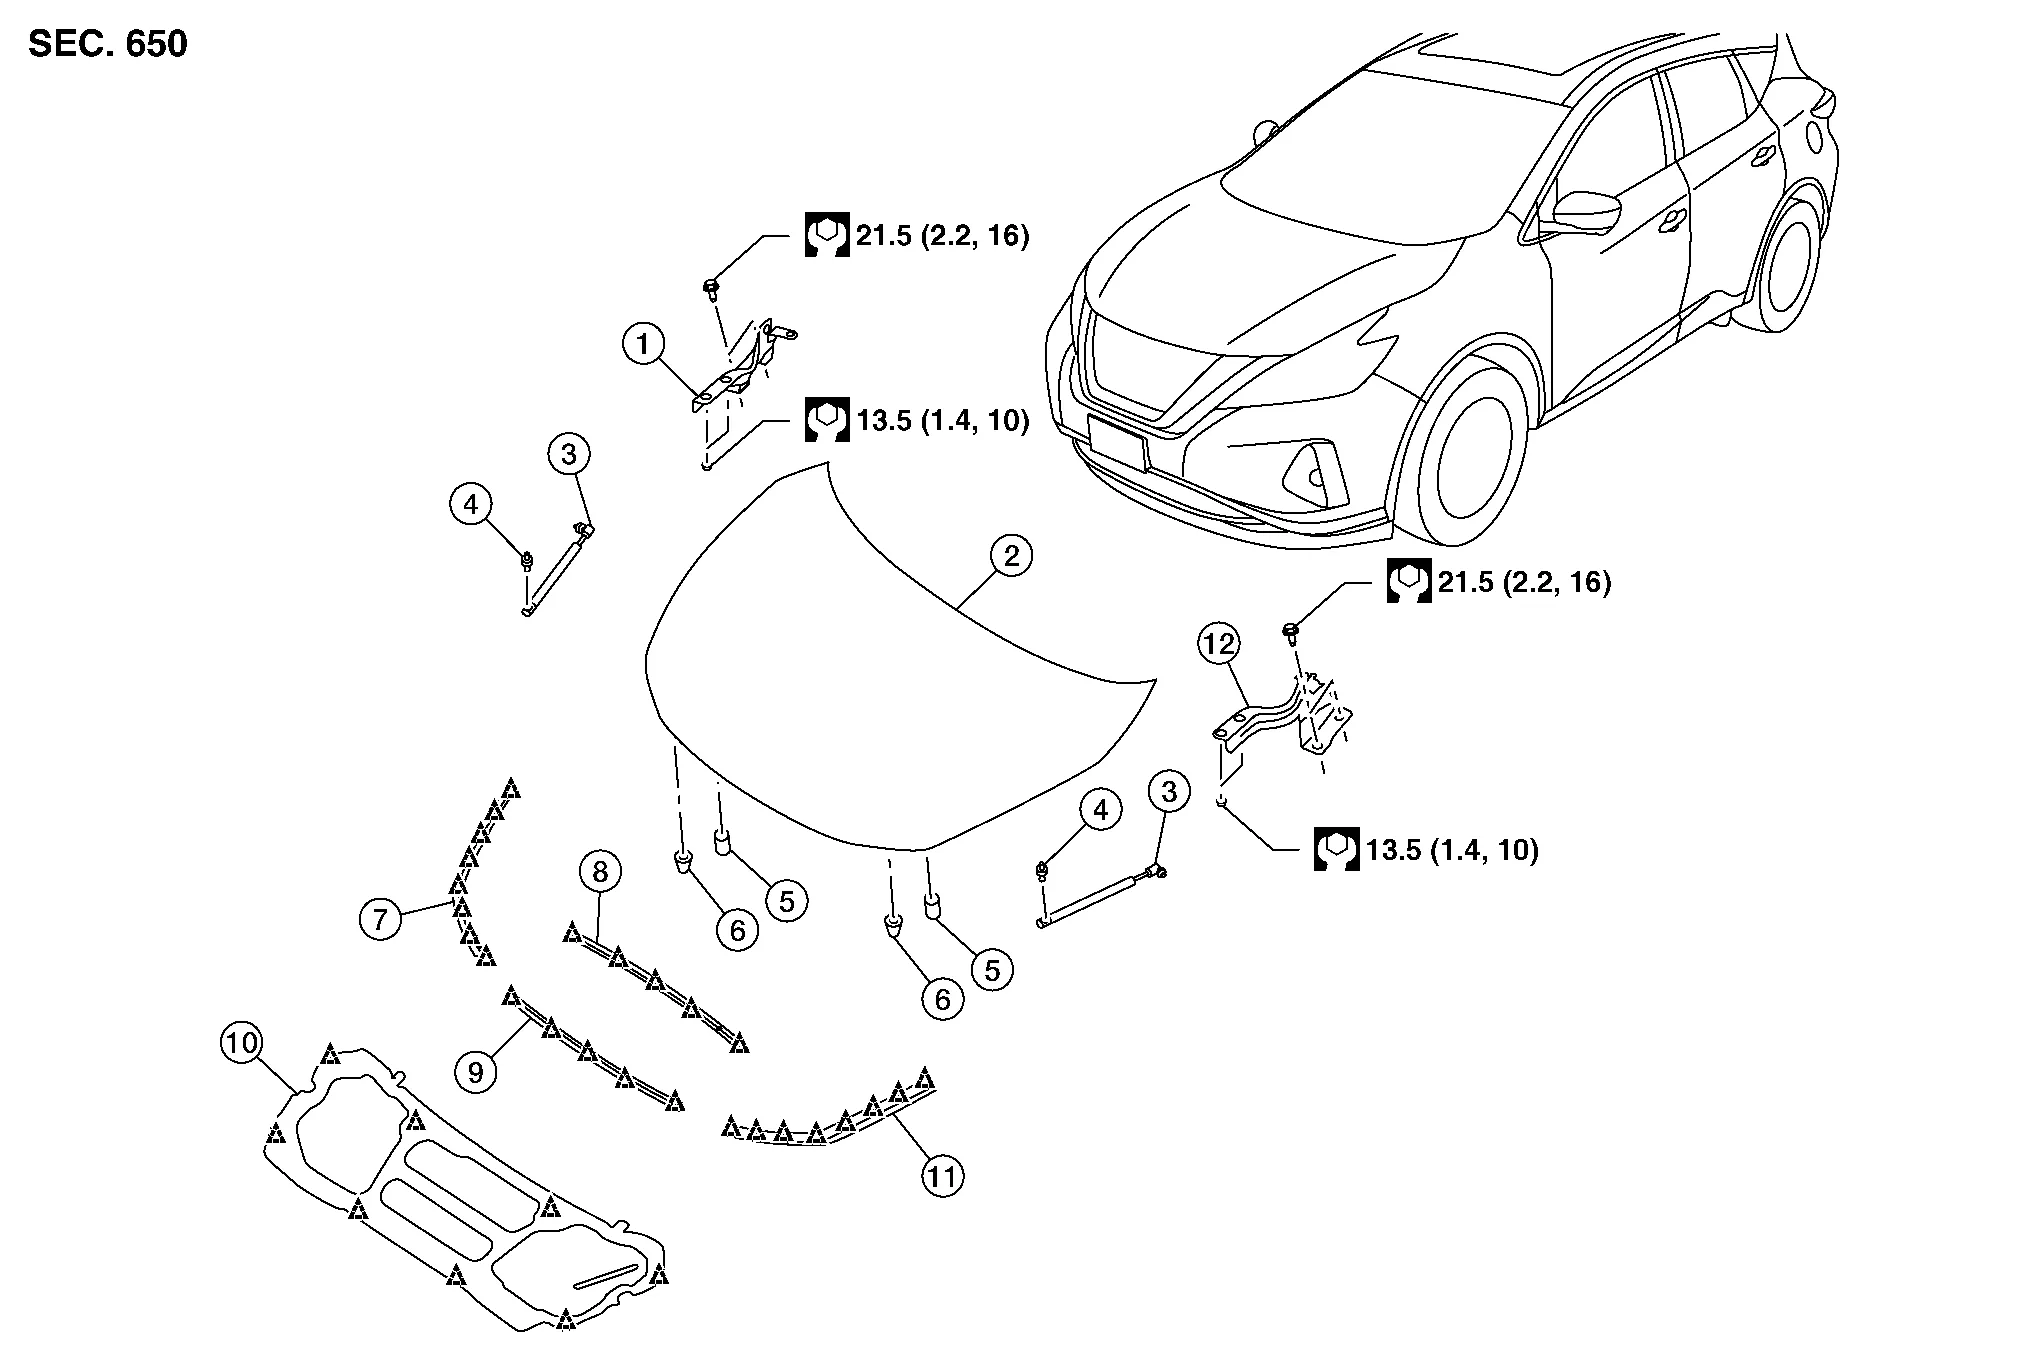
| 1. | Hood hinge (RH) | 2. | Hood | 3. | Hood stay (RH/LH) |
| 4. | Hood stay stud ball (LH/RH) | 5. | Bumper rubber (LH/RH) | 6. | Grommet |
| 7. | Hood side seal (RH) | 8. | Hood rear seal | 9. | Hood front seal |
| 10. | Hood insulator | 11. | Hood side seal (LH) | 12. | Hood hinge (LH) |
 |
Clip |
CAUTION:
-
Use two people when removing or installing hood assembly due to its heavy weight.
-
Use protective tape or shop cloths to protect surrounding components from damage during removal and installation of hood assembly.
REMOVAL
Support hood assembly using a suitable tool.
WARNING:
Bodily injury may occur if hood assembly is not supported properly when removing hood assembly.
Release clips using a suitable tool and remove hood insulator. Refer to Exploded View.
Disconnect front washer tube. Refer to Exploded View.
Release clip (LH/RH) using a suitable tool and remove hood stay from hood side.
Remove hood hinge to hood nuts (A) (LH/RH) and hood assembly.
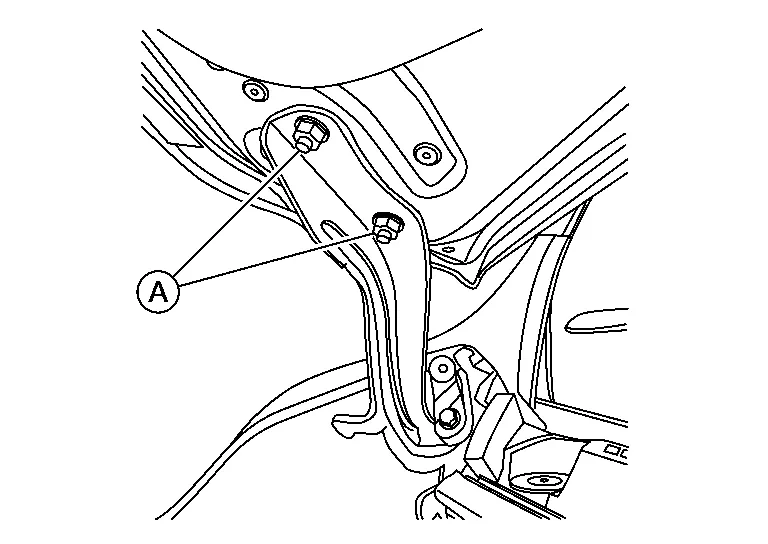
 NOTE:
NOTE:
RH side shown; LH similar.
INSTALLATION
Installation is in the reverse order of removal.
CAUTION:
-
Before installing hood hinge, apply anticorrosive agent onto surface of Nissan Murano vehicle.
-
After installation, perform hood assembly adjustment procedure. Refer to Adjustment.
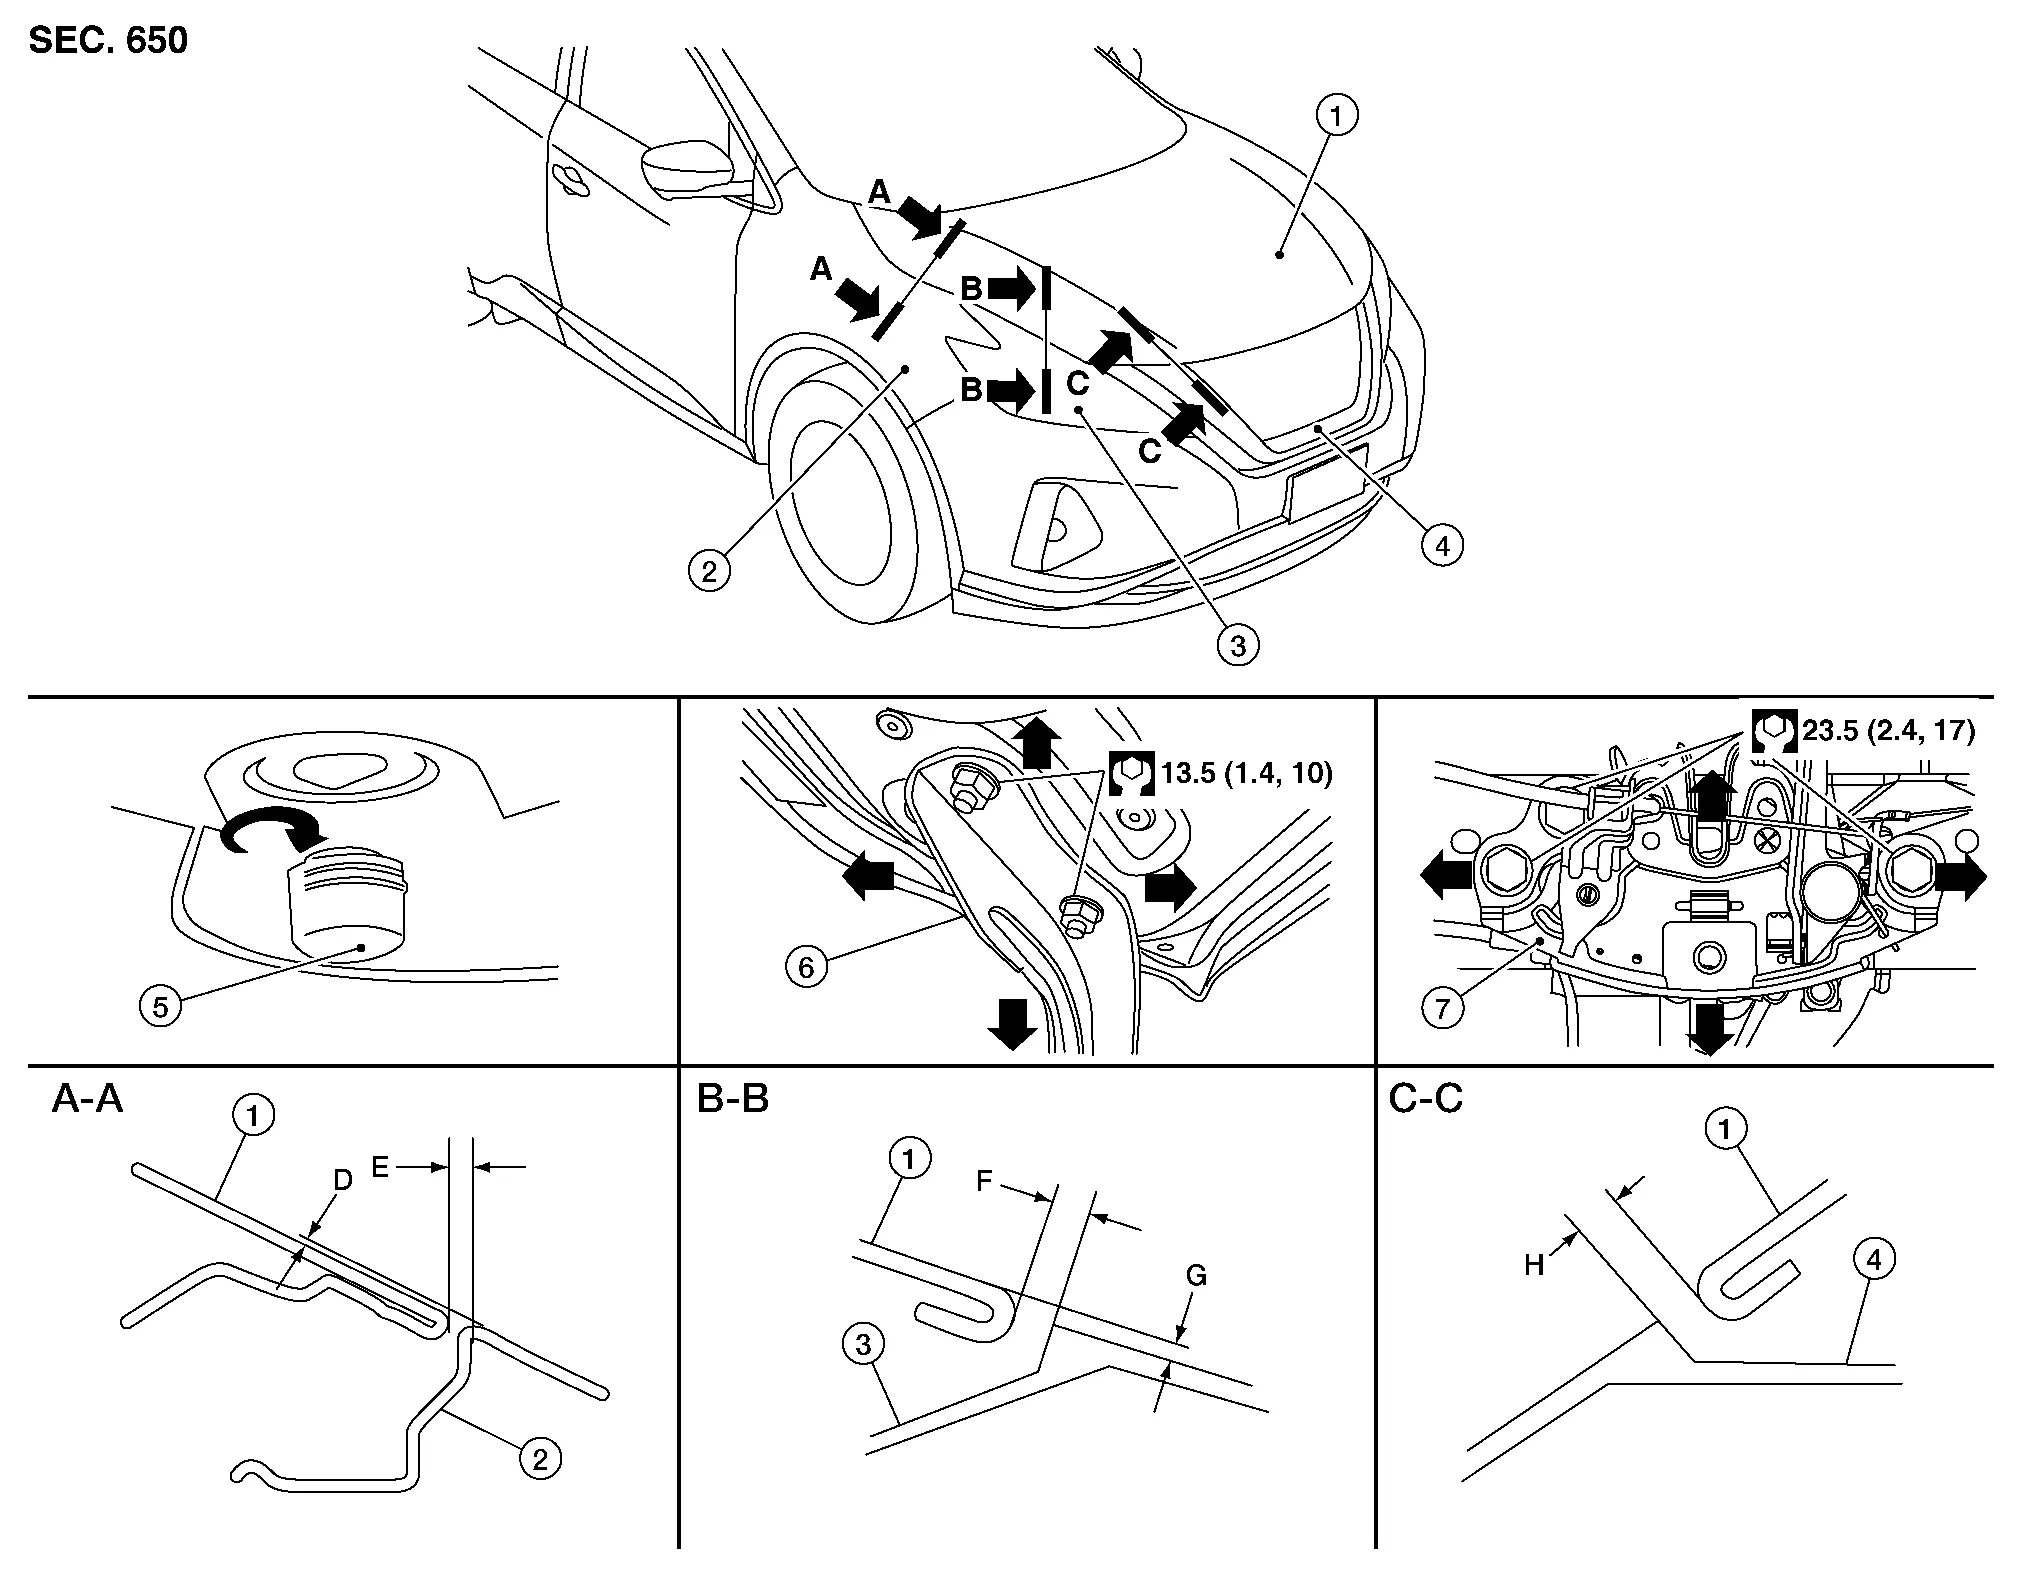
| 1. | Hood assembly | 2. | Front fender | 3. | Front combination lamp |
| 4. | Front grille | 5. | Bumper rubber | 6. | Hood hinge |
| 7. | Hood lock |
Check clearance and surface height between hood and each part by visual inspection and tactile feel.
If clearance and surface height are out of specification, adjust them according to adjustment procedures.
Unit: mm (in)
| Portion | Section | Item | Measurement | Standard | Parallelism |
|---|---|---|---|---|---|
| Hood - Fender | A - A | D | Surface height | 0.0 ± 1.0 (0.0 ± 0.04) | 1.5 (0.06) |
| E | Clearance | 3.5 ± 1.0 (0.14 ± 0.04) | 1.5 (0.06) | ||
| Fender - Front combination lamp | B - B | F | Clearance | 4.5 ± 2.0 (0.18 ± 0.08) | 1.99 (0.08) |
| G | Surface Height | Blend ± 2.0 (Blend ± 0.08) | 1.99 (0.08) | ||
| Hood - Front combination lamp | C - C | H | Clearance | 5.5 ± 2.0 (0.22 ± 0.08) | 1.99 (0.08) |
HEIGHT ADJUSTMENT
Loosen hood lock assembly bolts.
Adjust surface height of hood assembly to front grille and front fender according to specified values by rotating hood bumper rubber.
Temporarily tighten hood lock assembly bolts.
Adjust (A) and (B) as shown to the following values with hood's own weight by dropping it from approximately 200 mm (7.87 in) height or by pressing hood lightly [approximately 29 N (3.0 kg, 6.5 lb)].
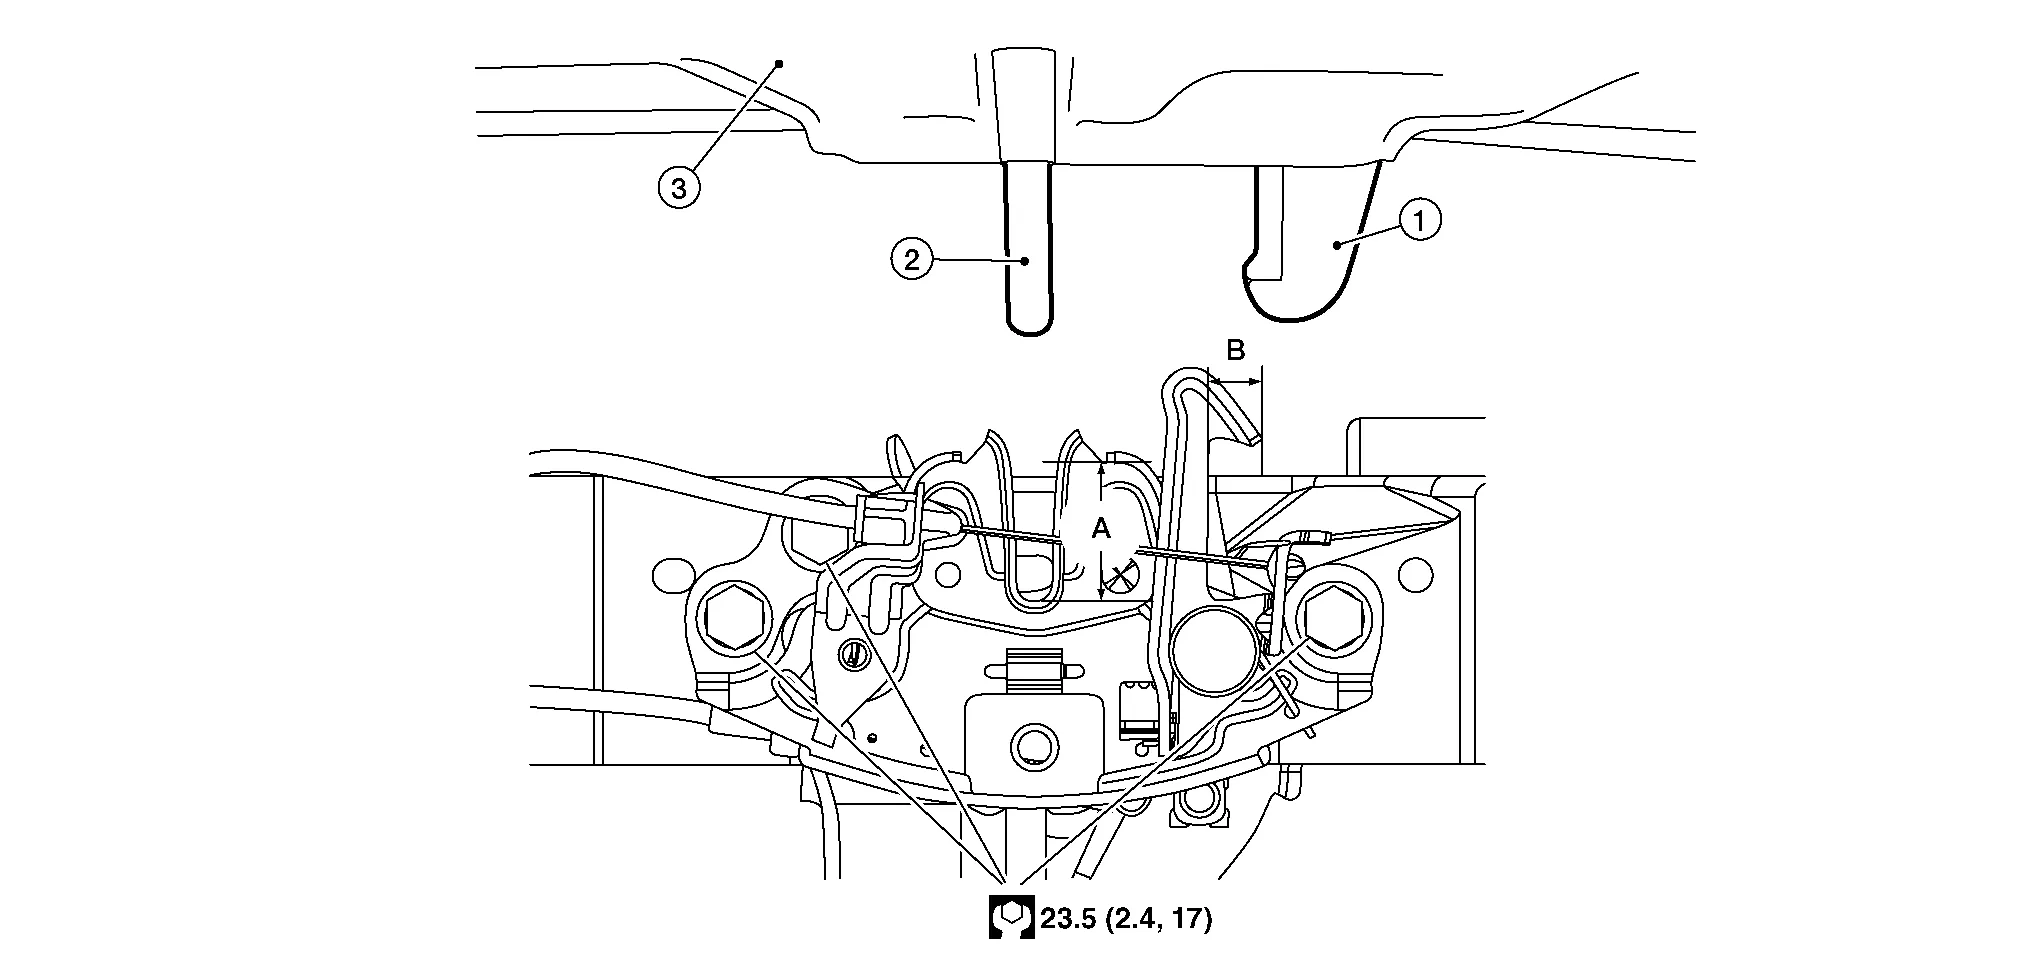
| 1. | Secondary striker | 2. | Primary striker | 3. | Hood assembly |
| A. | 20 mm (0.79 in) | B. | 6.8 mm (0.27 in) |
After adjustment, tighten hood hinge nuts and bolts to specified torque.
CAUTION:
-
Check hood hinge rotating part for poor lubrication. If necessary, apply a suitable multi-purpose grease.
-
After adjusting, apply touch-up paint (body color) to heads of hood hinge bolts and nuts.
CLEARANCE ADJUSTMENT
Loosen hood hinge nuts and bolts.
Loosen hood lock assembly bolts.
Adjust hood assembly so clearance measurements are within specifications.
Tighten hood hinge nuts and bolts to specified torque.
Tighten hood lock assembly bolts to specified torque.
 Hood
Hood
..
 Hood Hinge
Removal and Installation
REMOVALRemove hood assembly. Refer to Removal and Installation.
Remove front fender. Refer to Removal and Installation.
Remove hood hinge bolts, and then remove hood hinge...
Other information:
Nissan Murano (Z52) 2015-2024 Service Manual: Interior Lighting System :: Basic Inspection. Diagnosis and Repair Workflow
Work Flow OVERALL SEQUENCEDETAILED FLOWINTERVIEW FOR MALFUNCTION Find out what the customer's concerns are. >> GO TO 2. SYMPTOM CHECK Verify the symptom from the customer's information. >> GO TO 3. BASIC INSPECTION Check the operation of each part...
Nissan Murano (Z52) 2015-2024 Service Manual: Moonroof Motor Assembly
Description BCM supplies the moonroof motor assembly with power. CPU is integrated in moonroof motor assembly. Tilts up/down & slides open/close by moonroof switch operation. In order to close the moonroof during high speed driving, the Combination meter will send a speed signal to the moonroof CPU to adjust the torque of the motor during the tilt-down operation...
Categories
- Manuals Home
- Nissan Murano Owners Manual
- Nissan Murano Service Manual
- System malfunction
- Memory storage function (key-link)
- GAS STATION INFORMATION
- New on site
- Most important about car
Vehicle security system
Your vehicle has two types of security systems:
Vehicle security system NISSAN Vehicle Immobilizer SystemThe vehicle security system provides visual and audible alarm signals if someone opens the doors, liftgate or the hood when the system is armed. It is not, however, a motion detection type system that activates when a vehicle is moved or when a vibration occurs.