
Nissan Murano: Power Window Control System :: Symptom Diagnosis / Anti-Pinch Function Does Not Operate
Nissan Murano (Z52) 2015-2024 Service Manual / Body Exterior, Doors, Roof & Vehicle Security / Power Window Control System :: Symptom Diagnosis / Anti-Pinch Function Does Not Operate
CHECK POWER WINDOW AUTO OPERATION
Check AUTO operation of the door when anti-pinch function does not operate.
Is the inspection result normal?
YES>>GO TO 2.
NO>>Refer to Diagnosis Procedure (front LH), Diagnosis Procedure (front RH).
CONFIRM THE OPERATION
Confirm the operation again.
Is the inspection result normal?
YES>>Check intermittent incident. Refer to Intermittent Incident.
NO>>GO TO 1.
 Rear Lh
Diagnosis Procedure
PERFORM INITIALIZATION PROCEDURE
Initialization procedure is performed and operation is confirmed.
Refer to Work Procedure .
Is the inspection result normal?
YES>>
Inspection End...
 Keyless Power Window Down Does Not Operate
Diagnosis Procedure
CHECK REMOTE KEYLESS ENTRY FUNCTION
Check remote keyless entry function.
Is the inspection result normal?
YES>>
GO TO 2.
NO>>
Refer to Diagnosis Procedure...
Other information:
Nissan Murano (Z52) 2015-2024 Service Manual: I-Da
System Description SYSTEM DIAGRAMADAS CONTROL UNIT INPUT/OUTPUT SIGNAL ITEMInput Signal Item Transmit unit Signal name Description ABS actuator and electric unit (control unit) CAN communication Nissan Murano Vehicle speed signal Receives the wheel speed of the four wheels Combination meter CAN communication System selection signal Receives a selection state of each item in “Driver Assistance” selected with the combination meter Steering angle sensor CAN communication Steering angle sensor signal Receives the amount of rotation, rotational angle, and rotational direction of the steering wheel Output Signal Item Reception unit Signal name Description Combination meter CAN communication Meter display signal I-DA status signal Transmits a signal and displays the status on the Nissan Murano vehicle information display Sonar control unit ITS communication Buzzer output signal Transmits a buzzer drive signal to activates the warning system buzzer FUNCTION DESCRIPTION The Intelligent Drive Alertness (I-DA) is controlled by the ADAS control unit control unit...
Nissan Murano (Z52) 2015-2024 Service Manual: Door Sash Molding
Exploded View 1. Front door sash molding 2. Rear door rear sash molding 3. Front door panel 4. Rear door panel Removal and Installation FRONT DOORRemovalRemove door mirror. Refer to Removal and Installation. Remove front door sash molding clip (A) using a suitable tool (B)...
Categories
- Manuals Home
- Nissan Murano Owners Manual
- Nissan Murano Service Manual
- Vehicle Dynamic Control (VDC) OFF switch
- All-Wheel Drive (AWD) (if so equipped)
- GAS STATION INFORMATION
- New on site
- Most important about car
Luggage hooks
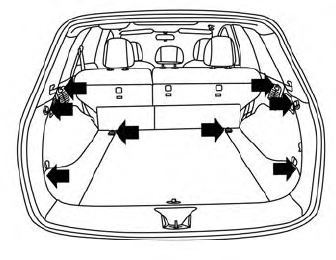
When securing items using luggage hooks located on the back of the seat or side finisher do not apply a load over more than 6.5 lbs. (29 N) to a single hook.
The luggage hooks that are located on the floor should have loads less than 110 lbs. (490 N) to a single hook.

Copyright © 2026 www.nimurano.com