Nissan Murano: Transaxle & Transmission :: Cvt: Re0f10j / Unit Disassembly and Assembly
Nissan Murano (Z52) 2015-2024 Service Manual / Transmission & Driveline / Transaxle & Transmission :: Cvt: Re0f10j / Unit Disassembly and Assembly
 All Wheel Drive
Removal and Installation - AWD
RemovalWARNING:
Do not remove the radiator cap when the engine is hot. Serious burns could occur from high pressure engine coolant escaping from the radiator...
 Transaxle Assembly
Exploded View
Transaxle assembly
Terminal cord assembly
Control valve
Bracket
O-ring
Oil strainer assembly
Oil pan gasket
Oil pan
Drain plug
Drain plug gasket
Magnet
Spring washer
Manual plate
Lip seal
Snap ring
Overflow plug
O-ring
: Always replace after every disassembly
: N·m (kg-m, ft-lb)
: N·m (kg-m, in-lb)
: Apply CVT fluid
: Apply petroleum jelly
Reduction gear assembly
Differential assembly
Clip
Lubrication tube
Baffle plate
Converter housing
Baffle plate
Snap ring
Drive sprocket
Driven sprocket
Oil pump chain
O-ring
Baffle plate (Chain cover)
Thrust bearing
Thrust bearing race
Dummy cover
Thrust washer
Chain guide
Bracket
Oil pump
O-ring
Transaxle case
: Always replace after every disassembly...
Other information:
Nissan Murano (Z52) 2015-2024 Service Manual: B2632 Dr Air Mix Door Mot
DTC Description DTC DETECTION LOGIC DTC No. CONSULT screen terms (Trouble diagnosis content) DTC detection condition B2632 DR AIR MIX DOOR MOT (SHORT) (Driver side air mix door motor) Diagnosis condition When ignition switch is ON. Signal (terminal) - Threshold PBR position 95% or more Diagnosis delay time - POSSIBLE CAUSE Air mix door motor LH Air mix door motor LH installation condition A/C auto amp...
Nissan Murano (Z52) 2015-2024 Service Manual: Fuel Injector and Fuel Tube
Exploded View 1. Fuel feed hose 2. Quick connector cap 3. Fuel tube 4. O-ring 5. Fuel damper 6. Fuel damper cap 7. Clip 8. O-ring (black) 9. Fuel injector 10. O-ring (green) A. Refer to Removal and Installation...
Categories
- Manuals Home
- Nissan Murano Owners Manual
- Nissan Murano Service Manual
- Power Steering Fluid (PSF)
- GAS STATION INFORMATION
- Shift lock release
- New on site
- Most important about car
Autolight system
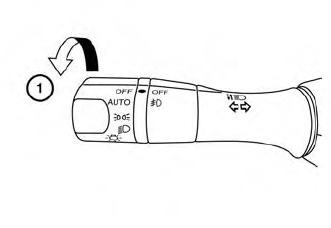
The autolight system allows the headlights to turn on and off automatically. The autolight system can:
Turn on the headlights, front parking, tail, license plate and instrument panel lights automatically when it is dark. Turn off all the lights (except daylight running lights) when it is light. Keep all the lights on for a period of time after you place the ignition switch in the OFF position and all doors are closed.
Copyright © 2026 www.nimurano.com