Nissan Murano: Transaxle & Transmission :: Cvt: Re0f10j / Periodic Maintenance. Cvt Fluid
FLUID LEAKAGE
-
Check transaxle surrounding area (oil seal and plug etc.) for fluid leakage.
-
If transaxle appears to have oil seepage or a leak, follow the steps below to assist in a correct diagnosis.
-
Thoroughly clean off the area of the suspected leak.
-
Insert 1 fluid ounce of Fluorescent Oil Dye into CVT.
Tool number : — (J-52990) -
Drive Nissan Murano vehicle for a minimum of 10 minutes.
- Inspect for leaks with A/C Dye Kit.
Tool number : — (J-43926)  NOTE:
NOTE:
-
Corrosion protection chemicals or assembly lubricants may cause dust to accumulate (gather) on the transaxle and have the appearance of an oil leak. Neither of these requires corrective action.
-
If no fluorescent oil trace/leak is found, no action is necessary.
-
If fluorescent oil trace/leak is found repair or replace damaged parts and adjust CVT fluid level. Refer to Adjustment.
-
INSPECTION
Park the vehicle on a level surface with the engine running and parking brake set.
Using CONSULT-III plus, ensure that the CVT fluid temperature is between 170°F to 180°F (77°C to 82°C).
Shift the transmission into REVERSE for 5 seconds.
Shift the transmission into DRIVE for 5 seconds.
Shift the transmission into REVERSE for 5 seconds.
Shift the transmission into PARK.
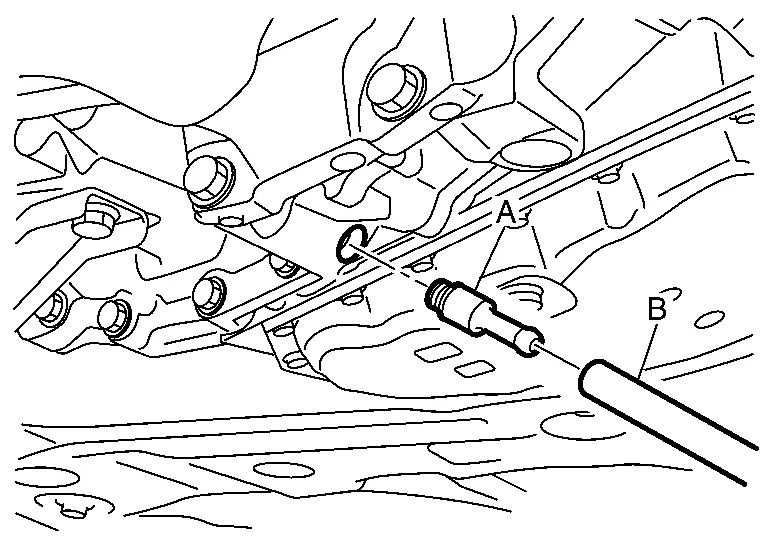
Remove cap (A).
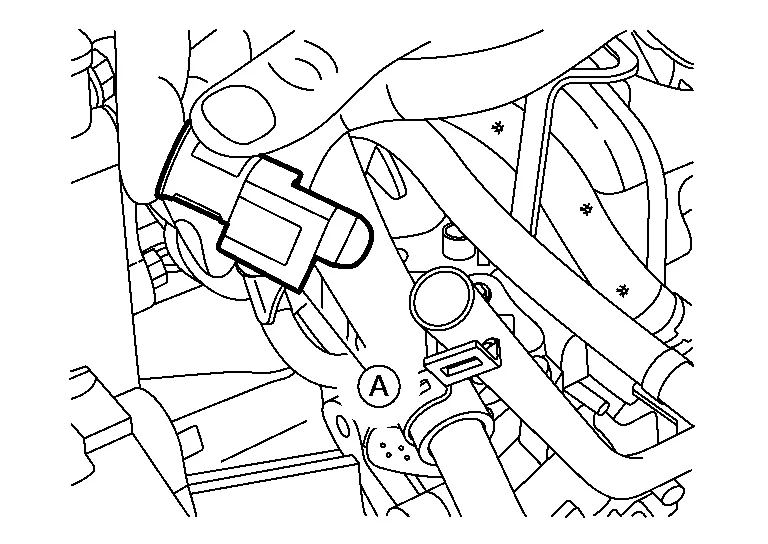
| Tool | : (J-52611) |
With the Nissan Murano vehicle in PARK and the engine running, insert Tool into the CVT fluid pipe.
| Tool | : (J-51155) |
NOTE:
The handle on the Tool has two positions, verify Tool is in red position (B) and not blue position (A).
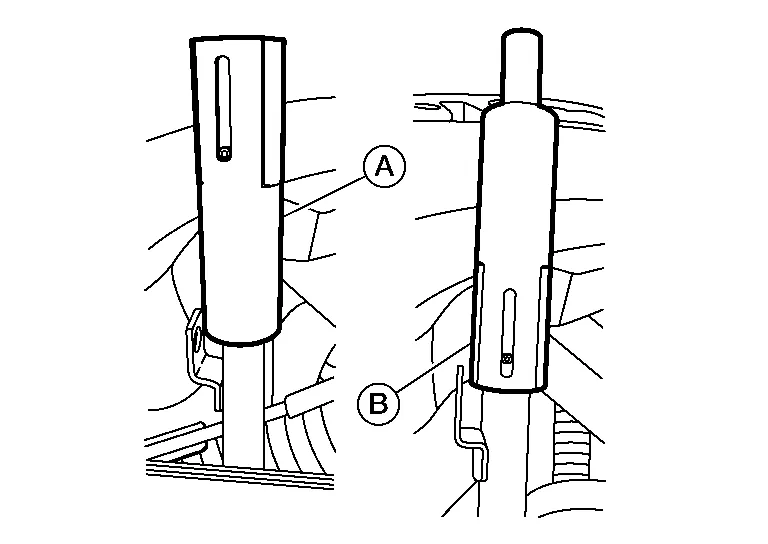
| Tool | : (J-51155) |
Inspect Tool to determine the CVT fluid level.
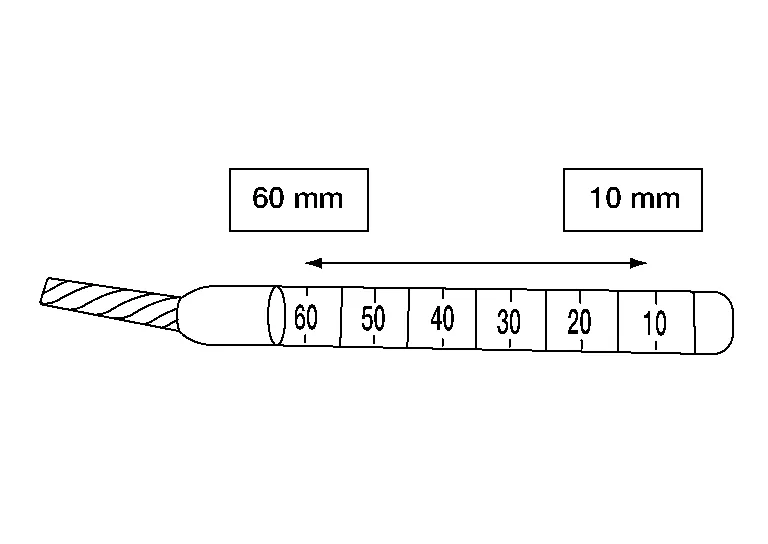
| Tool | : (J-51155) |
| CVT fluid level | : 14 – 22 mm (0.55 – 0.86 in) |
ADJUSTMENT
Adjust the fluid level from the bottom of the CVT using the charge pipe. Refer to Adjustment.
| CVT fluid | : Refer to Fluids and Lubricants. |
| Fluid capacity | : Refer to Fluids and Lubricants. |
CAUTION:
-
Always use shop paper. Never use shop cloth.
-
Replace a drain plug gasket with new ones at the final stage of the operation when installing.
-
Use caution when looking into the drain hole as there is a risk of dripping fluid entering the eye.
-
After replacement, always perform CVT fluid leakage check.
Select “Data Monitor” in “TRANSMISSION” using CONSULT.
Select “FLUID TEMP” and confirm that the CVT fluid temperature is 40°C (104°F) or less.
Check that the selector lever is in the “P” position, then completely engage the parking brake.
Lift up the Nissan Murano vehicle.
Remove the drain plug and drain the CVT fluid from the oil pan. Refer to Exploded View.
Install the drain plug to oil pan.
CAUTION:
Drain plug gasket use the old one.
Remove the overflow plug  from converter housing.

| : Nissan Murano Vehicle front |
Install the charging pipe set (CVT stand pipe adapter kit) KV311039S0 (J-52584) (A) into the overflow plug hole.
CAUTION:
Tighten the charging pipe by hand.
Install the ATF changer hose (B) to the charging pipe.
CAUTION:
Press the ATF changer hose all the way onto the charging pipe until it stops.
Fill approximately 3 liter (3-1/8 US qt, 2-5/8 lmp qt) of the CVT fluid.
Remove the ATF changer hose and charging pipe, then install the overflow plug.
NOTE:
Perform this work quickly because CVT fluid leaks.
Lift down the Nissan Murano vehicle.
Start the engine.
While depressing the brake pedal, shift the selector lever to the entire position from “P” to “L”, and shift it to the “P” position.
NOTE:
Hold the lever at each position for 5 seconds.
Check that the CONSULT “Data Monitor” in “FLUID TEMP” is 35°C (95°F) to 45°C (113°F).
Stop the engine.
Lift up the Nissan Murano vehicle.
Remove the drain plug, and then drain CVT fluid from oil pan.
Repeat steps 8 to 18 (one time).
Tighten the drain plug to the specified torque. Refer to Exploded View.
Remove the overflow plug.
Install the charging pipe set (CVT stand pipe adapter kit) KV311039S0 (J-52584) into the overflow plug hole.
CAUTION:
Tighten the charging pipe by hand.
Install the ATF changer hose to the charging pipe.
CAUTION:
Press the ATF changer hose all the way onto the charging pipe until it stops.
Fill approximately 3 liter (3-1/8 US qt, 2-5/8 lmp qt) of the CVT fluid.
Remove the ATF changer hose and charging pipe, then install the overflow plug.
NOTE:
Perform this work quickly because CVT fluid leaks.
Lift down the Nissan Murano vehicle.
Start the engine.
While depressing the brake pedal, shift the selector lever to the entire position from “P” to “L”, and shift it to the “P” position.
NOTE:
Hold the lever at each position for 5 seconds.
Check that the CONSULT “Data Monitor” in “FLUID TEMP” is 35°C (95°F) to 45°C (113°F).
Lift up the Nissan Murano vehicle.
Remove the overflow plug and confirm that the CVT fluid is drained from the overflow plug hole.
CAUTION:
Perform this work with the Nissan Murano vehicle idling.
NOTE:
If the CVT fluid is not drained, refer to “Adjustment” and refill with the CVT fluid.
When the flow of CVT fluid slows to a drip, tighten the overflow plug to the specified torque. Refer to Exploded View.
CAUTION:
Never reuse O-ring.
Lift down the Nissan Murano vehicle.
Select “Data Monitor” in “TRANSMISSION” using CONSULT.
Select “CONFORM CVTF DETERIORTN”.
Select “Erase”.
Stop the engine.
| CVT fluid | : Refer to Fluids and Lubricants. |
| Fluid capacity | : Refer to Fluids and Lubricants. |
CAUTION:
-
During adjustment of the CVT fluid level, check CONSULT so that the oil temperature may be maintained from 35 to 45°C (95 to 113°F).
-
Maintain specified engine idle speed during CVT fluid level adjustment. Refer to Idle Speed.
-
Use caution when looking into the drain hole as there is a risk of dripping fluid entering the eye.
Check that the selector lever is in the “P” position, then completely engage the parking brake.
Start the engine.
Adjust the CVT fluid temperature to be approximately 40°C (104°F).
NOTE:
The CVT fluid is largely affected by temperature. Therefore be sure to use CONSULT and check the “FLUID TEMP” under “TRANSMISSION” in “Data Monitor” while adjusting.
While depressing the brake pedal, shift the selector lever to the entire position from “P” to “L”, and shift it to the “P” position.
NOTE:
Hold the lever at each position for 5 seconds.
Lift up the Nissan Murano vehicle.
Check that there is no CVT fluid leakage.
Remove the overflow plug from converter housing.
| : Nissan Murano Vehicle front |
Install the charging pipe set (CVT stand pipe adapter kit) KV311039S0 (J-52584) (A) into the overflow plug hole.
CAUTION:
Tighten the charging pipe by hand.
Install the ATF changer hose (B) to the charging pipe.
CAUTION:
Press the ATF changer hose all the way onto the charging pipe until it stops.
Fill approximately 0.5 liter (1/2 US qt, 1/2 lmp qt) of the CVT fluid.
Remove the ATF changer hose from the charging pipe, and check that the CVT fluid drains out from the charging pipe. If it does not drain out, perform charging again.
CAUTION:
Perform this work with the Nissan Murano vehicle idling.
When the flow of CVT fluid slows to a drip, remove the charging pipe from the converter housing.
Tighten the overflow plug to the specified torque. Refer to Exploded View.
CAUTION:
Never reuse O-ring.
Lift down the Nissan Murano vehicle.
Stop the engine.
| CVT fluid | : Refer to General Specification. |
| Fluid capacity | : Refer to General Specification. |
CAUTION:
-
Always use shop paper. Never use shop cloth.
-
Use caution when looking into the drain hole as there is a risk of dripping fluid entering the eye.
-
After replacement, always perform CVT fluid leakage check.
-
Use only Genuine CVT fluid. Using transmission fluid other than Genuine CVT fluid will damage the CVT, which is not covered by the warranty.
Check that the shift position is in the “P” position, then completely engage the parking brake.
Lift up the Nissan Murano vehicle.
Remove the overflow plug from converter housing.
| : Nissan Murano Vehicle front |
Install the charging pipe set (CVT stand pipe adapter kit) KV311039S0 (J-52584) (A) into the overflow plug hole.
CAUTION:
Tighten the charging pipe by hand.
Install the ATF changer hose (B) to the charging pipe.
CAUTION:
Press the ATF changer hose all the way onto the charging pipe until it stops.
Fill the CVT fluid. For the amount of CVT fluid to refill, refer to the following table.
| Work | Amount of CVT fluid to refill |
| Replacement of control valve only | 4 liter (4-2/8 US qt, 3-4/8 imp qt) |
| Replacement of sub-assembly and control valve | Refer to General Specification. |
Remove the ATF changer hose and charging pipe, then install the overflow plug.
NOTE:
Perform this work quickly because CVT fluid leaks.
Lower the Nissan Murano vehicle.
Start the engine and let it idle for 2 minuites.
While depressing the brake pedal, shift the selector lever to the entire position from “P” to “L”, and shift it to the “P” position.
NOTE:
Hold the lever at each position for 5 seconds.
Check that the CONSULT “Data Monitor” in “FLUID TEMP” is 35°C (95°F) to 45°C (113°F).
Lift up the Nissan Murano vehicle.
Remove the overflow plug and confirm that the CVT fluid is drained from the overflow plug hole.
CAUTION:
Perform this work with the Nissan Murano vehicle idling.
NOTE:
If the CVT fluid is not drained, refer to “Adjustment” and refill with the CVT fluid. Refer to Adjustment.
When the flow of CVT fluid slows to a drip, tighten the overflow plug to the specified torque. Refer to Exploded View.
CAUTION:
Never reuse O-ring.
Lower the Nissan Murano vehicle.
Select “Work Support” in “TRANSMISSION” using CONSULT.
Select “CONFORM CVTF DETERIORTN”.
Select “Erase”.
Stop the engine.
 Symptom Diagnosis. Cvt Control System
Symptom Table
The diagnosis item number indicates the order of check. Start checking in the order from 1.
Perform diagnoses of symptom table 1 before symptom table 2...

Other information:
Nissan Murano (Z52) 2015-2024 Owners Manual: Jump starting
To start your engine with a booster battery, the instructions and precautions below must be followed. WARNING If done incorrectly, jump starting can lead to a battery explosion, resulting in severe injury or death. It could also damage your vehicle...
Nissan Murano (Z52) 2015-2024 Service Manual: Configuration (audio Unit)
Description Vehicle specification needs to be written with CONSULT because it is not written after replacing audio unit.Configuration has three functions as follows: Function Description "Before Replace ECU" Reads the Nissan Murano vehicle configuration of current audio unit...
Categories
- Manuals Home
- Nissan Murano Owners Manual
- Nissan Murano Service Manual
- Checking engine oil level
- Fuel recommendation
- Shift lock release
- New on site
- Most important about car
LATCH (Lower Anchors and Tethers for CHildren) system

LATCH system lower anchor locations - bench seat
Your vehicle is equipped with special anchor points that are used with LATCH system compatible child restraints. This system may also be referred to as the ISOFIX or ISOFIX compatible system. With this system, you do not have to use a vehicle seat belt to secure the child restraint unless the combined weight of the child and child restraint exceeds 65 lbs. (29.5 kg). If the combined weight of the child and child restraint is greater than 65 lbs. (29.5 kg), use the vehicle’s seat belt (not the lower anchors) to install the child restraint. Be sure to follow the child restraint manufacturer’s instructions for installation.