Nissan Murano: Fuses / Engine compartment
WARNING
Never use a fuse of higher or lower amperage rating than that specified on the fuse box cover. This could damage the electrical system or electronic control units or cause a fire.
If any electrical equipment does not come on, check for an open fuse.
- Be sure the ignition switch and the headlight switch are OFF.
- Open the engine hood.
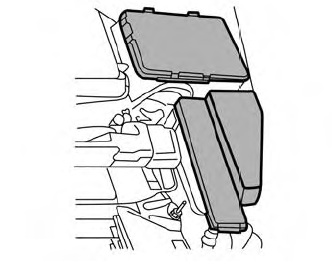
- Remove the fuse box cover by pushing the tab and lifting the cover up.
- Remove the fuse with the fuse puller.
The fuse puller is located in the center
of the fuse block in the passenger
compartment.

- If the fuse is open
 , replace
it with a
new fuse
, replace
it with a
new fuse  .
. - If a new fuse also opens, have the electrical system checked and repaired. It is recommended that you visit a NISSAN dealer for this service.
Fusible links
If any electrical equipment does not operate and the fuses are in good condition, check the fusible links in the holder. If any of the fusible links are melted, replace only with Genuine NISSAN parts.
For checking and replacing the fusible links, it is recommended that you visit a NISSAN dealer for this service.
 Fuses
Fuses
If any electrical equipment does not operate,
check for an open fuse.
Fuses are used in the passenger and engine
compartment. Spare fuses are provided
and can be found in the passenger
compartment fuse box...
 Passenger compartment
WARNING
Never use a fuse of higher or lower amperage
rating than that specified on the
fuse box cover. This could damage the
electrical system or electronic control
units or cause a fire...
Other information:
Nissan Murano (Z52) 2015-2024 Service Manual: U0079 Control Module Communication Bus G Off
DTC Description DTC DETECTION LOGIC DTC No. CONSULT screen terms (Trouble diagnosis content) DTC detection condition U0079–00 Control module communication Bus G Off (Control module communication Bus G Off) [—] Diagnosis condition When ignition switch is ON...
Nissan Murano (Z52) 2015-2024 Service Manual: Cooling System
Cooling Circuit 1. Cylinder block (bank 1) 2. Oil cooler 3. Cylinder head (bank 1) 4. Water pump 5. Radiator 6. Water outlet 7. Thermostat 8. Cylinder head (bank 2) 9. Cylinder block (bank 2) A. To heater. Refer to Exploded View...
Categories
- Manuals Home
- Nissan Murano Owners Manual
- Nissan Murano Service Manual
- Indicator lights
- Tire rotation
- Power Steering Fluid (PSF)
- New on site
- Most important about car
Unfastening the seat belts. Checking seat belt operation
Unfastening the seat belts
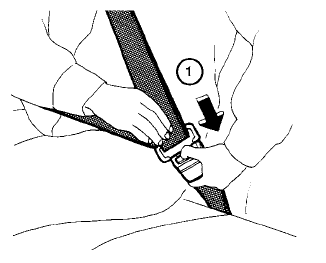
To unfasten the seat belt, press the button
on the buckle  . The seat belt
automatically
retracts.
. The seat belt
automatically
retracts.
Copyright © 2026 www.nimurano.com