Nissan Murano: Exterior :: Removal and Installation / Emblem

| 1. | Emblem A | 2. | Emblem B | 3. | Emblem L (if equipped) |
| 4. | Emblem C/D/E/F/G/H/J/K (if equipped) |
REMOVAL
Remove the emblem from the panel heating with a heat gun.
CAUTION:
Do not damage the painted surface of the panel when removing the emblem.
INSTALLATION
 NOTE:
NOTE:
-
Do not reuse the emblem.
-
Ensure Nissan Murano vehicle surface temperature is between 25ºC (77ºF) to 50ºC (122ºF).
-
The following figure shows the fixing position of the emblem.
-
The central position of the left and right of emblem A should be measured between the left and right end portions of the back door assembly. Then attach the emblem at the center of the back door assembly.
Remove grease, dust, etc. from the emblem and vehicle surface.
Install the emblem to the vehicle surface.
Using a roller, or suitable tool, apply even pressure to firmly affix the emblem to Nissan Murano vehicle surface.

| 1. | Emblem A | 2. | Back Door Assembly | 3. | Emblem B |
| 4. | Emblem C (if equipped) | 5. | Emblem D (if equipped) | 6. | Emblem E (if equipped) |
| 7. | Emblem F (if equipped) | 8. | Emblem G (if equipped) | 9. | Emblem H (if equipped) |
| 10. | Emblem J (if equipped) | 11. | Emblem K (if equipped) | 12. | Emblem L (if equipped) |
Unit: mm (in)
| A | : 0.0 (0.0) | B | : 7.2 (0.3) | C | : 98.5 (3.9) | D | : 294.7 (11.6) |
| E | : 111.2 (4.4) | F | : 291.1 (11.5) | G | : 215.9 (8.5) | H | : 272.7 (10.7) |
| J | : 205.3 (8.1) | K | : 274.1 (10.8) | M | : 99.0 (3.9) | N | : 296.7 (11.7) |
| P | : 98.9 (3.9) | R | : 217.0 (8.5) | S | : 51.7 (2.0) | T | : 33.6 (1.3) |
 Back Door Outer Finisher
Exploded View
1.
Back door outer finisher
2.
Rear view camera
3.
Back door request switch
Clip
Removal and Installation
REMOVALRemove back door lower finisher...

Other information:
Nissan Murano (Z52) 2015-2024 Owners Manual: Removal of engine protectors
..
Nissan Murano (Z52) 2015-2024 Owners Manual: Heated seat switches (if so equipped)
WARNING Do not use or allow occupants to use the seat heater if you or the occupants cannot monitor elevated seat temperatures or have an inability to feel pain in those body parts in contact with the seat. Use of the seat heater by such people could result in serious injury...
Categories
- Manuals Home
- Nissan Murano Owners Manual
- Nissan Murano Service Manual
- Passenger compartment
- Rear bench seat adjustment
- Fuel recommendation
- New on site
- Most important about car
Driver and passenger supplemental knee air bag
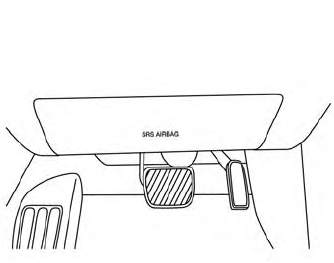
Driver’s side
The knee air bag is located in the knee bolster, on the driver’s and passenger’s side. All of the information, cautions and warnings in this manual apply and must be followed. The knee air bag is designed to inflate in higher severity frontal collisions, although it may inflate if the forces in another type of collision are similar to those of a higher severity frontal impact. It may not inflate in certain collisions.
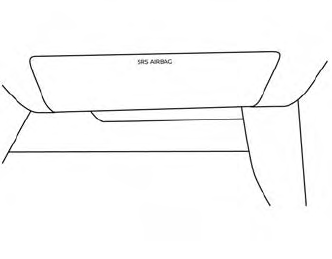
Passenger’s side