Nissan Murano: Front Disc Brake / Brake Caliper Assembly
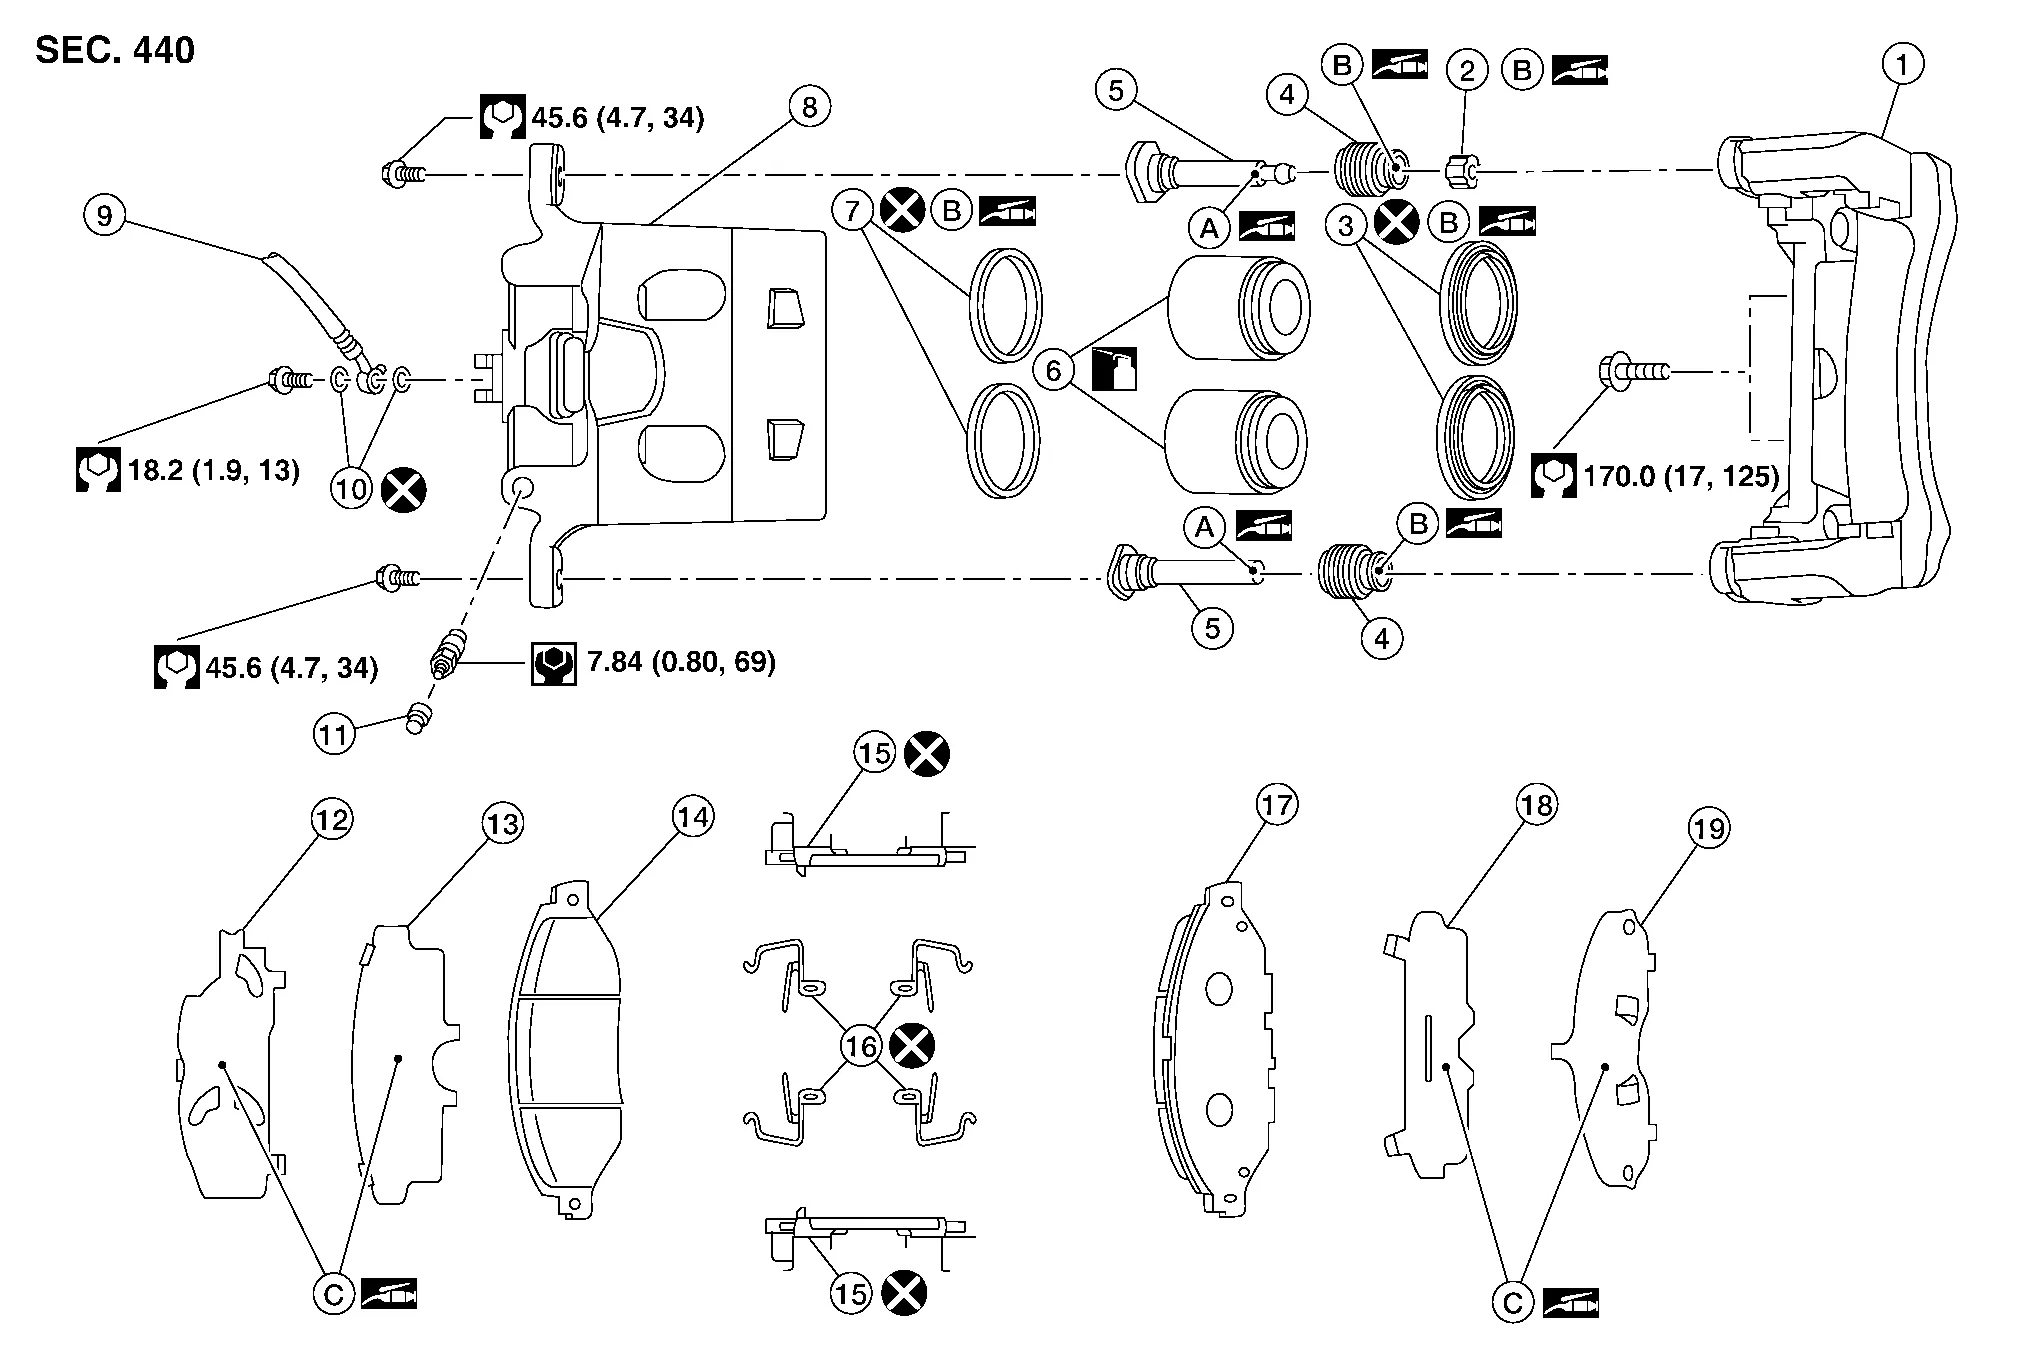
| 1. | Torque member | 2. | Bushing | 3. | Piston boot |
| 4. | Slide pin boot | 5. | Slide pin | 6. | Piston |
| 7. | Piston seal | 8. | Brake caliper body | 9. | Brake hose |
| 10. | Copper sealing washers | 11. | Bleeder cap | 12. | Inner shim cover |
| 13. | Inner shim | 14. | Inner pad | 15. | Pad retainer |
| 16. | Anti-rattle clip | 17. | Outer pad | 18. | Outer shim |
| 19. | Outer shim cover | A. | Nigrove Rx-2 | B. | Rubber grease |
| C. | Molykote® AS-880N | ||||
 : Apply brake fluid. : Apply brake fluid. |
|||||
WARNING:
Clean dust on brake caliper and brake pad with a vacuum dust collector to minimize the hazard of airborne particles or other materials.
CAUTION:
-
Do not depress the brake pedal.
-
Do not spill or splash brake fluid on painted areas; it may cause paint damage. If brake fluid is splashed on painted areas, wash it away with water immediately.
-
Do not bend, twist or pull the brake hoses and piping.
-
Do not reuse drained brake fluid.
 NOTE:
NOTE:
When removing components such as hoses, tubes/lines, etc., cap or plug openings to prevent fluid from spilling.
REMOVAL
Remove reservoir cap from the reservoir tank.
Remove front wheels and tires using power tool.
Secure the disc brake rotor using wheel nuts.
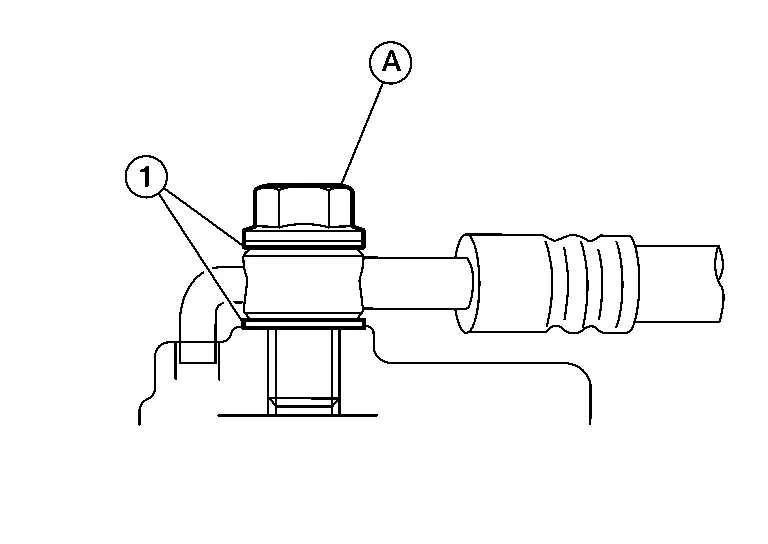
Remove union bolt, copper sealing washers, and disconnect brake hose from brake caliper. Discard the copper sealing washers.
CAUTION:
Do not reuse copper sealing washers.
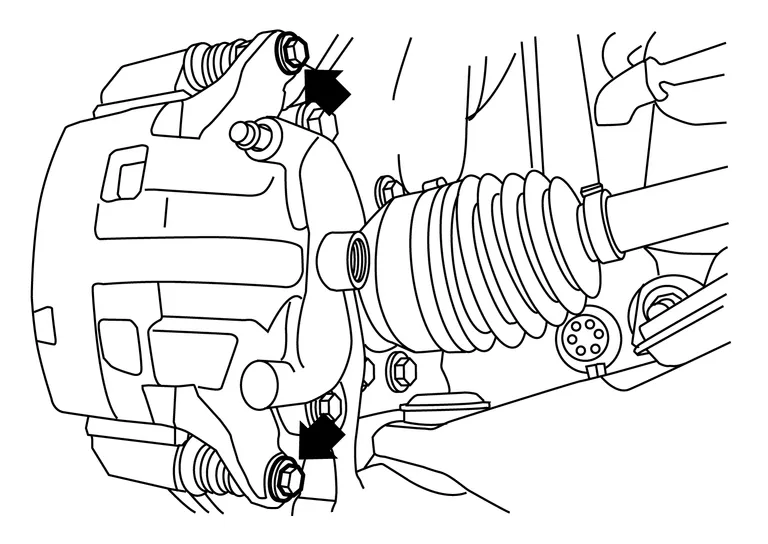
Remove slide pin bolts and the brake caliper.
CAUTION:
Do not drop brake pads or caliper.
Remove the brake pads from the torque member.
CAUTION:
-
Do not damage the piston boot.
-
Do not drop the brake pads, shims, or the shim covers.
-
Note the position of components during removal to aid with installation.
INSTALLATION
Install the brake pads in the torque member.
CAUTION:
-
Do not damage the piston boot.
-
Do not drop the brake pads, shims, or the shim covers.
Position the brake caliper to torque member and install the slide pin bolts. Tighten to specification.
Assemble the union bolt (A) and the copper sealing washers (1) to the brake hose and install it as an assembly to the brake caliper. Align the brake hose L-pin by aligning it with the brake caliper hole, and tighten the union bolt (1) to the specified torque.
CAUTION:
Do not reuse copper sealing washers.
Refill with new brake fluid and perform the air bleeding. Refer to Bleeding Brake System.
CAUTION:
-
Do not reuse drained brake fluid.
-
Do not spill or splash brake fluid on the disc brake rotor.
Install the front wheels and tires. Refer to Removal and Installation.
INSPECTION AFTER INSTALLATION
Check the drag of front disc brake. If any drag is found, follow the procedure described below.
Remove brake pads.
Using a suitable tool, press the pistons into the brake caliper body.
CAUTION:
Do not damage the piston boots.
Install brake pads.
Depress the brake pedal several times.
Check the drag of front disc brake again. If any drag is found, disassemble the brake caliper body.
Burnish contact surfaces after refinishing or replacing disc brake rotors or if a soft pedal occurs at very low mileage. Refer to Brake Pedal.
 Brake Pad
Exploded View
1.
Torque member
2.
Bushing
3.
Piston boot
4.
Slide pin boot
5.
Slide pin
6.
Piston
7.
Piston seal
8.
Brake caliper body
9...
 Disc Brake Rotor
Exploded View
1.
Front disc brake rotor
2.
Front wheel hub and bearing assembly
3.
Splash guard
Front
Removal and Installation
REMOVALRemove front wheels and tires using power tool...
Other information:
Nissan Murano (Z52) 2015-2024 Service Manual: Rear Door Glass
Exploded View 1. Rear door 2. Rear door glass rubber run 3. Rear door glass rear run 4. Rear door glass corner finisher 5. Rear door glass 6. Rear door glass power window motor 7. Rear door glass regulator Removal and Installation REMOVALRemove rear door finisher...
Nissan Murano (Z52) 2015-2024 Service Manual: U1000 Can Comm Circuit
DTC Description DESCRIPTIONCAN (Controller Area Network) is a serial communication line for real-time application. It is an on-Nissan Murano vehicle multiplex communication line with high data communication speed and excellent error detection ability...
Categories
- Manuals Home
- Nissan Murano Owners Manual
- Nissan Murano Service Manual
- Indicator lights
- Passenger compartment
- Checking engine oil level
- New on site
- Most important about car
LATCH (Lower Anchors and Tethers for CHildren) system

LATCH system lower anchor locations - bench seat
Your vehicle is equipped with special anchor points that are used with LATCH system compatible child restraints. This system may also be referred to as the ISOFIX or ISOFIX compatible system. With this system, you do not have to use a vehicle seat belt to secure the child restraint unless the combined weight of the child and child restraint exceeds 65 lbs. (29.5 kg). If the combined weight of the child and child restraint is greater than 65 lbs. (29.5 kg), use the vehicle’s seat belt (not the lower anchors) to install the child restraint. Be sure to follow the child restraint manufacturer’s instructions for installation.