Nissan Murano: Door & Lock :: Dtc/circuit Diagnosis / Automatic Back Door Warning Buzzer
CHECK AUTOMATIC BACK DOOR WARNING BUZZER GROUND CIRCUIT
-
Ignition switch OFF.
-
Disconnect automatic back door warning buzzer connector.
-
Check continuity between automatic back door warning buzzer harness connector and ground.
| (+) | (–) | Continuity | |
| Automatic back door warning buzzer | |||
| Connector | Terminal | ||
| B93 | 2 | Ground | Yes |
Is the inspection result normal?
YES>>GO TO 2.
NO>>Repair or replace harness.
CHECK AUTOMATIC BACK DOOR WARNING BUZZER SIGNAL CIRCUIT
-
Disconnect automatic back door control module connector.
-
Check continuity between automatic back door control module harness connector and automatic back door warning buzzer harness connector.
Automatic back door control module Automatic back door warning buzzer Continuity Connector Terminal Connector Terminal B55 37 B93 1 Yes -
Check continuity between automatic back door control module harness connector and ground.
Automatic back door control module Ground Continuity Connector Terminal B55 37 No
Is the inspection result normal?
YES>>GO TO 3.
NO>>Repair or replace harness.
CHECK AUTOMATIC BACK DOOR WARNING BUZZER
Refer to Component Inspection.
Is the inspection result normal?
YES>>Replace automatic back door control module. Refer to Removal and Installation.
NO>>Replace automatic back door warning buzzer. Refer to Removal and Installation.
CHECK AUTOMATIC BACK DOOR WARNING BUZZER
-
Ignition switch OFF.
-
Disconnect automatic back door warning buzzer connector.
-
Connect battery power supply directly to automatic back door warning buzzer terminals and check the operation.
| Automatic back door warning buzzer | Operation | |
| Terminal | ||
| (+) | (-) | |
| 1 | 2 | Chime sounds |
Is the inspection result normal?
YES>>Inspection End.
NO>>Replace automatic back door warning buzzer. Refer to Removal and Installation.
 Back Door Closure Motor
Diagnosis Procedure
CHECK BACK DOOR CLOSURE MOTOR INPUT SIGNAL
Ignition switch OFF.
Disconnect back door lock assembly connector.
Check voltage between back door lock assembly harness connector and ground...
 Hood Switch
Component Function Check
CHECK FUNCTION
CONSULT
Select “HOOD SW” and "HOOD SW 2" in “Data Monitor” mode of “IPDM E/R”.
Check “HOOD SW” and "HOOD SW 2" indication under the following conditions:
Monitor item Condition Indication
HOOD SW
Hood
Open
OFF
Close
ON
HOOD SW 2
Open
ON
Close
OFF
Is the indication normal?
YES>>
Hood switch is OK...
Other information:
Nissan Murano (Z52) 2015-2024 Service Manual: B133a Avm Connection
DTC Description DTC DETECTION LOGIC DTC No. CONSULT screen terms (Trouble diagnosis content) DTC detection condition B133A-8F AVM connection (Camera image signal) Diagnosis condition When ignition switch is ON. Signal (terminal) Camera image signal circuit (terminal 49) Threshold — Diagnosis delay time — POSSIBLE CAUSE Camera image signal circuit Around view monitor control unit AV control unit FAIL-SAFECamera image is inoperative DTC Confirmation Procedure PERFORM DTC CONFIRMATION PROCEDURE CONSULT Ignition switch ON...
Nissan Murano (Z52) 2015-2024 Service Manual: Tcu
Removal and Installation REMOVALCAUTION: Before replacing TCU, perform “ADDITIONAL SERVICE WHEN REPLACING TCU”. For details, refer to Description. Remove the cluster lid D. Refer to Removal and Installation. Remove the A/C switch assembly. Refer to Removal and Installation...
Categories
- Manuals Home
- Nissan Murano Owners Manual
- Nissan Murano Service Manual
- Vehicle Dynamic Control (VDC) OFF switch
- Turning the AEB system on/off
- GAS STATION INFORMATION
- New on site
- Most important about car
Unfastening the seat belts. Checking seat belt operation
Unfastening the seat belts
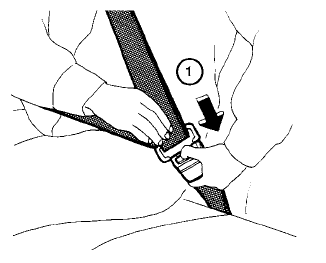
To unfasten the seat belt, press the button
on the buckle  . The seat belt
automatically
retracts.
. The seat belt
automatically
retracts.