Nissan Murano: Dtc/circuit Diagnosis / Variable Induction Air System
CHECK OVERALL FUNCTION-I
 With CONSULT
-
Start engine and warm it up to the normal operating temperature.
-
Perform “VIAS S/V-1” in “ACTIVE TEST” mode with CONSULT.
-
Turn VIAS control solenoid valve 1 “ON” and “OFF”, and check that power valve actuator 1 rod moves.
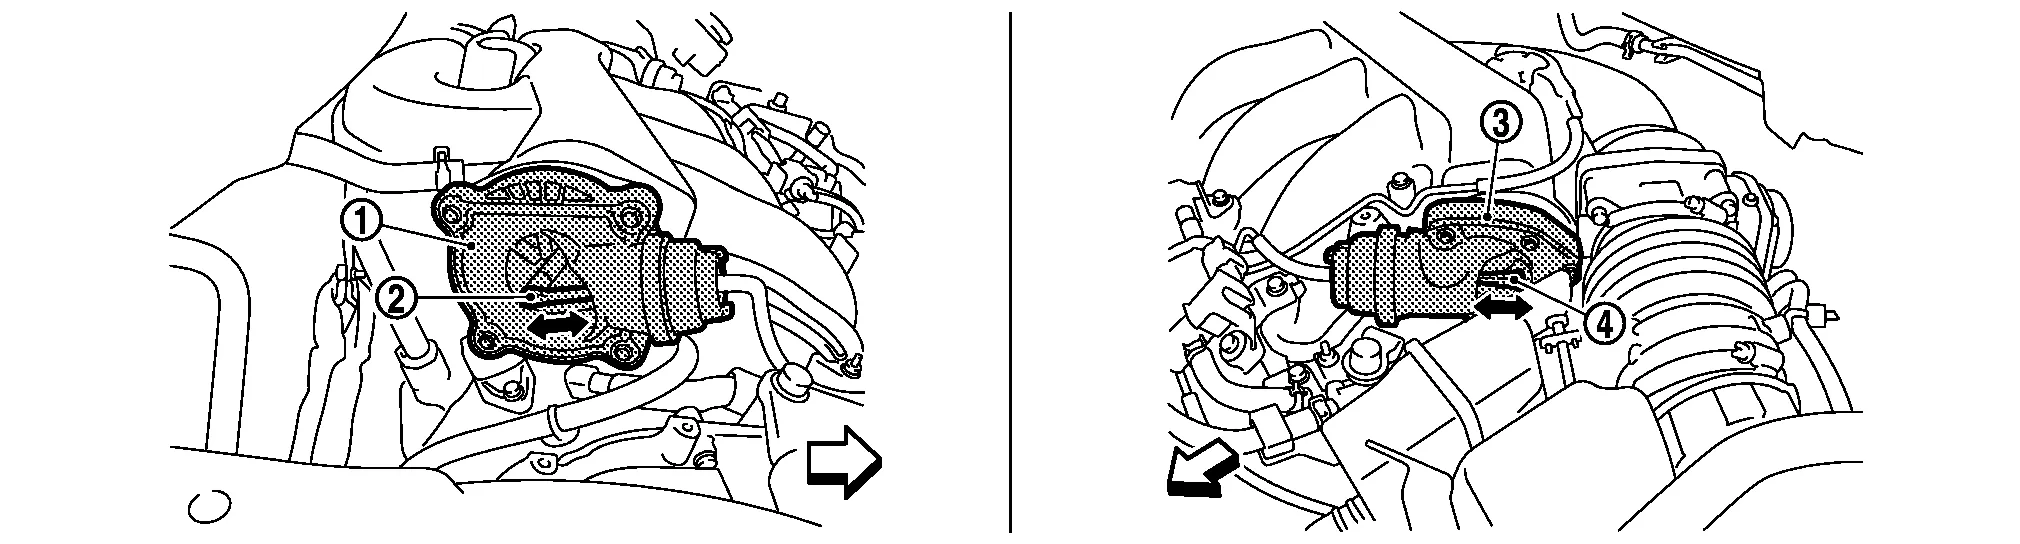

Power valve actuator 1 
Power valve actuator 1 rod 
Power valve actuator 2 
Power valve actuator 2 rod 
: Nissan Murano Vehicle front
 Without CONSULT
-
Start engine and warm it up to the normal operating temperature.
-
Rev engine quickly up to approximately 5,000 rpm.
-
Check that power valve actuator 1 rod moves.

Power valve actuator 1 Power valve actuator 1 rod Power valve actuator 2 Power valve actuator 2 rod : Nissan Murano Vehicle front
Is the inspection result normal?
YES>>GO TO 2.
NO>>Diagnosis Procedure.
CHECK OVERALL FUNCTION-II
With CONSULT
-
Perform “VIAS S/V-2” in “ACTIVE TEST” mode with CONSULT.
-
Turn VIAS control solenoid valve 2 “ON” and “OFF”, and check that power valve actuator 2 rod moves.
Power valve actuator 1 Power valve actuator 1 rod Power valve actuator 2 Power valve actuator 2 rod : Nissan Murano Vehicle front
Without CONSULT
-
When revving engine up to 5,000 rpm quickly.
-
Rev engine quickly up to approximately 5,000 rpm.
-
Check that power valve actuator 2 rod moves.
Power valve actuator 1 Power valve actuator 1 rod Power valve actuator 2 Power valve actuator 2 rod : Nissan Murano Vehicle front
Is the inspection result normal?
YES>>INSPECTION END
NO>>Diagnosis Procedure.
INSPECTION START
Confirm the malfunctioning system (power valve 1 or power valve 2). Refer to Component Function Check.
Which system is related to the incident?
Power valve 1>>GO TO 2.
Power valve 2>>GO TO 6.
CHECK VACUUM EXISTENCE-I
With CONSULT
-
Stop engine and disconnect vacuum hose connected to power valve actuator 1.
-
Start engine and let it idle.
-
Perform “VIAS S/V-1” in “ACTIVE TEST” mode with CONSULT.
-
Turn VIAS control solenoid valve 1 ON and OFF, and check vacuum existence under the following conditions.
VIAS S/V-1 Vacuum ON Existed OFF Not existed
Without CONSULT
-
Stop engine and disconnect vacuum hose connected to power valve actuator 1.
-
Disconnect VIAS control solenoid valve 1 harness connector.
-
Start engine.
-
Rev engine quickly up to approximately 5,000 rpm.
-
Check vacuum existence under the following conditions.
Condition Vacuum Idle Existed Rev engine quickly up to approximately 5,000 rpm Not existed
Is the inspection result normal?
YES>>Repair or replace power valve actuator 1. Refer to Component Parts Location.
NO>>GO TO 3.
CHECK VACUUM TANK
-
Stop engine and disconnect vacuum hose connected to intake manifold collector.
-
Start engine and let it idle.
-
Check vacuum existence from intake manifold collector.
Does vacuum existence from the intake manifold collector?
YES>>GO TO 4.
NO>>Replace intake manifold collector. Refer to Removal and Installation.
CHECK VACUUM HOSE
-
Stop engine.
-
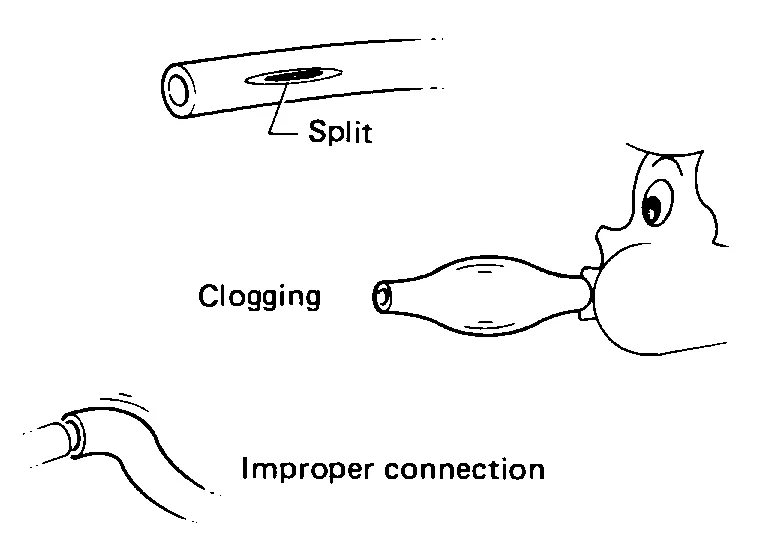
Check vacuum hose for crack, clogging, improper connection or disconnection. Refer to System Description.
Is the inspection result normal?
YES>>GO TO 5.
NO>>Repair hoses or tubes.
CHECK VIAS CONTROL SOLENOID VALVE 1
Check VIAS control solenoid valve 1. Refer to Component Inspection.
Is the inspection result normal?
YES>>GO TO 8.
NO>>Replace VIAS control solenoid valve 1. Refer to Component Parts Location.
CHECK VACUUM EXISTENCE-II
With CONSULT
-
Stop engine and disconnect vacuum hose connected to power valve actuator 2.
-
Start engine and let it idle.
-
Perform “VIAS S/V-2” in “ACTIVE TEST” mode with CONSULT.
-
Turn VIAS control solenoid valve 2 ON and OFF, and check vacuum existence under the following conditions.
VIAS S/V 2 Vacuum ON Existed OFF Not existed
Without CONSULT
-
Stop engine and disconnect vacuum hose connected to power valve actuator 2.
-
Disconnect VIAS control solenoid valve 1 harness connector.
-
Start engine.
-
Rev engine quickly up to approximately 5,000 rpm.
-
Check vacuum existence under the following conditions.
Condition Operation Idle Existed Rev engine quickly up to approximately 5,000 rpm Not existed
Is the inspection result normal?
YES>>Repair or replace power valve actuator 2. Refer to Component Parts Location.
NO>>GO TO 7.
CHECK VACUUM HOSE
-
Stop engine.
-
Check vacuum hose for crack, clogging, improper connection or disconnection. Refer to System Description.
Is the inspection result normal?
YES>>GO TO 8.
NO>>Repair hoses or tubes.
CHECK VIAS CONTROL SOLENOID VALVE 2
Check VIAS control solenoid valve 2. Refer to Component Inspection.
Is the inspection result normal?
YES>>Check intermittent incident. Refer to Intermittent Incident.
NO>>Replace VIAS control solenoid valve 2. Refer to Component Parts Location.
 Sensor Power Supply2 Circuit
Diagnosis Procedure
ECM supplies a voltage of 5 V to some of the sensors systematically divided into 2 groups, respectively. Accordingly, when a short circuit develops in a sensor power source, a malfunction may occur simultaneously in the sensors belonging to the same group as the short-circuited sensor...

Other information:
Nissan Murano (Z52) 2015-2024 Service Manual: System. Moonroof
System Diagram System Description MOONROOF SYSTEMINPUT/OUTPUT SIGNAL CHART Item Input signal to moonroof motor assembly Moonroof motor function Actuator Moonroof switch Moonroof signal (tilt up/ down or slide open/close) Receives signal and moves the moonroof and sunshade assembly to the correct position...
Nissan Murano (Z52) 2015-2024 Service Manual: Warning Chime System
System Description SYSTEM DIAGRAMDESCRIPTIONCombination MeterThe combination meter sounds the alarm buzzer installed in the combination meter when receiving the buzzer output signal transmitted from each unit.BCMBCM receives signals from various units and transmits a buzzer output signal to the combination meter via CAN communication if it judges that the warning buzzer should be activated...
Categories
- Manuals Home
- Nissan Murano Owners Manual
- Nissan Murano Service Manual
- Turning the AEB system on/off
- Checking engine oil level
- System malfunction
- New on site
- Most important about car
LATCH (Lower Anchors and Tethers for CHildren) system

LATCH system lower anchor locations - bench seat
Your vehicle is equipped with special anchor points that are used with LATCH system compatible child restraints. This system may also be referred to as the ISOFIX or ISOFIX compatible system. With this system, you do not have to use a vehicle seat belt to secure the child restraint unless the combined weight of the child and child restraint exceeds 65 lbs. (29.5 kg). If the combined weight of the child and child restraint is greater than 65 lbs. (29.5 kg), use the vehicle’s seat belt (not the lower anchors) to install the child restraint. Be sure to follow the child restraint manufacturer’s instructions for installation.