Nissan Murano: Seat :: Removal and Installation / Second Row Seats
LH SEAT — With Heated Seats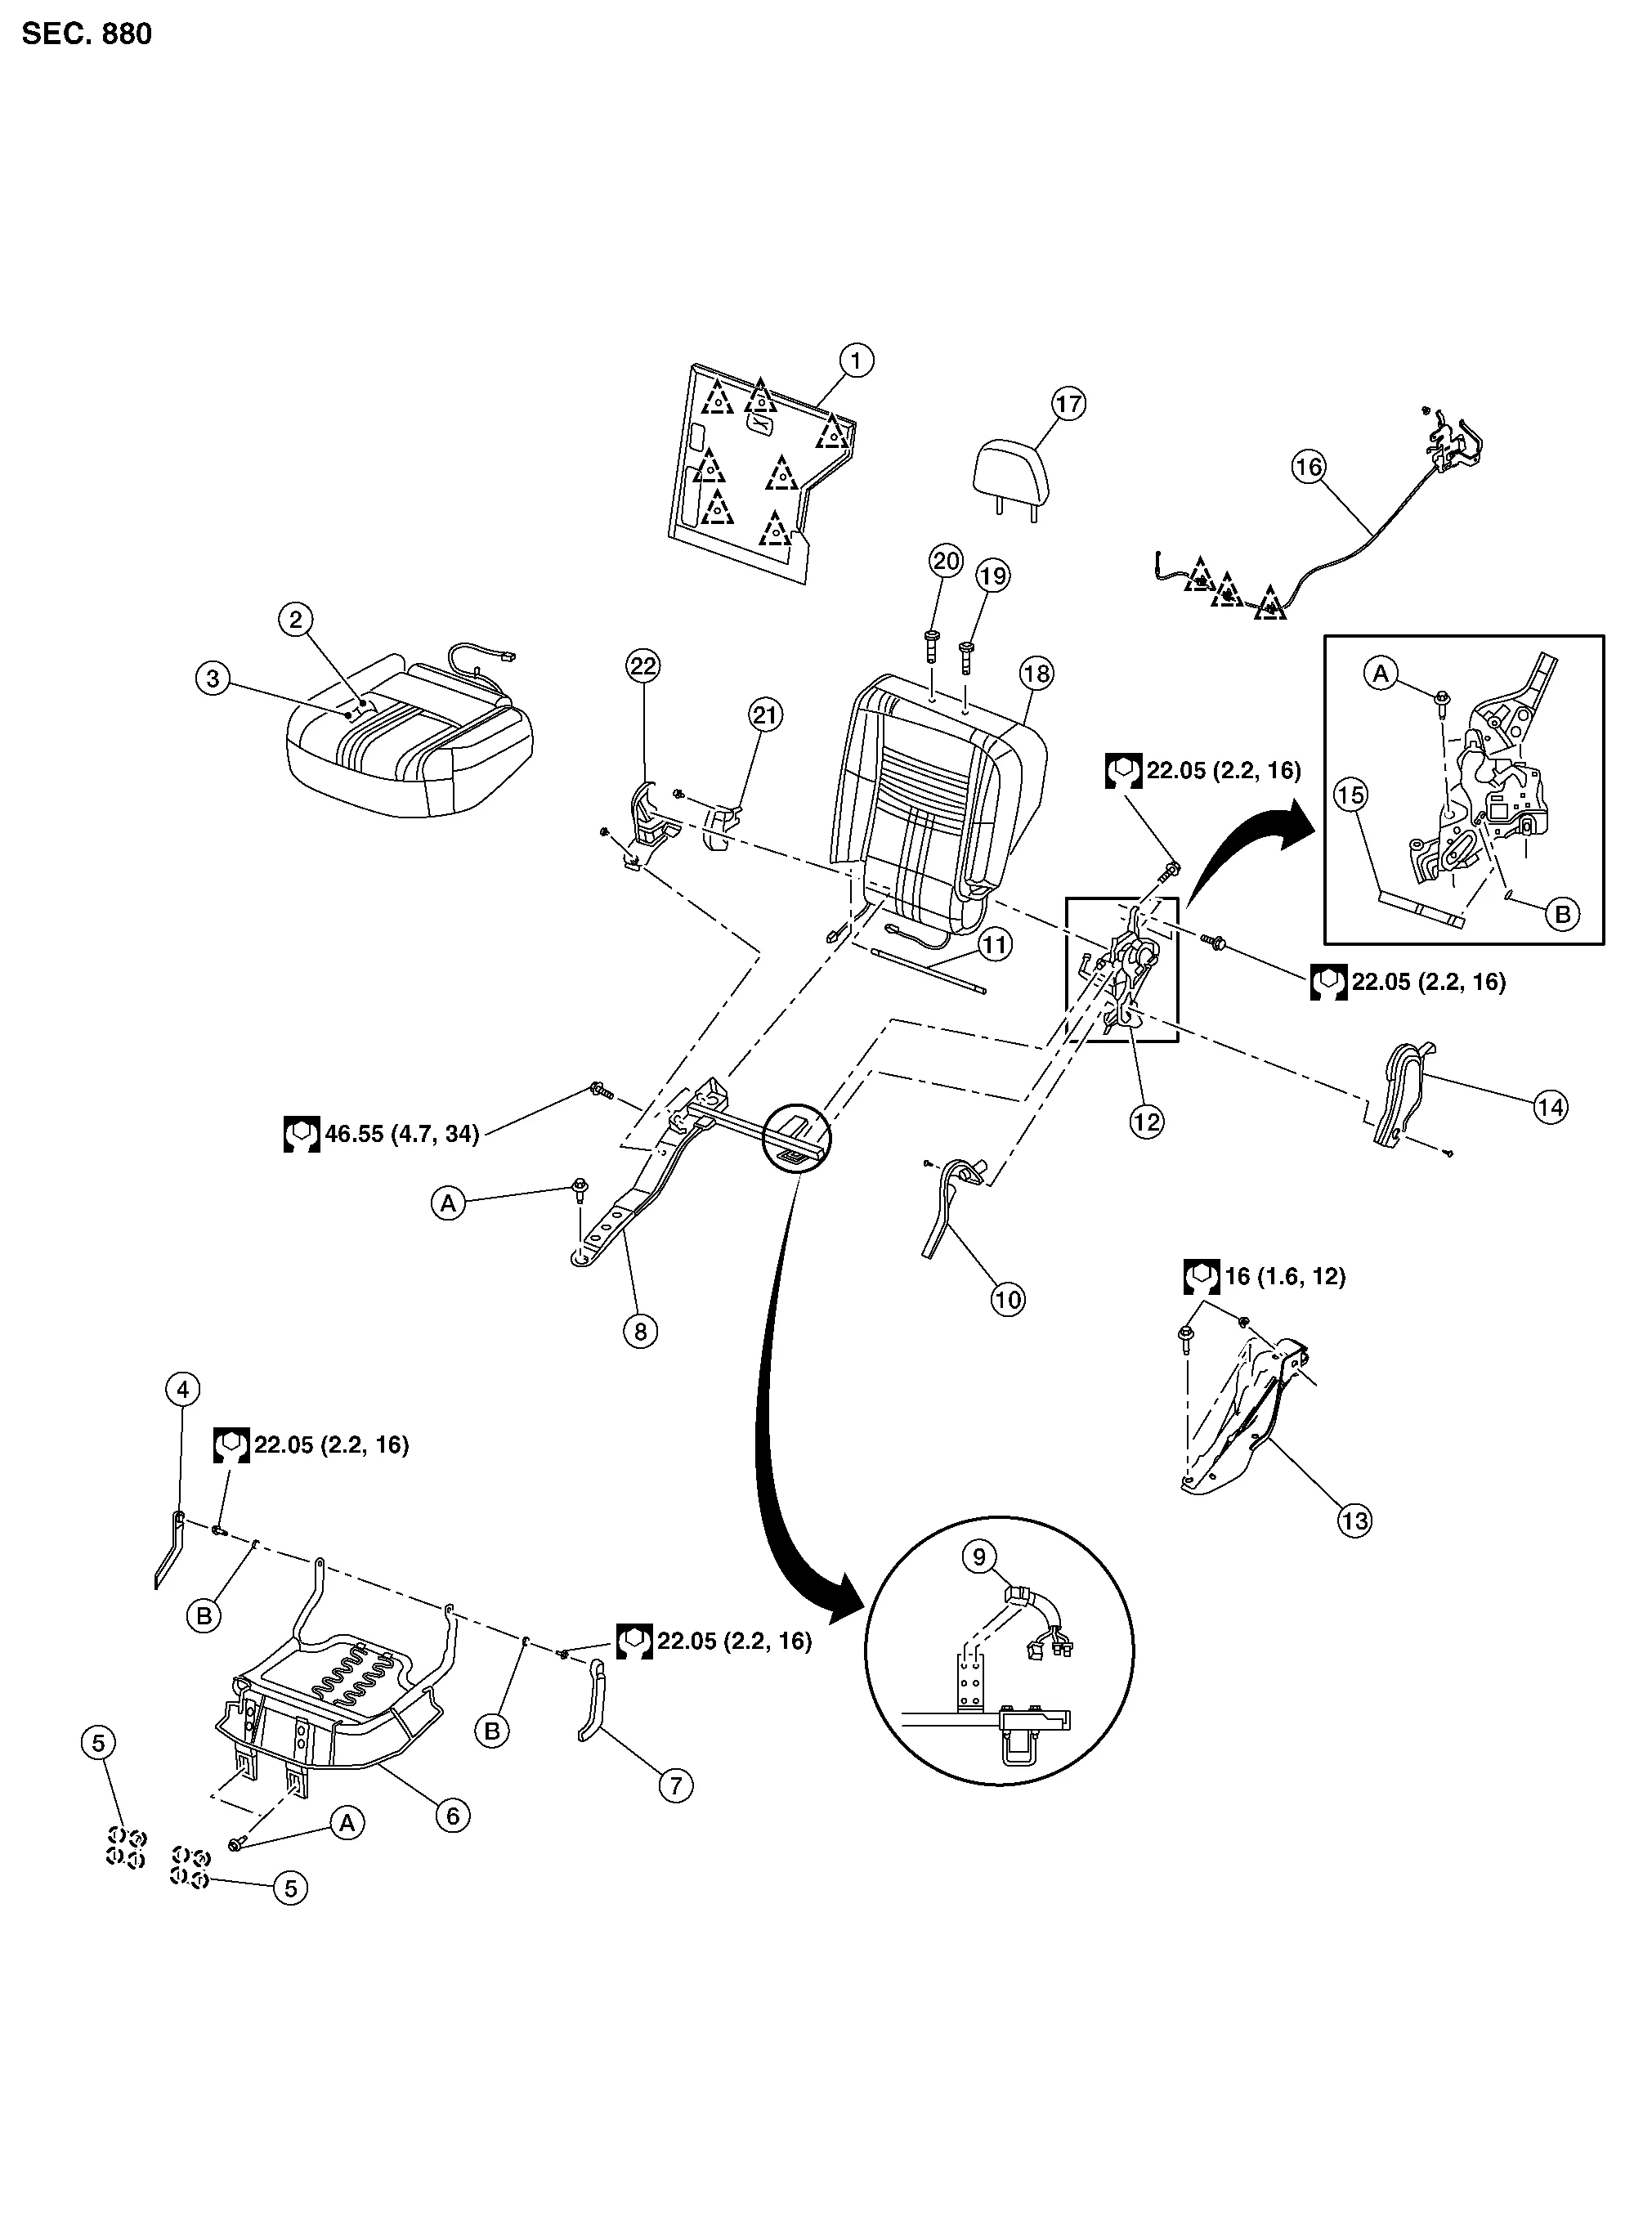
| 1. | Seatback board | 2. | Seat cushion trim | 3. | Seat cushion pad (with heated seats) |
| 4. | Seat cushion link cover (RH) | 5. | Seat cushion hinge cover | 6. | Seat cushion frame |
| 7. | Seat cushion link cover (LH) | 8. | LATCH bracket | 9. | Seat harness (LH) |
| 10. | Reclining device inner cover (LH) | 11. | Reclining device connecting rod | 12. | Reclining device assembly |
| 13. | Seat bracket | 14. | Reclining device outer cover (LH) | 15. | Pull strap |
| 16. | Recline release cable assembly | 17. | Headrest | 18. | Seatback assembly |
| 19. | Headrest holder (free) | 20. | Headrest holder (locked) | 21. | Reclining device inner cover (RH) |
| 22. | Reclining device outer cover (RH) | A. | Refer to Removal and Installation. | B. | Grommet |
 |
Clip |  |
Pawl |
LH SEAT — Without Heated Seats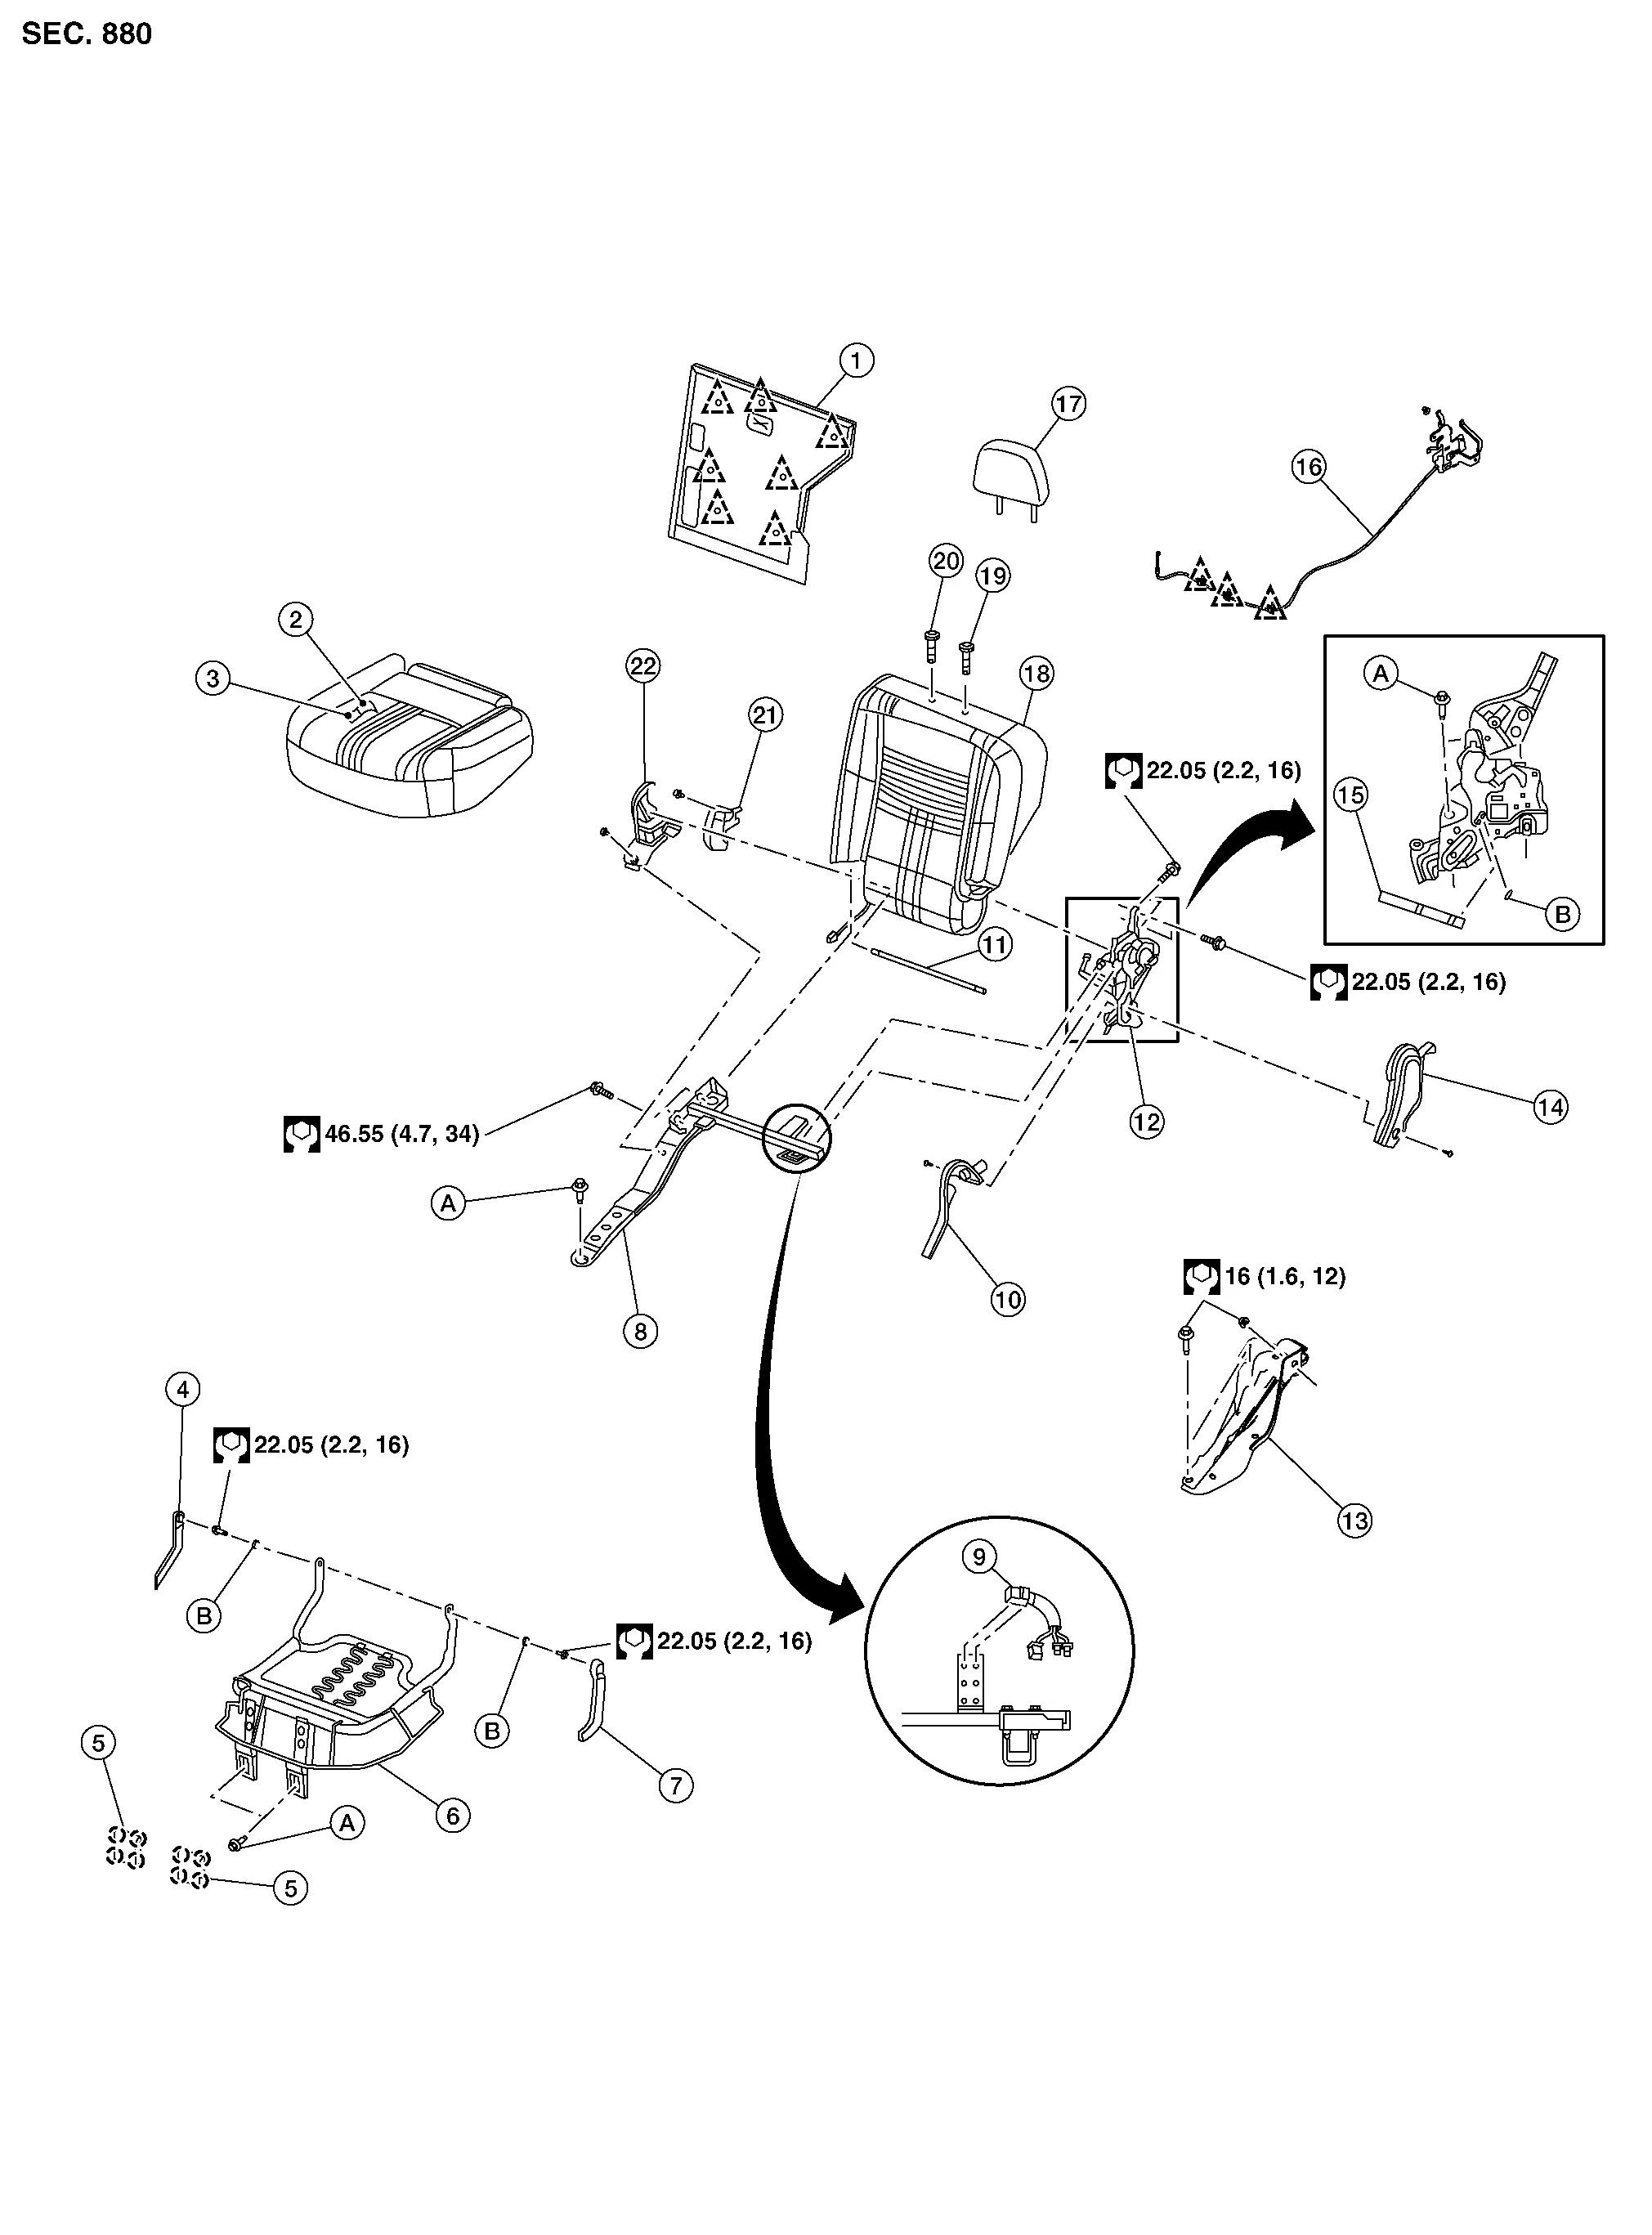
| 1. | Seatback board | 2. | Seat cushion trim | 3. | Seat cushion pad (without heated seats) |
| 4. | Seat cushion link cover (RH) | 5. | Seat cushion hinge cover | 6. | Seat cushion frame |
| 7. | Seat cushion link cover (LH) | 8. | LATCH bracket | 9. | Seat harness (LH) |
| 10. | Reclining device inner cover (LH) | 11. | Reclining device connecting rod | 12. | Reclining device assembly |
| 13. | Seat bracket | 14. | Reclining device outer cover (LH) | 15. | Pull strap |
| 16. | Recline release cable assembly | 17. | Headrest | 18. | Seatback assembly |
| 19. | Headrest holder (free) | 20. | Headrest holder (locked) | 21. | Reclining device inner cover (RH) |
| 22. | Reclining device outer cover (RH) | A. | Refer to Removal and Installation. | B. | Grommet |
|
Clip | |
Pawl |
RH SEAT — WITH HEATED SEATES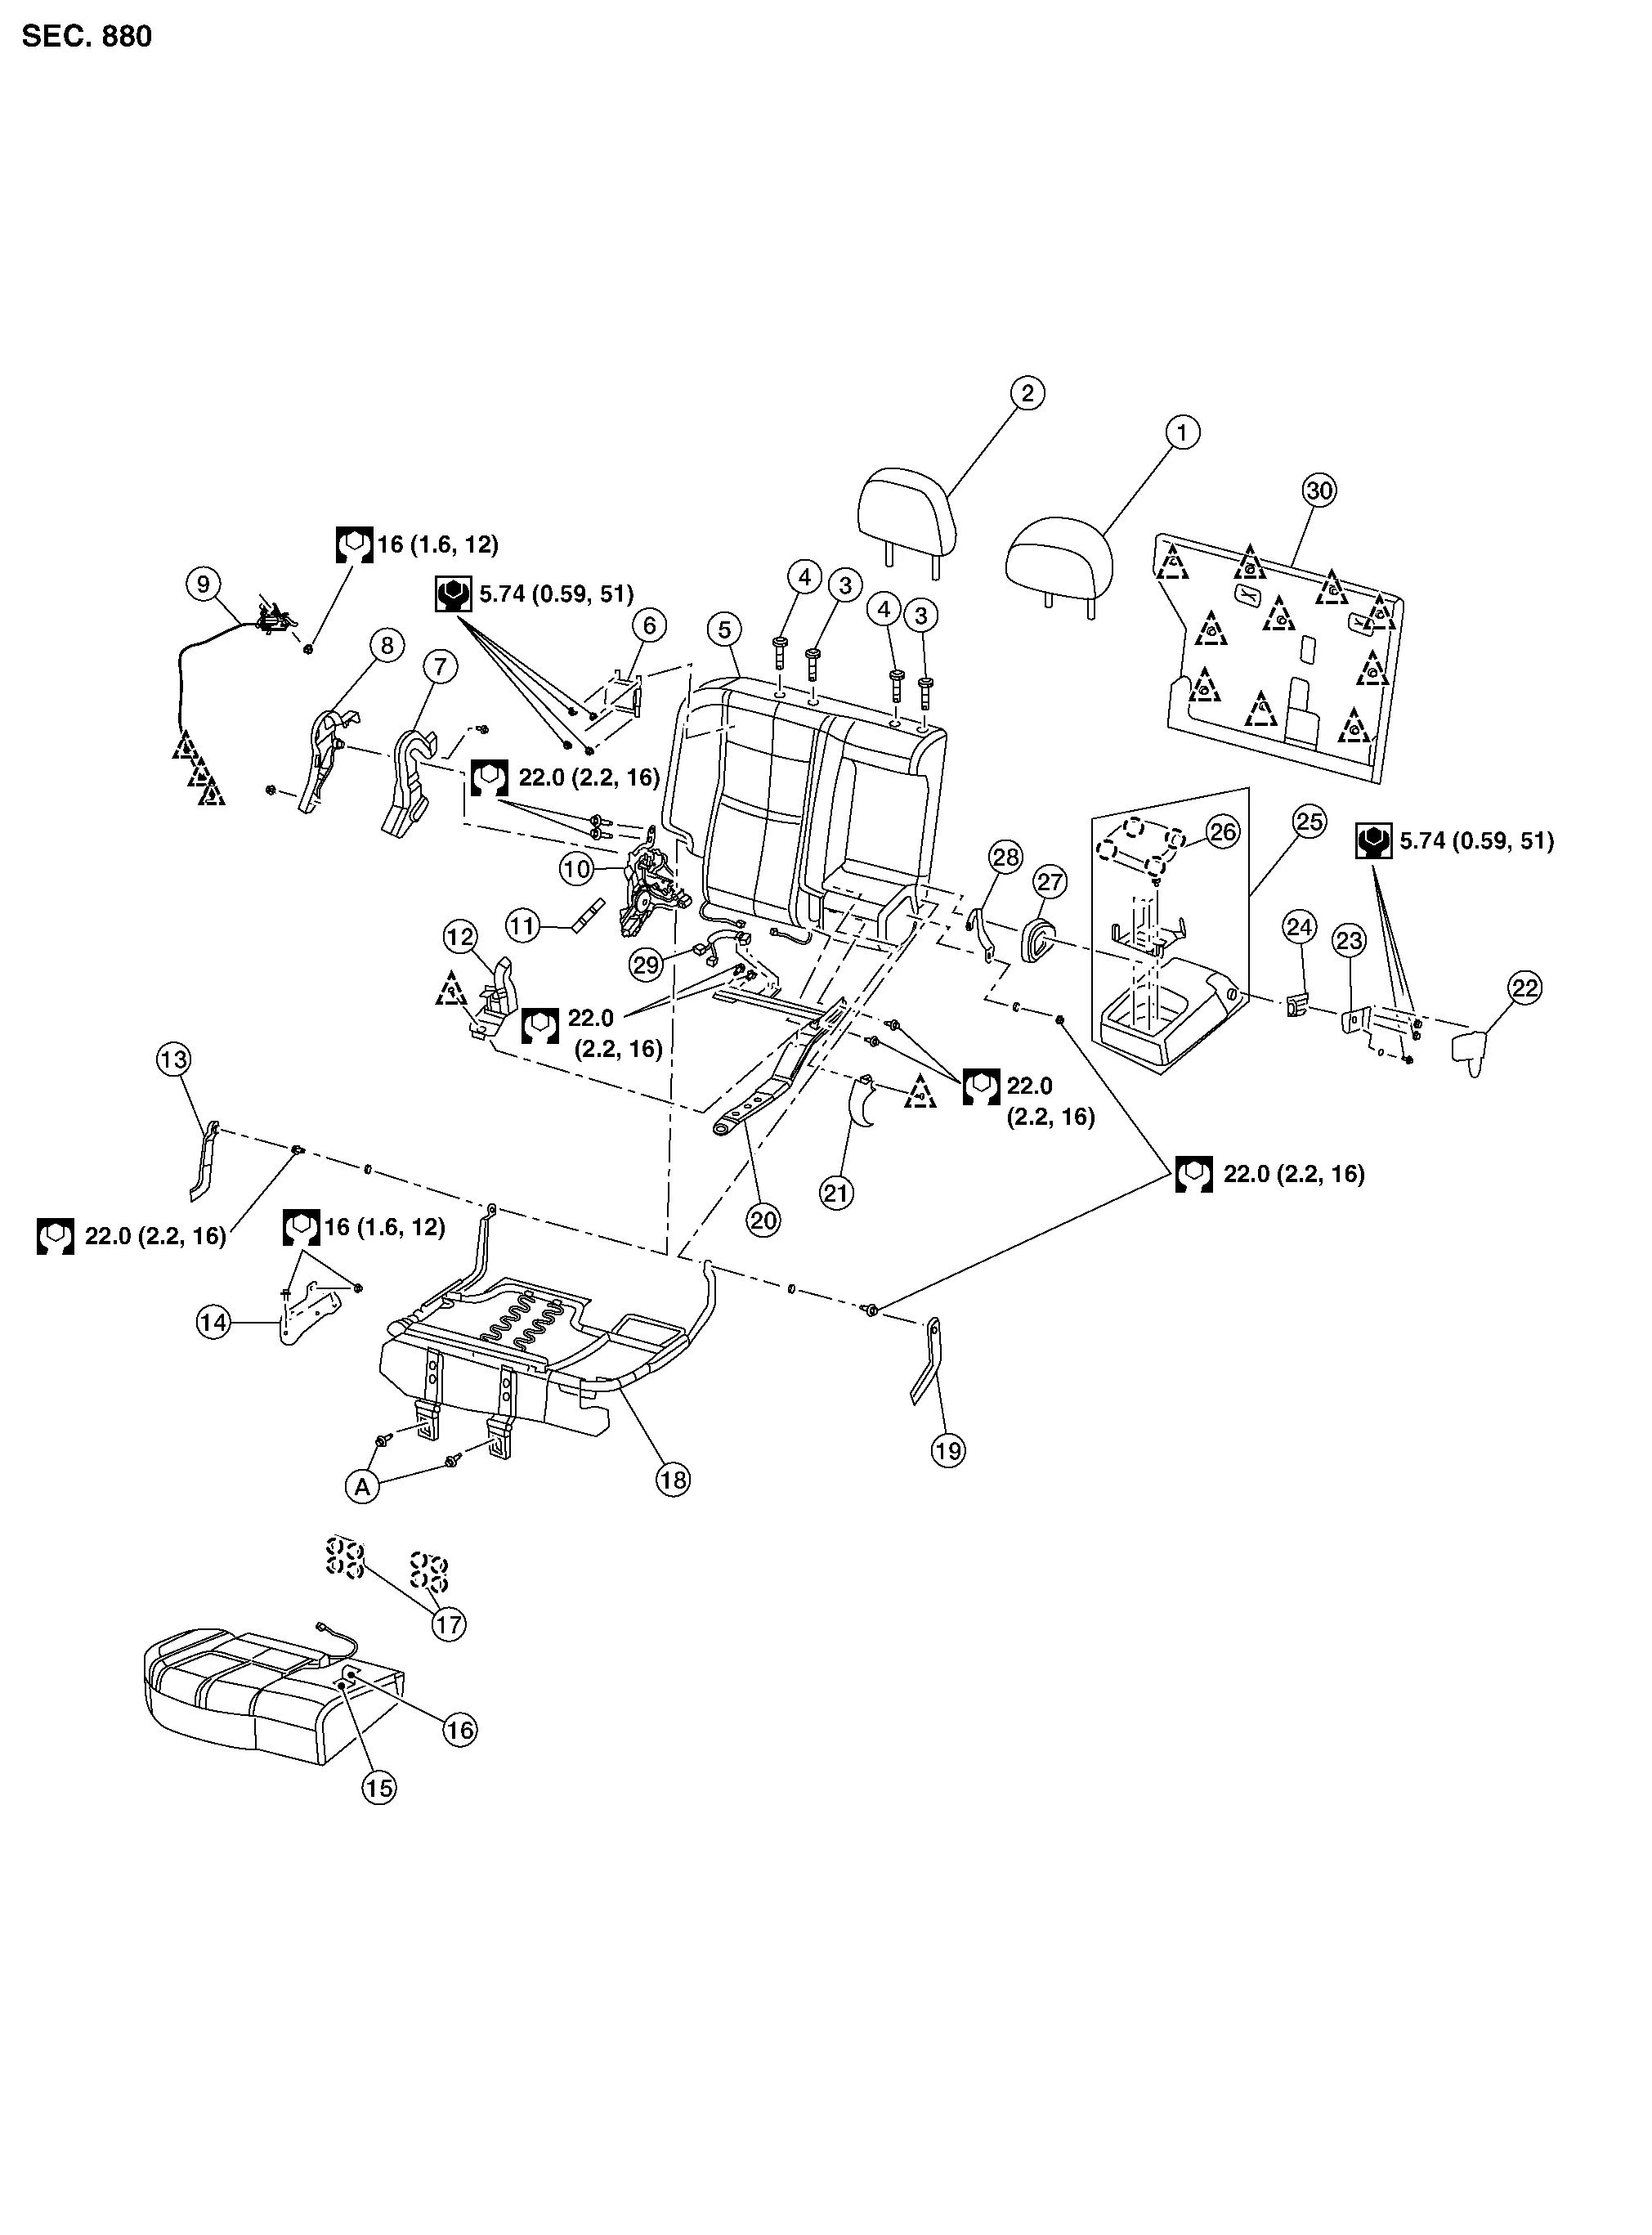
| 1. | Headrest (center) | 2. | Headrest (RH) | 3. | Headrest holder (free) |
| 4. | Headrest holder (locked) | 5. | Seatback assembly | 6. | Dampener |
| 7. | Reclining device inner finisher (RH) | 8. | Reclining device outer finisher (RH) | 9. | Recline release cable assembly |
| 10. | Reclining device assembly | 11. | Pull strap | 12. | Reclining device outer cover (LH) |
| 13. | Seat cushion link cover (RH) | 14. | Seat bracket | 15. | Seat cushion pad (with heated seats) |
| 16. | Seat cushion trim | 17. | Seat cushion hinge cover | 18. | Seat cushion frame |
| 19. | Seat cushion link cover (LH) | 20. | LATCH bracket | 21. | Reclining device inner finisher (LH) |
| 22. | Armrest bracket outer finisher (LH) | 23. | Armrest outer bracket | 24. | Armrest bracket inner finisher (LH) |
| 25. | Armrest assembly | 26. | Cup holder | 27. | Armrest bracket finisher (RH) |
| 28. | Armrest inner bracket | 29. | Seat harness | 30. | Seatback board |
| A. | Refer to Removal and Installation. | |
Clip | |
Pawl |
RH SEAT — WITHOUT HEATED SEATES
| 1. | Headrest (center) | 2. | Headrest (RH) | 3. | Headrest holder (free) |
| 4. | Headrest holder (locked) | 5. | Seatback assembly | 6. | Dampener |
| 7. | Reclining device inner finisher (RH) | 8. | Reclining device outer finisher (RH) | 9. | Recline release cable assembly |
| 10. | Reclining device assembly | 11. | Pull strap | 12. | Reclining device outer cover (LH) |
| 13. | Seat cushion link cover (RH) | 14. | Seat bracket | 15. | Seat cushion pad (without heated seats) |
| 16. | Seat cushion trim | 17. | Seat cushion hinge cover | 18. | Seat cushion frame |
| 19. | Seat cushion link cover (LH) | 20. | LATCH bracket | 21. | Reclining device inner finisher (LH) |
| 22. | Armrest bracket outer finisher (LH) | 23. | Armrest outer bracket | 24. | Armrest bracket inner finisher (LH) |
| 25. | Armrest assembly | 26. | Cup holder | 27. | Armrest bracket finisher (RH) |
| 28. | Armrest inner bracket | 29. | Seat harness | 30. | Seatback board |
| A. | Refer to Removal and Installation. | |
Clip | |
Pawl |
REMOVAL
WARNING:
Do not leave any objects (screwdrivers, tools, etc.) on the seat during seatback repair. It can lead to personal injury if the side air bag module should accidentally deploy.
CAUTION:
-
Before servicing, place ignition switch in the OFF position, disconnect both battery terminals then wait at least three minutes.
-
Always work from the side or back of the seatback, do not work in front of seat.
-
Do not use air tools or electric tools for servicing the seat assembly.
-
Do not insert any objects into the side air bag module.
-
Do not attempt to disassemble the side air bag module.
-
Do not expose the side air bag module to temperatures exceeding 90°C (194°F).
-
Do not expose the side air bag module to any oil, grease, detergent or water.
-
During disassembly, do not damage the seatback board, connectors, retainers, clips, module harness or the side air bag module.
-
Before removal and installation, use shop cloths to protect parts from damage.
-
During removal and installation, an assistant is required to protect against injury or damage.
 NOTE:
NOTE:
-
If the vehicle has been involved in a collision and the side air bag module has deployed, the seatback must be replaced.
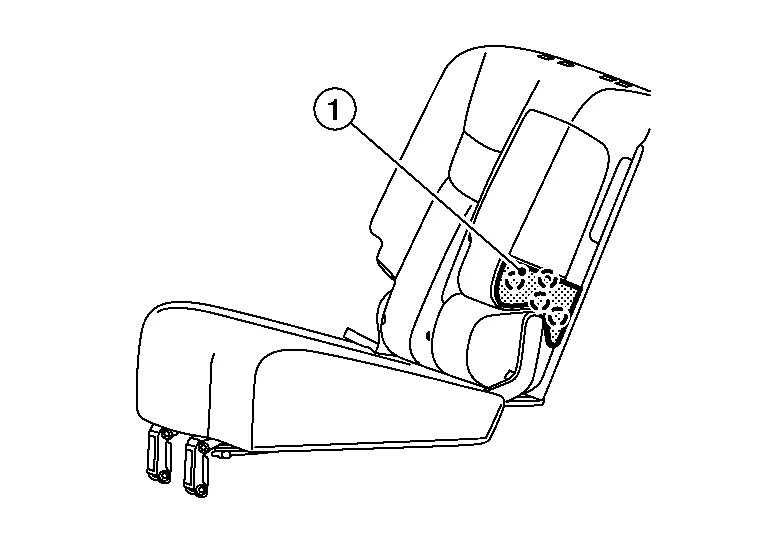
-
RH seat shown; LH seat similar.
Remove headrests.
Remove seat cushion hinge covers (LH/RH).Slide seat cushion hinge covers upward (1) to release pawls.
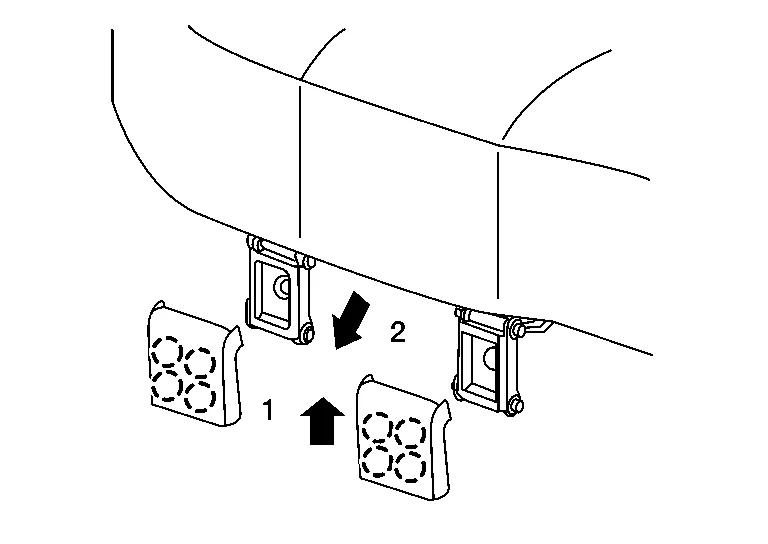
: Pawl
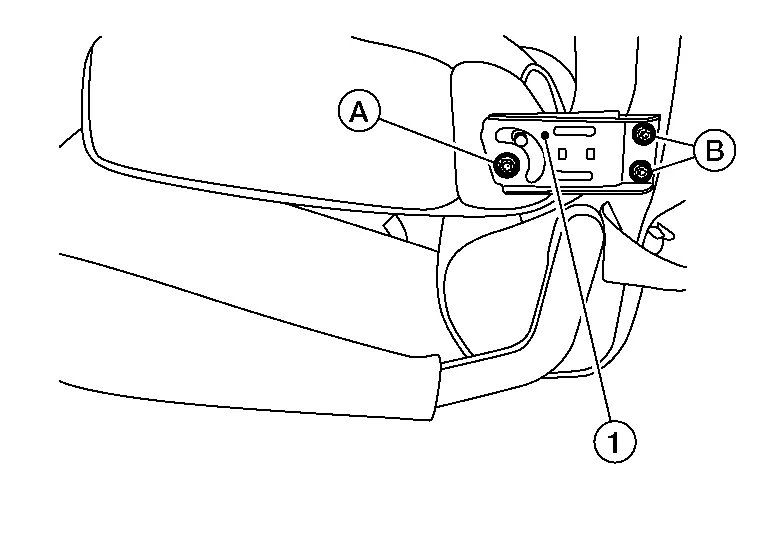
Remove two seat front bolts (A).
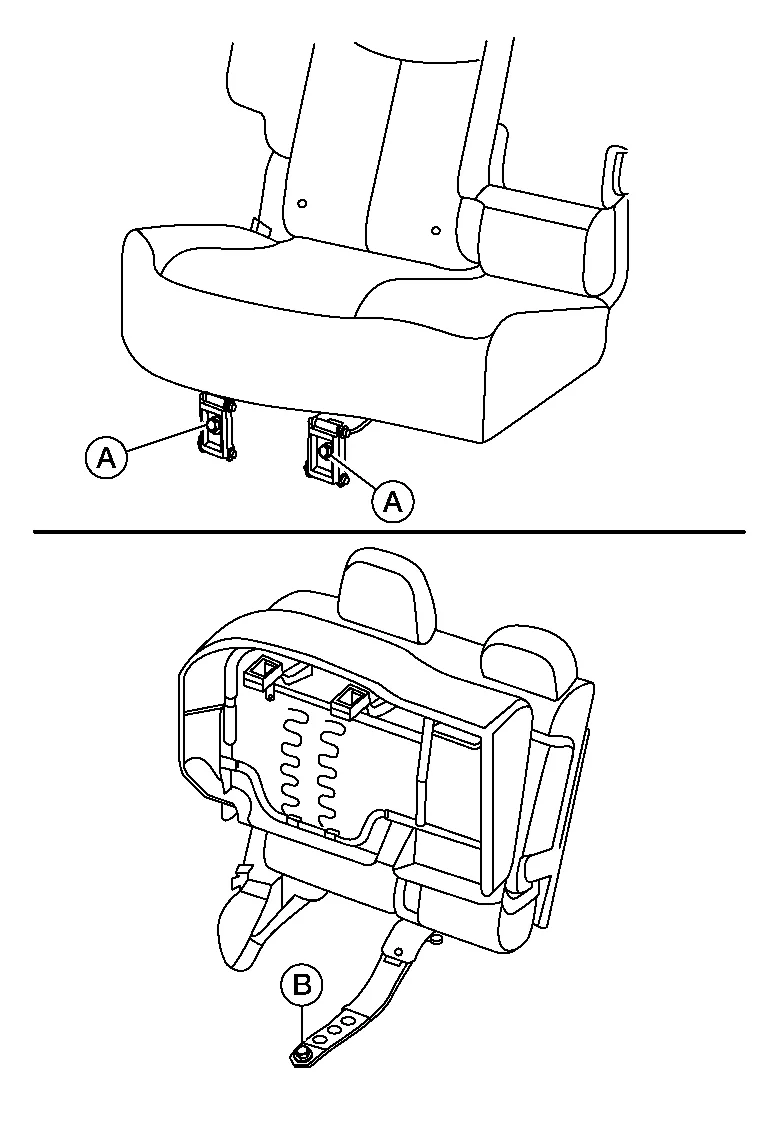
Lift and support rear seat cushion assembly using a suitable tool then remove bolt (B).
Adjust rear seat to fold flat position then remove seat rear bolts (A) and nut (B).
Disconnect negative and positive battery terminals then wait at least three minutes. Refer to Removal and Installation.
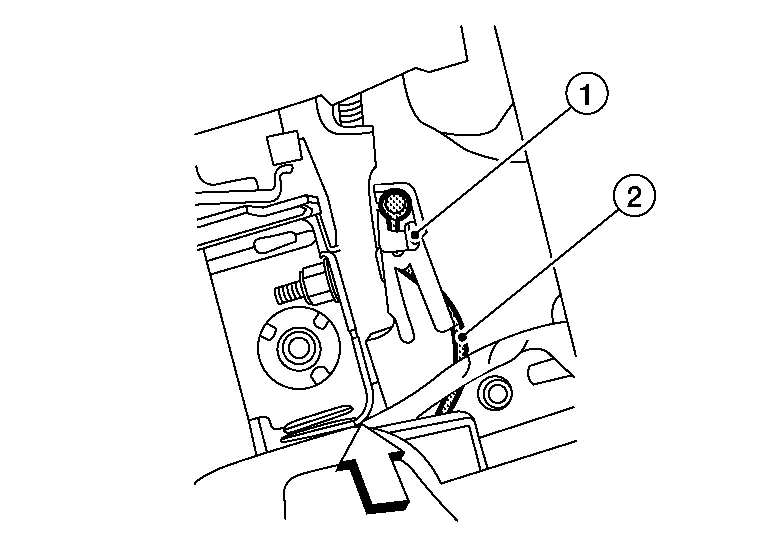
Disconnect harness connector for side air bag module.
Disconnect harness connectors from seat (LH) cushion heater (if equipped).
Release recline release cable from reclining device and remove seat.
INSTALLATION
Installation is in the reverse order of removal.
CAUTION:
-
Always route side air bag module harness in original location. Replace any deformed or damaged clips with same type and color. Always install clips in the original location in the harness.
-
After work is completed, check that no system malfunction is detected causing the air bag warning lamp to illuminate.
-
If a malfunction is detected by the air bag warning lamp after repair or replacement of the malfunction parts, perform the SRS final check. Refer to SRS Final Check.
NOTE:
-
With seat folded flat, tighten seat rear bolts and nut in the order shown.
Seat rear bolts and nut :45 N·m (4.6 Kg–m, 33 Ft–lb) -
Lift seat cushion and tighten seat front bolt (A) then lower seat cushion and tighten seat front bolts (B) in the order shown.
Seat front bolts :45 N·m (4.6 Kg–m, 33 Ft–lb)
REMOVAL
Adjust rear seat (LH) to the fold flat position.
Release pawls and remove armrest bracket outer finisher.
: Pawl
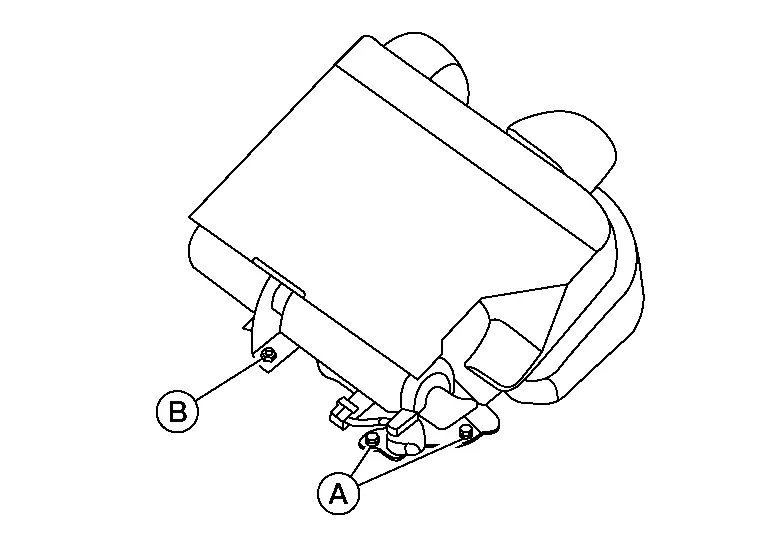
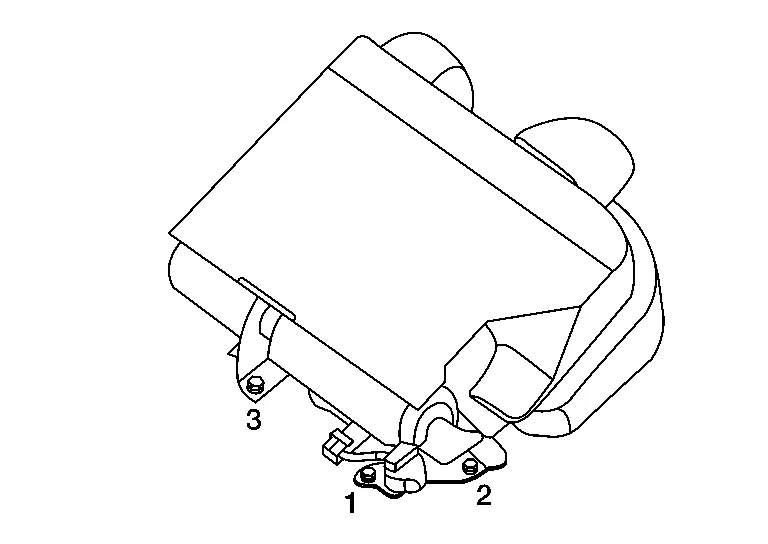
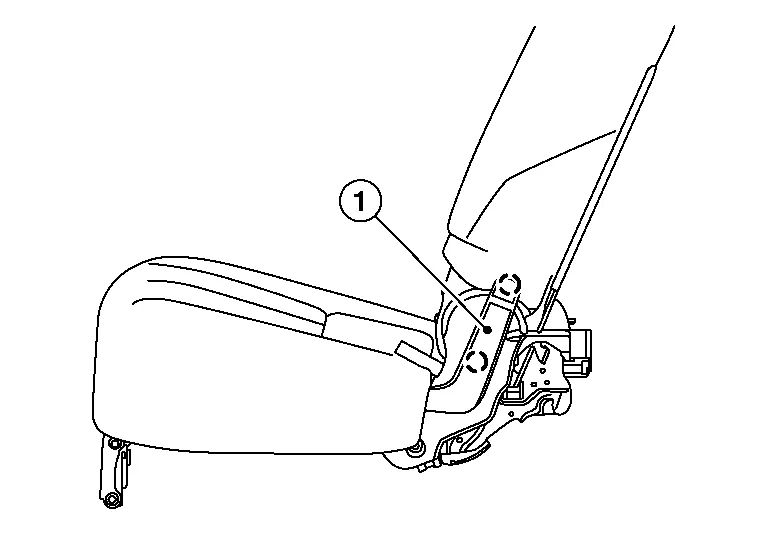
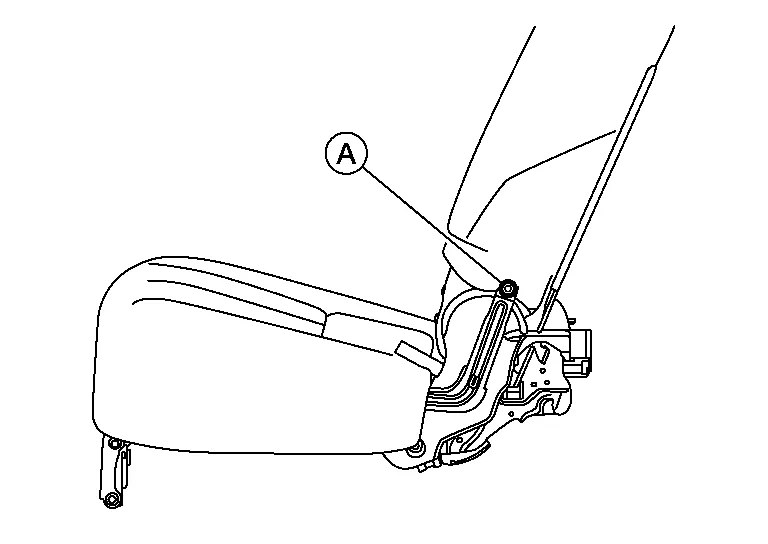
Remove bolt (A) and nuts (B), then remove armrest outer bracket (1).
Remove armrest assembly.
INSTALLATION
Installation is in the reverse order of removal.
REMOVAL
NOTE:
LH seat cushion shown; RH seat cushion similar.
Remove rear seat. Refer to Removal and Installation.
Disconnect harness connectors from seat (LH) cushion heater (if equipped) and release harness from attachments.
NOTE:
Take note of harness routing and attachment location for correct installation.
Release pawls and remove seat cushion link cover (RH/LH).
: Pawl
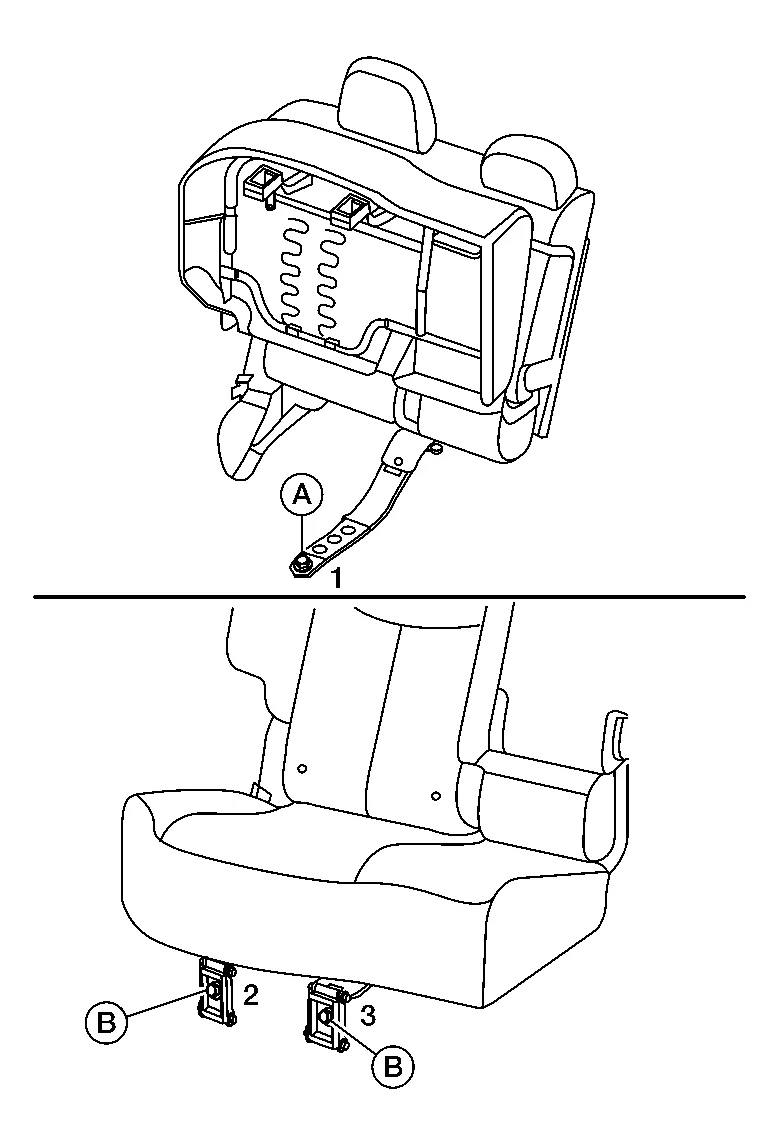
Remove seat cushion link bolt (RH/LH) (A) and remove seat cushion.
INSTALLATION
Installation is in the reverse order of removal.
NOTE:
Tighten seat cushion link bolt to specification. Refer to Exploded View.
REMOVAL
NOTE:
LH shown; RH similar.
Remove luggage side lower finisher. Refer to Removal and Installation (LH) or Removal and Installation (RH).
Remove nuts (A) and recline release cable assembly (1).
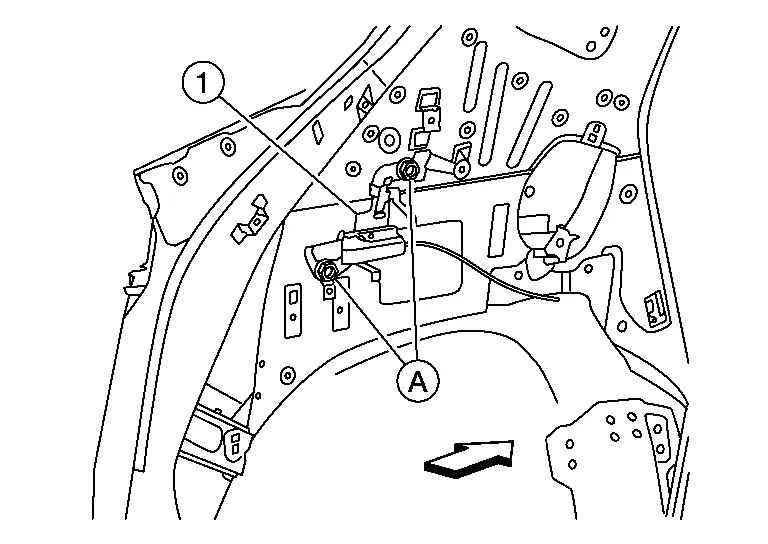
![]() : Front
: Front
Remove recline release cable (1) from clips (A).
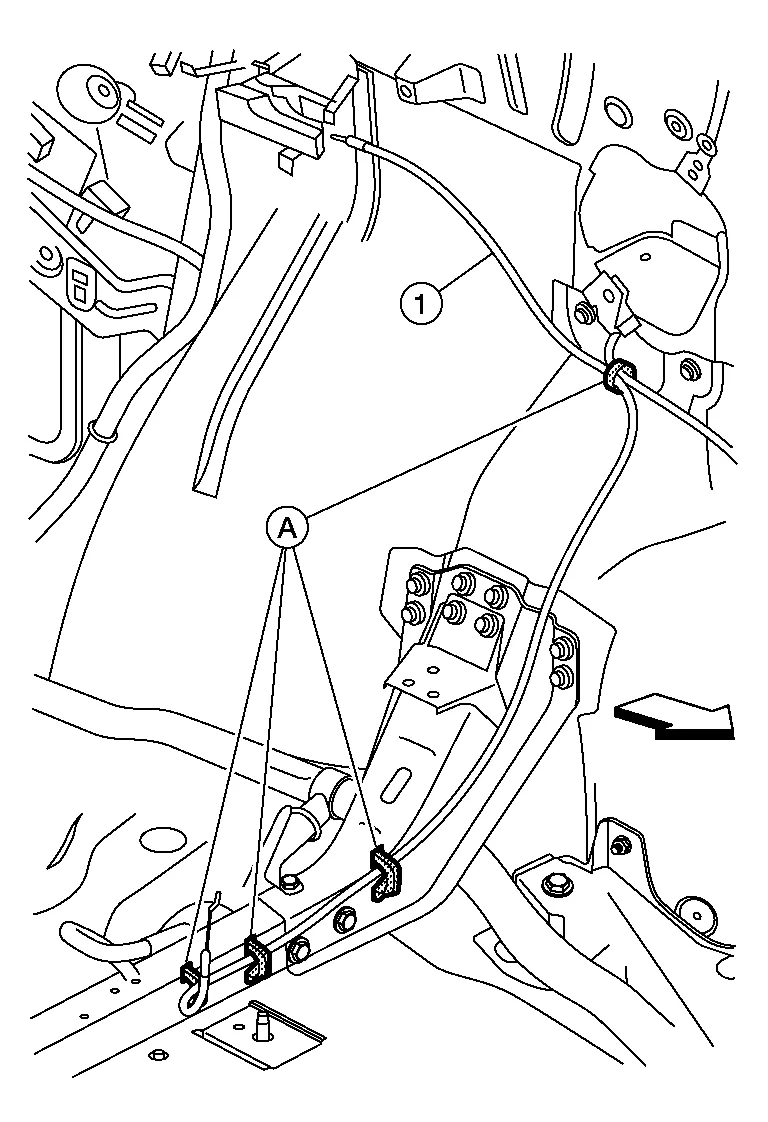
![]() : Front
: Front
CAUTION:
Note cable routing for correct installation.
Remove recline release cable assembly (2) from rear seat (LH) recline device assembly (1).
![]() : Front
: Front
INSTALLATION
Installation is in the reverse order of removal.
CAUTION:
Route cables correctly for proper function.
REMOVAL
Remove center console tray mat. Refer to Exploded View.
Remove screw and release clips then remove center console tray.
Remove screws (A) and release clips using a suitable tool then remove center console rear finisher (1).

 : Metal clip
Remove screws (A) and release pawls then remove second row heated seat switches (1).
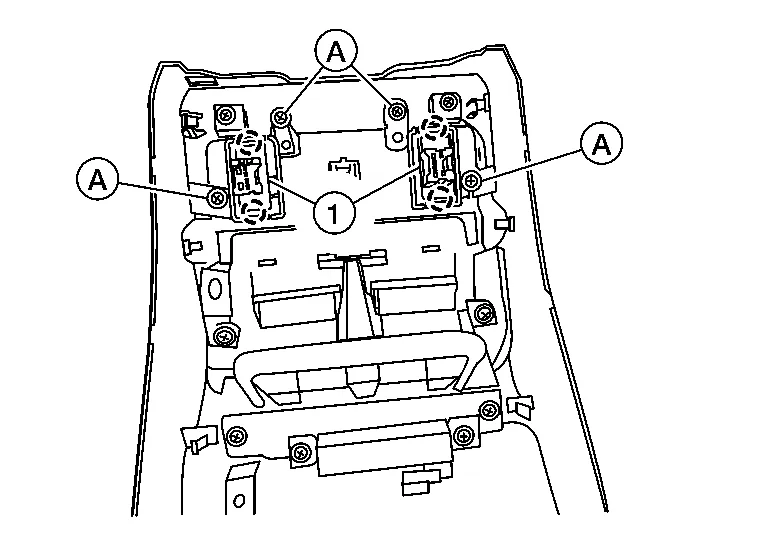
: Pawl
INSTALLATION
Installation is in the reverse order of removal.
REMOVAL and INSTALLATION
Seat Heater - Seat cushion pad
The seat heater and seat cushion pad are serviced as an assembly.
If replacing the seat heater replace the seat cushion pad. Refer to Seat Cushion (LH) or Seat Cushion (RH).
Seat Heater - Seatback pad
The seat heater and seatback pad are serviced as an assembly.
If replacing the seatback heater replace the seat cushion pad. Refer to Seatback (LH) or Seatback (RH).
 Front Seat
Exploded View
DRIVER SEAT WITH CLIMATE CONTROL 1.
Headrest
2.
Seat cushion trim
3.
Seat cushion pad
4.
Seatback assembly
5.
Seat cushion outer finisher (RH)
6...

Other information:
Nissan Murano (Z52) 2015-2024 Owners Manual: System malfunction
If the RAB system malfunctions, it will be turned off automatically, and the RAB system warning light will illuminate in the vehicle information display. Action to take If the warning light illuminates, park the vehicle in a safe location, turn the engine off, and restart the engine...
Nissan Murano (Z52) 2015-2024 Service Manual: P1212 Tcs Communication Line
DTC Description DESCRIPTIONThis CAN communication line is used to control the smooth engine operation during the TCS operation. Pulse signals are exchanged between ECM and “ABS actuator and electric unit (control unit)”.Be sure to erase the malfunction information such as DTC not only for “ABS actuator and electric unit (control unit)” but also for ECM after TCS related repair...
Categories
- Manuals Home
- Nissan Murano Owners Manual
- Nissan Murano Service Manual
- Vehicle Dynamic Control (VDC) OFF switch
- Checking engine oil level
- Indicator lights
- New on site
- Most important about car
Unfastening the seat belts. Checking seat belt operation
Unfastening the seat belts
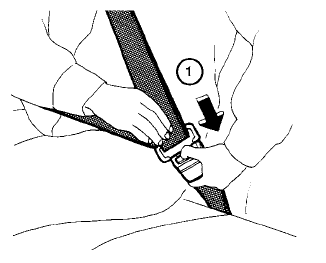
To unfasten the seat belt, press the button
on the buckle  . The seat belt
automatically
retracts.
. The seat belt
automatically
retracts.