Nissan Murano: Seat :: Removal and Installation / Front Seat
DRIVER SEAT WITH CLIMATE CONTROL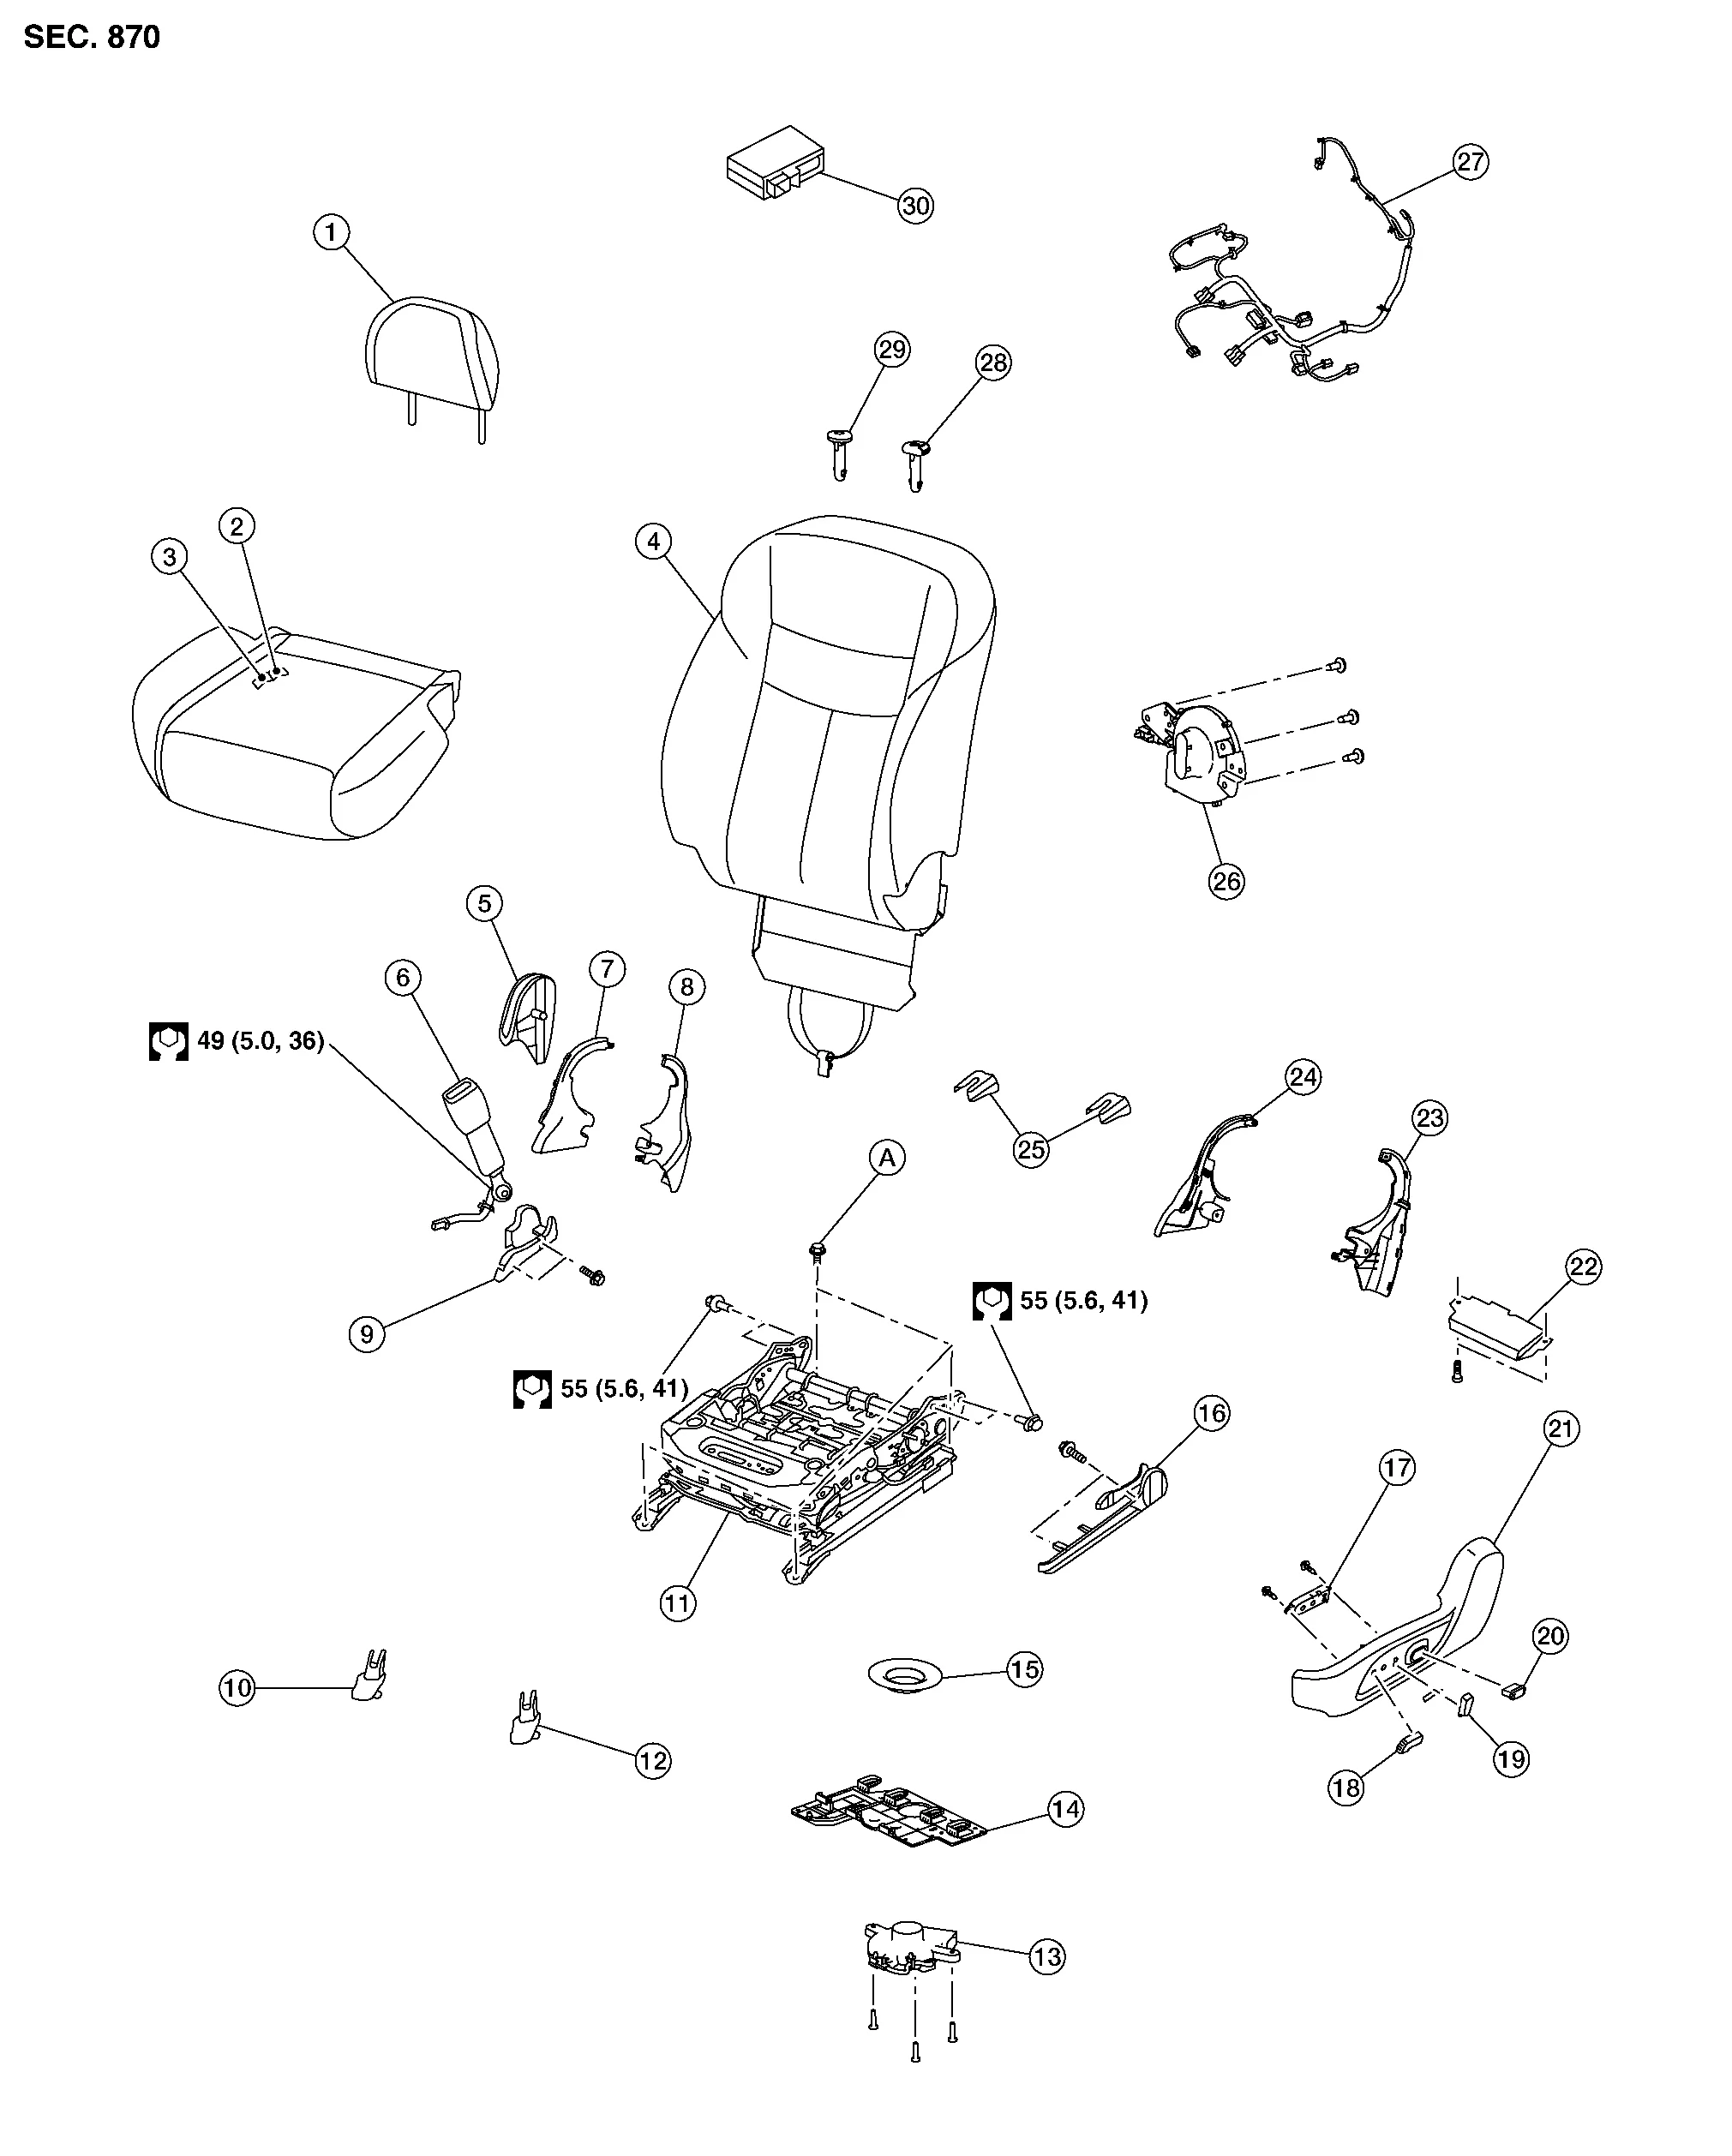
| 1. | Headrest | 2. | Seat cushion trim | 3. | Seat cushion pad |
| 4. | Seatback assembly | 5. | Seat cushion outer finisher (RH) | 6. | Seat belt buckle |
| 7. | Seat cushion inner finisher [RH (front)] | 8. | Seat cushion inner finisher [RH (rear)] | 9. | Slide finisher outer (RH) |
| 10. | Front slide finisher (RH) | 11. | Seat frame assembly | 12. | Front slide finisher (LH) |
| 13. | Seat cushion blower | 14. | Blower motor bracket | 15. | Blower motor nozzle |
| 16. | Slide finisher outer (LH) | 17. | Power seat switch | 18. | Seat slide knob |
| 19. | Seat recline knob | 20. | Lumbar support switch | 21. | Seat cushion outer finisher (LH) |
| 22. | Driver seat control unit | 23. | Seat cushion inner finisher [LH (rear)] | 24. | Seat cushion inner finisher [LH (front)] |
| 25. | Rear slide finisher | 26. | Seat back blower | 27. | Seat harness |
| 28. | Headrest holder (locked) | 29. | Headrest holder (free) | 30. | Climate controlled seat control unit |
| A. | Refer to Removal and Installation. |
DRIVER SEAT WITHOUT CLIMATE CONTROL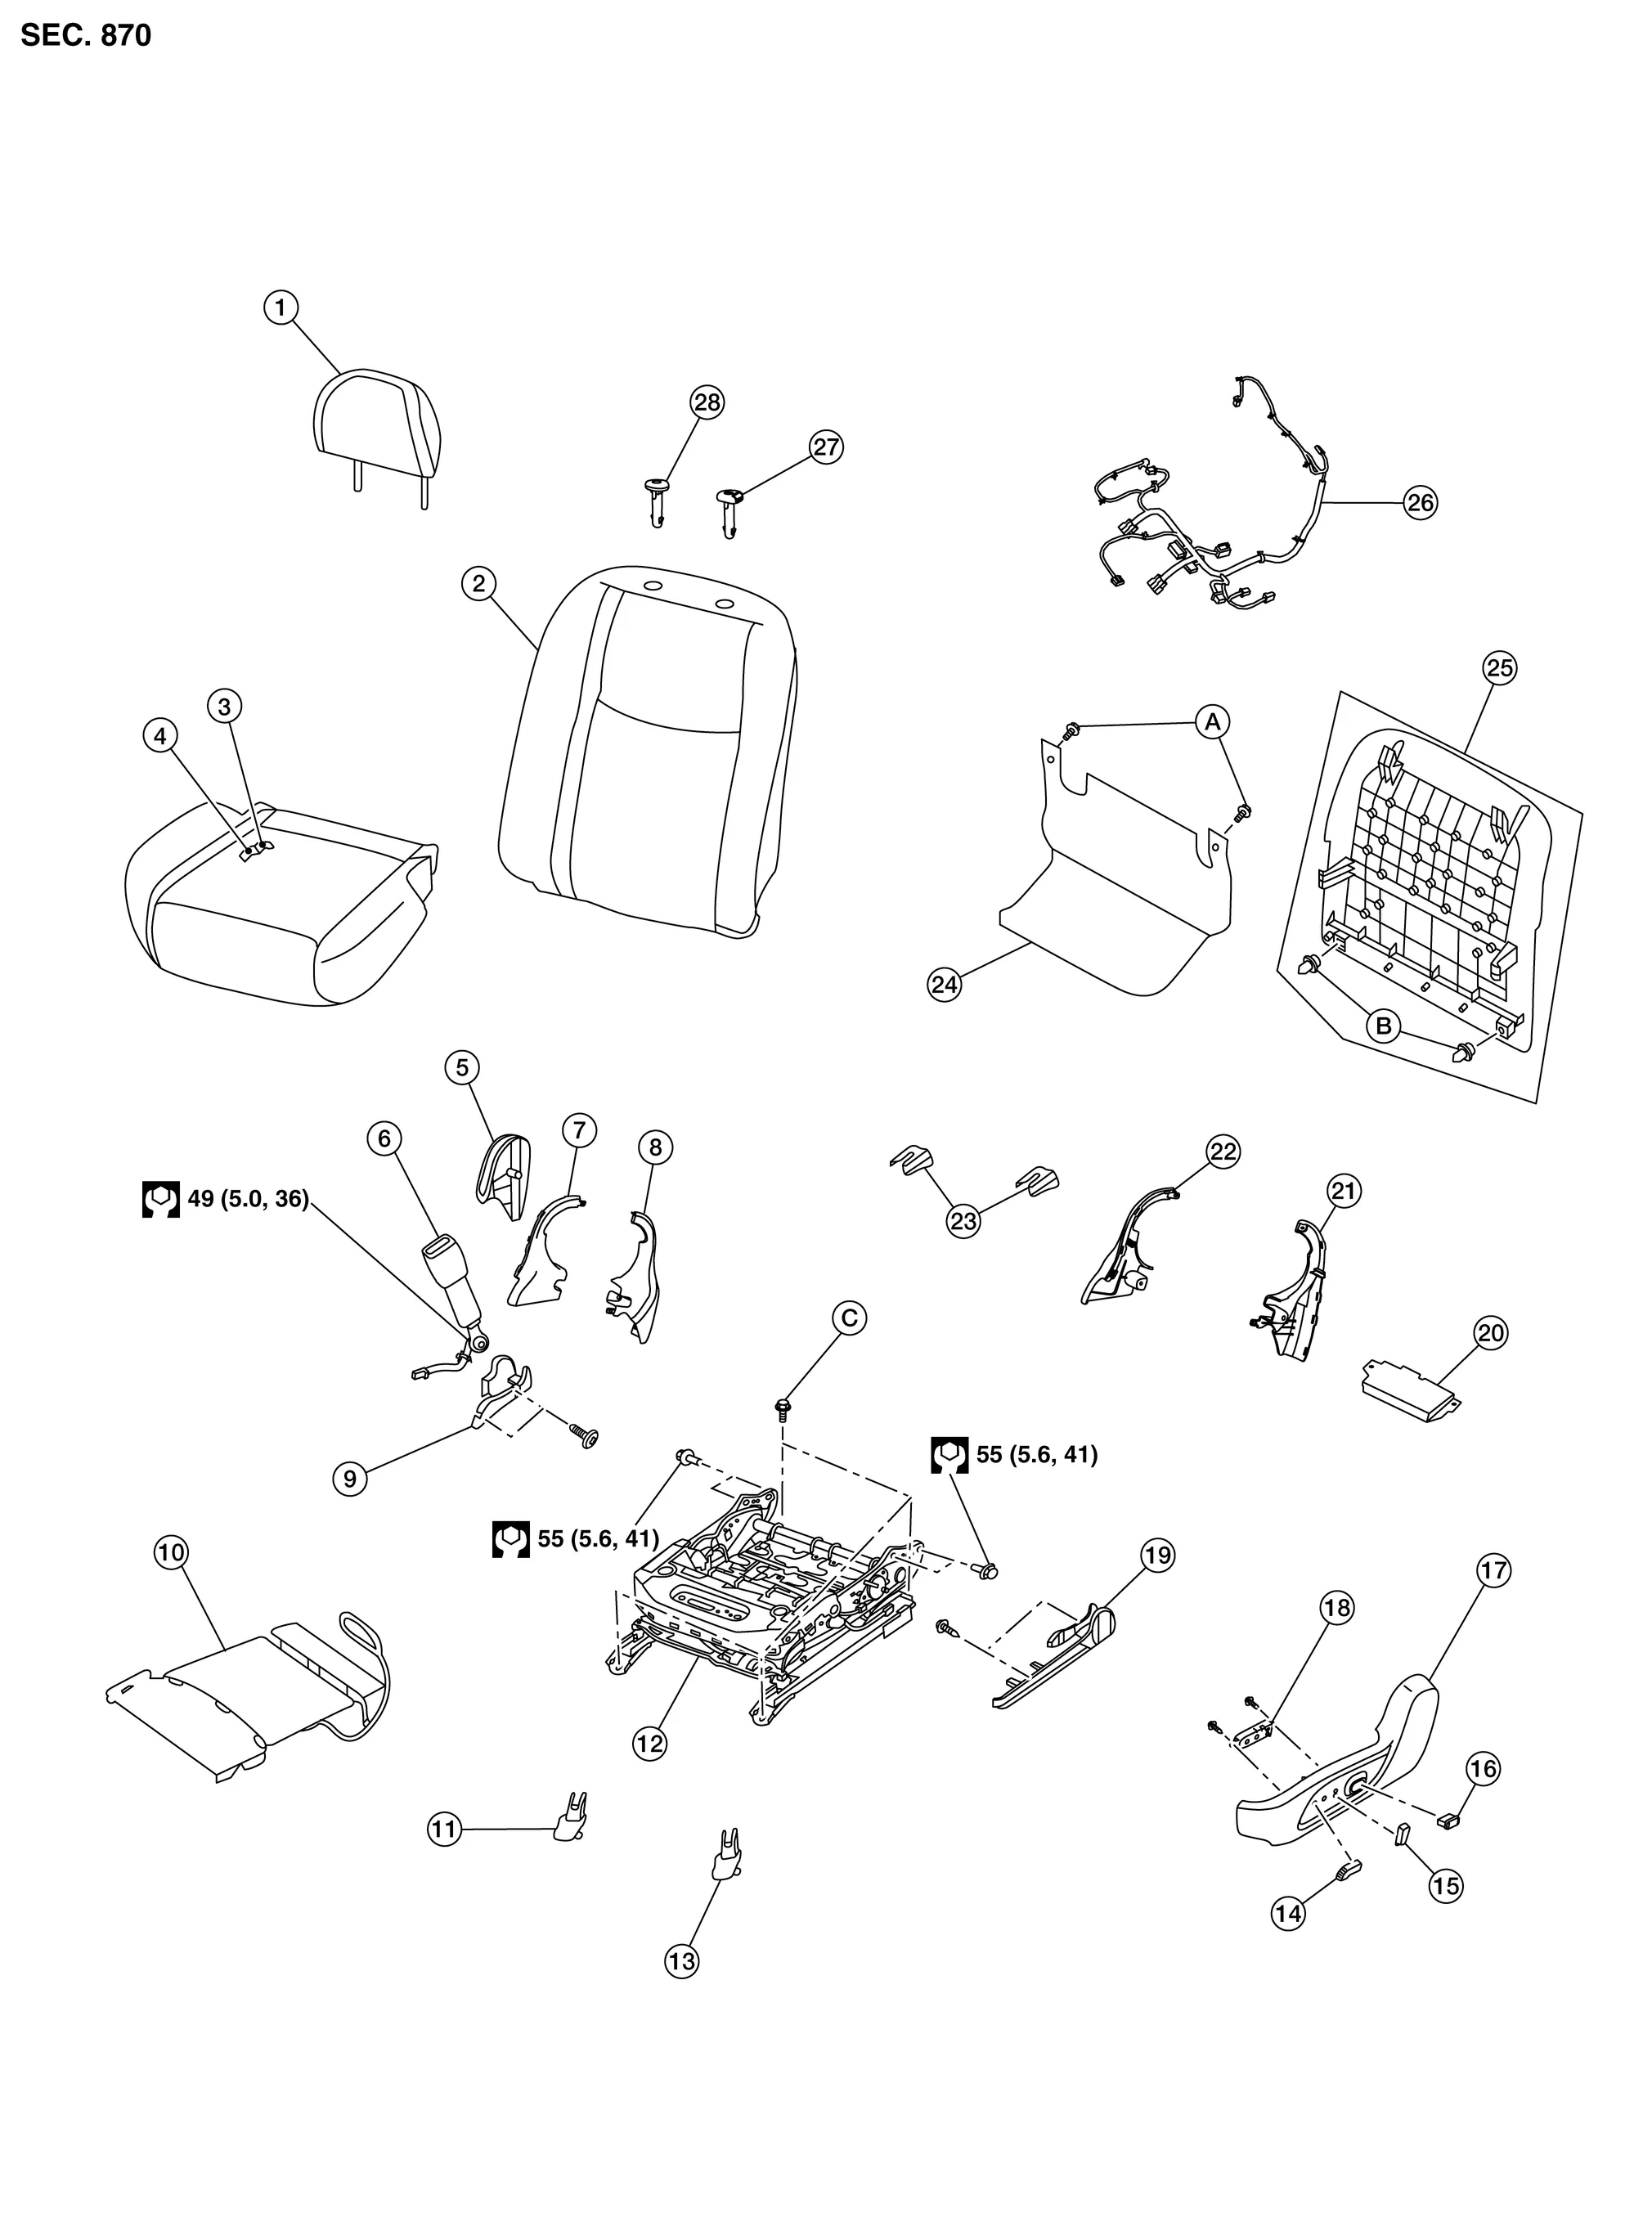
| 1. | Headrest | 2. | Seatback assembly | 3. | Seat cushion trim |
| 4. | Seat cushion pad | 5. | Seat cushion outer finisher (RH) | 6. | Seat belt buckle |
| 7. | Seat cushion inner finisher [RH (front)] | 8. | Seat cushion inner finisher [RH (rear)] | 9. | Slide finisher outer (RH) |
| 10. | Front seat heater (if equipped) | 11. | Front slide finisher (RH) | 12. | Seat frame assembly |
| 13. | Front slide finisher (LH) | 14. | Seat slide knob | 15. | Seat recline knob |
| 16. | Lumbar support switch | 17. | Seat cushion outer finisher (LH) | 18. | Power seat switch |
| 19. | Slide finisher outer (LH) | 20. | Driver seat control unit | 21. | Seat cushion inner finisher [LH (rear)] |
| 22. | Seat cushion inner finisher [LH (front)] | 23. | Rear slide finisher | 24. | Rear hinge cover |
| 25. | Seatback board | 26. | Seat harness | 27. | Headrest holder (locked) |
| 28. | Headrest holder (free) | A. | Rear hinge cover clips | B. | Seatback board clips |
| C. | Refer to Removal and Installation. |
DRIVER SEAT - MANUAL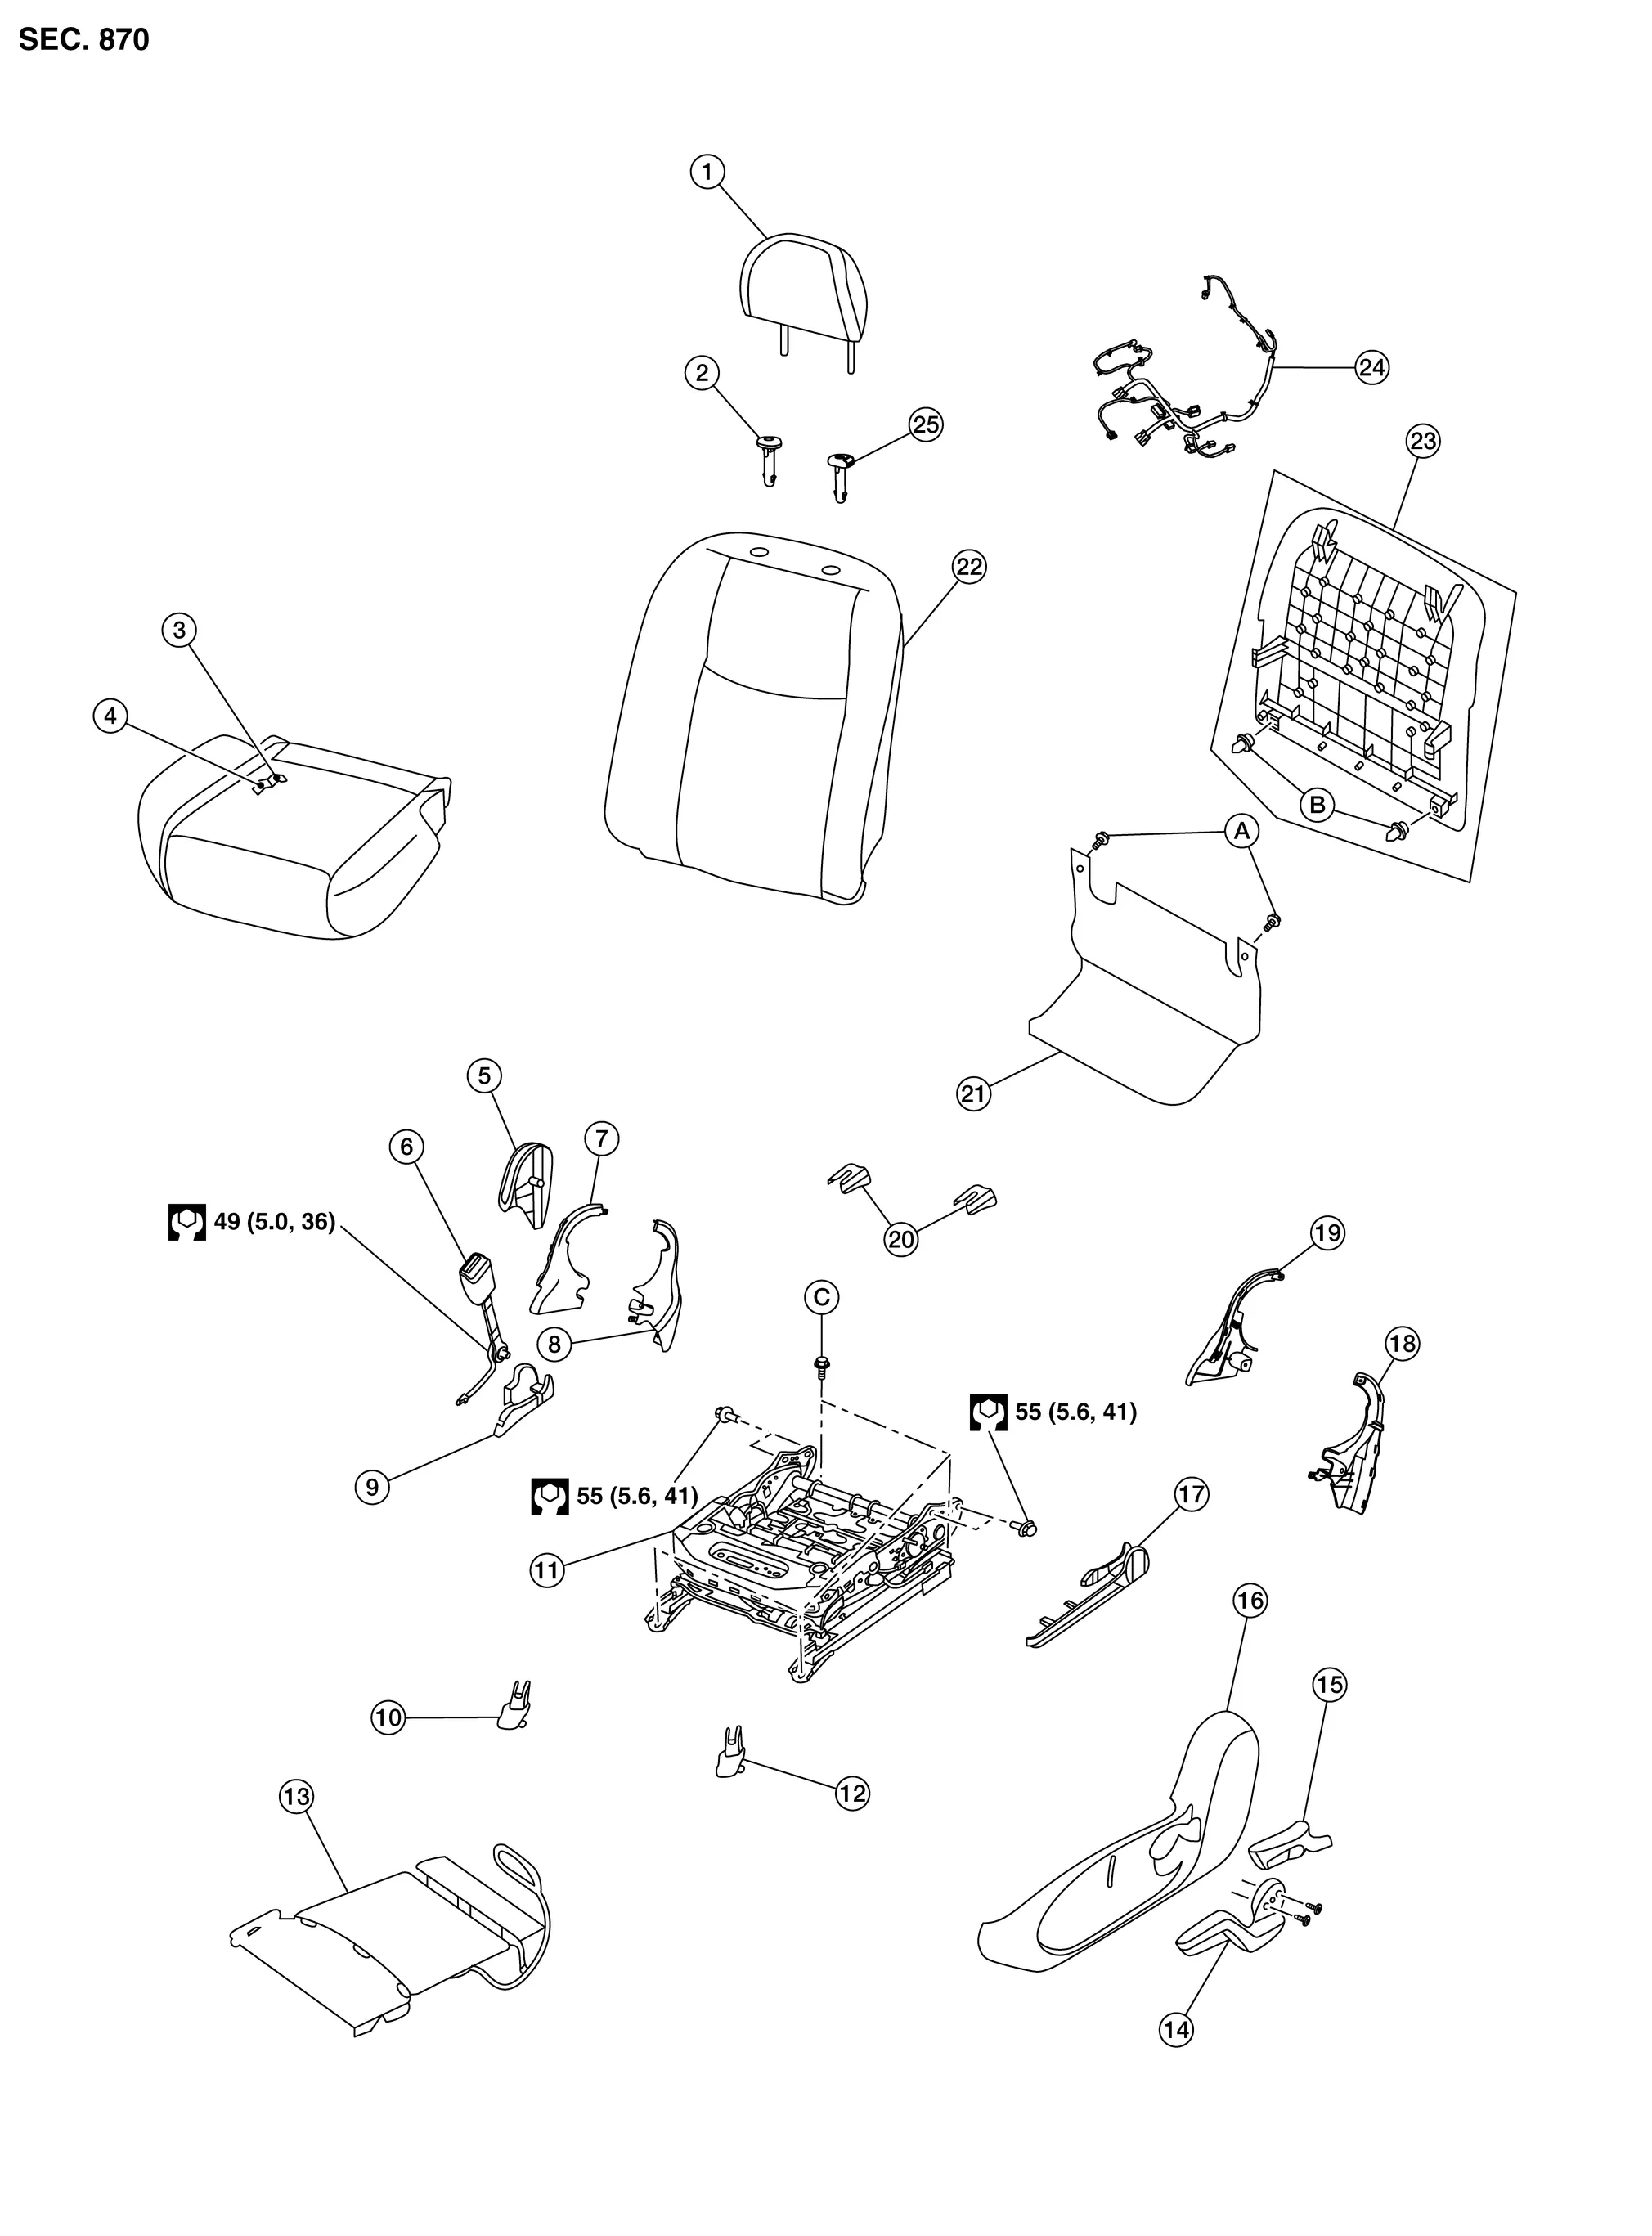
| 1. | Headrest | 2. | Headrest holder (free) | 3. | Seat cushion trim |
| 4. | Seat cushion pad | 5. | Seat cushion outer finisher (RH) | 6. | Seat belt buckle |
| 7. | Seat cushion inner finisher [RH (front)] | 8. | Seat cushion inner finisher [RH (rear)] | 9. | Slide finisher outer (RH) |
| 10. | Front slide finisher (RH) | 11. | Seat frame assembly | 12. | Front slide finisher (LH) |
| 13. | Front seat heater (if equipped) | 14. | Lift lever | 15. | Recline lever finisher |
| 16. | Seat cushion outer finisher (LH) | 17. | Slide finisher outer (LH) | 18. | Seat cushion inner finisher [LH (rear)] |
| 19. | Seat cushion inner finisher [LH (front)] | 20. | Rear slide finisher | 21. | Rear hinge cover |
| 22. | Seatback assembly | 23. | Seatback board | 24. | Seat harness |
| 25. | Headrest holder (locked) | A. | Rear hinge cover clips | B. | Seatback board clips |
| C. | Refer to Removal and Installation. |
PASSENGER SEAT WITH CLIMATE CONTROL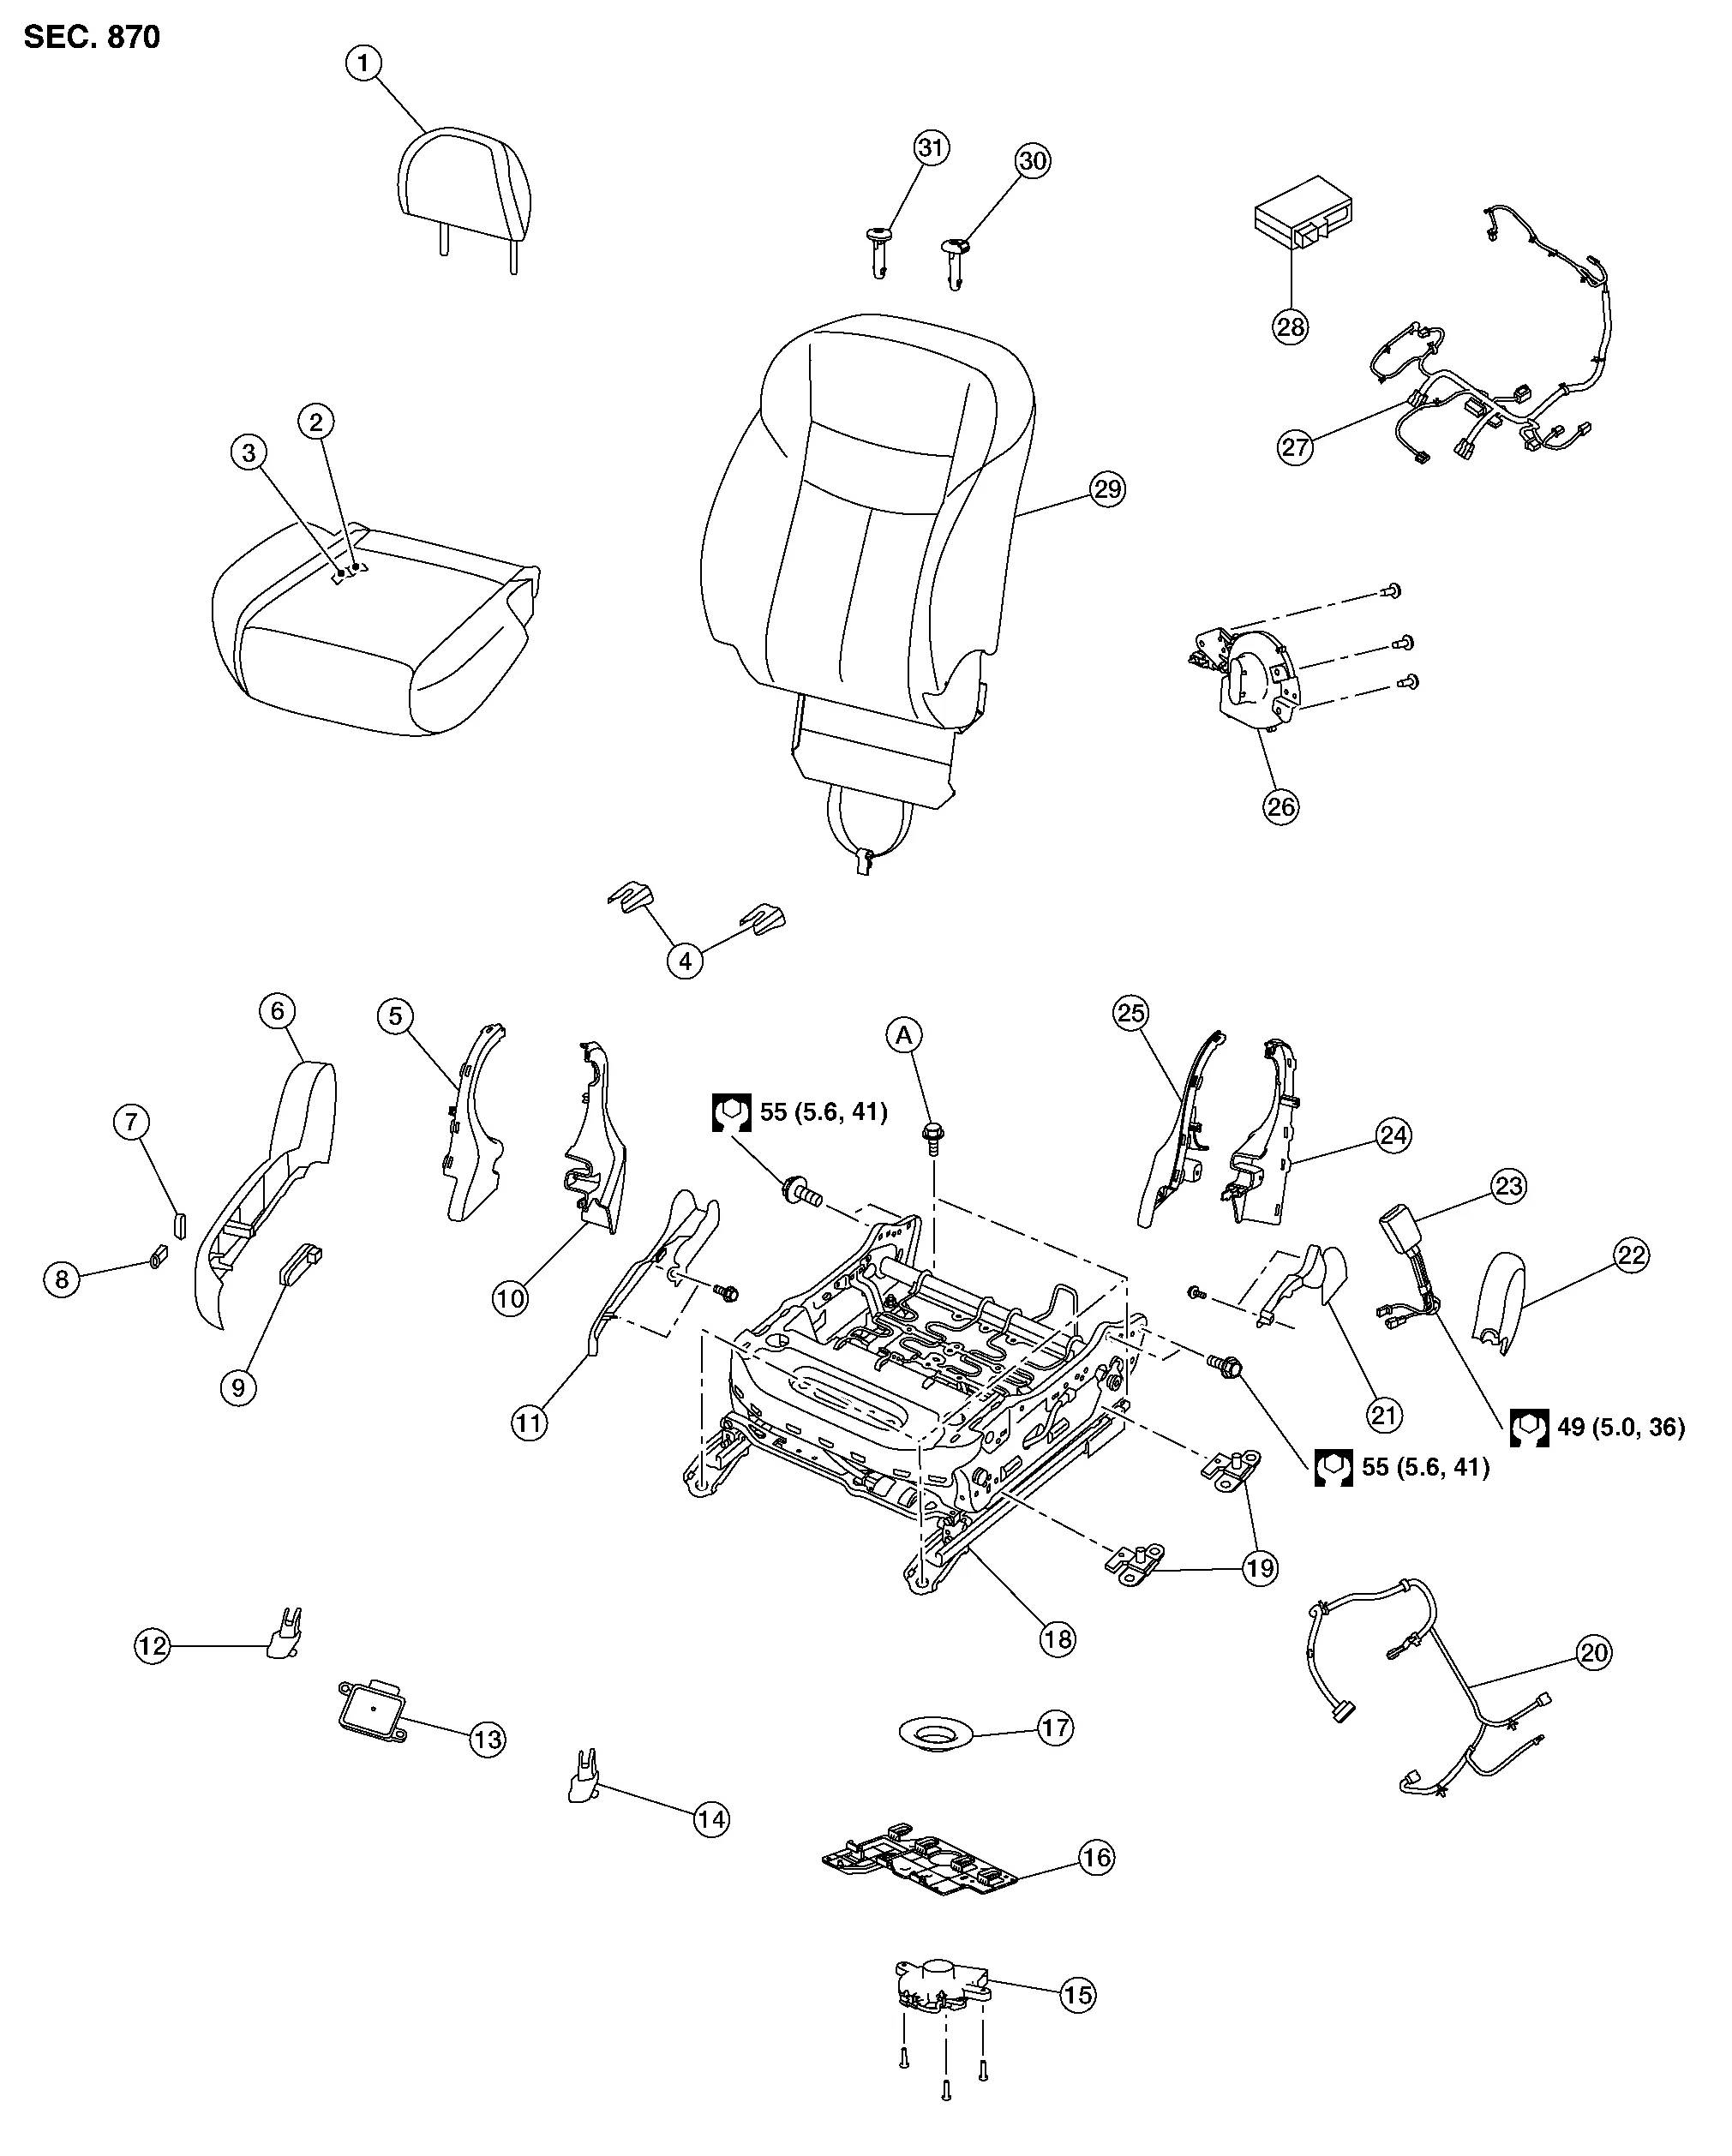
| 1. | Headrest | 2. | Seat cushion trim | 3. | Seat cushion pad |
| 4. | Rear slide finisher | 5. | Seat cushion inner finisher [RH (front)] | 6. | Seat cushion outer finisher (RH) |
| 7. | Seat recline knob | 8. | Seat slide knob | 9. | Power seat switch |
| 10. | Seat cushion inner finisher [RH (rear)] | 11. | Slide finisher outer (RH) | 12. | Front slide finisher (RH) |
| 13. | Occupant Classification System control unit | 14. | Front slide finisher (LH) | 15. | Seat cushion blower |
| 16. | Blower motor bracket | 17. | Blower motor nozzle | 18. | Seat frame assembly |
| 19. | Occupant Classification System sensor | 20. | Occupant Classification System harness | 21. | Slide finisher outer (LH) |
| 22. | Seat cushion outer finisher (LH) | 23. | Seat belt buckle | 24. | Seat cushion inner finisher [LH (rear)] |
| 25. | Seat cushion inner finisher [LH (front)] | 26. | Seat back blower | 27. | Seat harness |
| 28. | Climate controlled seat control unit | 29. | Seatback assembly | 30. | Headrest holder (locked) |
| 31. | Headrest holder (free) | A. | Refer to Removal and Installation. |
PASSENGER SEAT WITHOUT CLIMATE CONTROL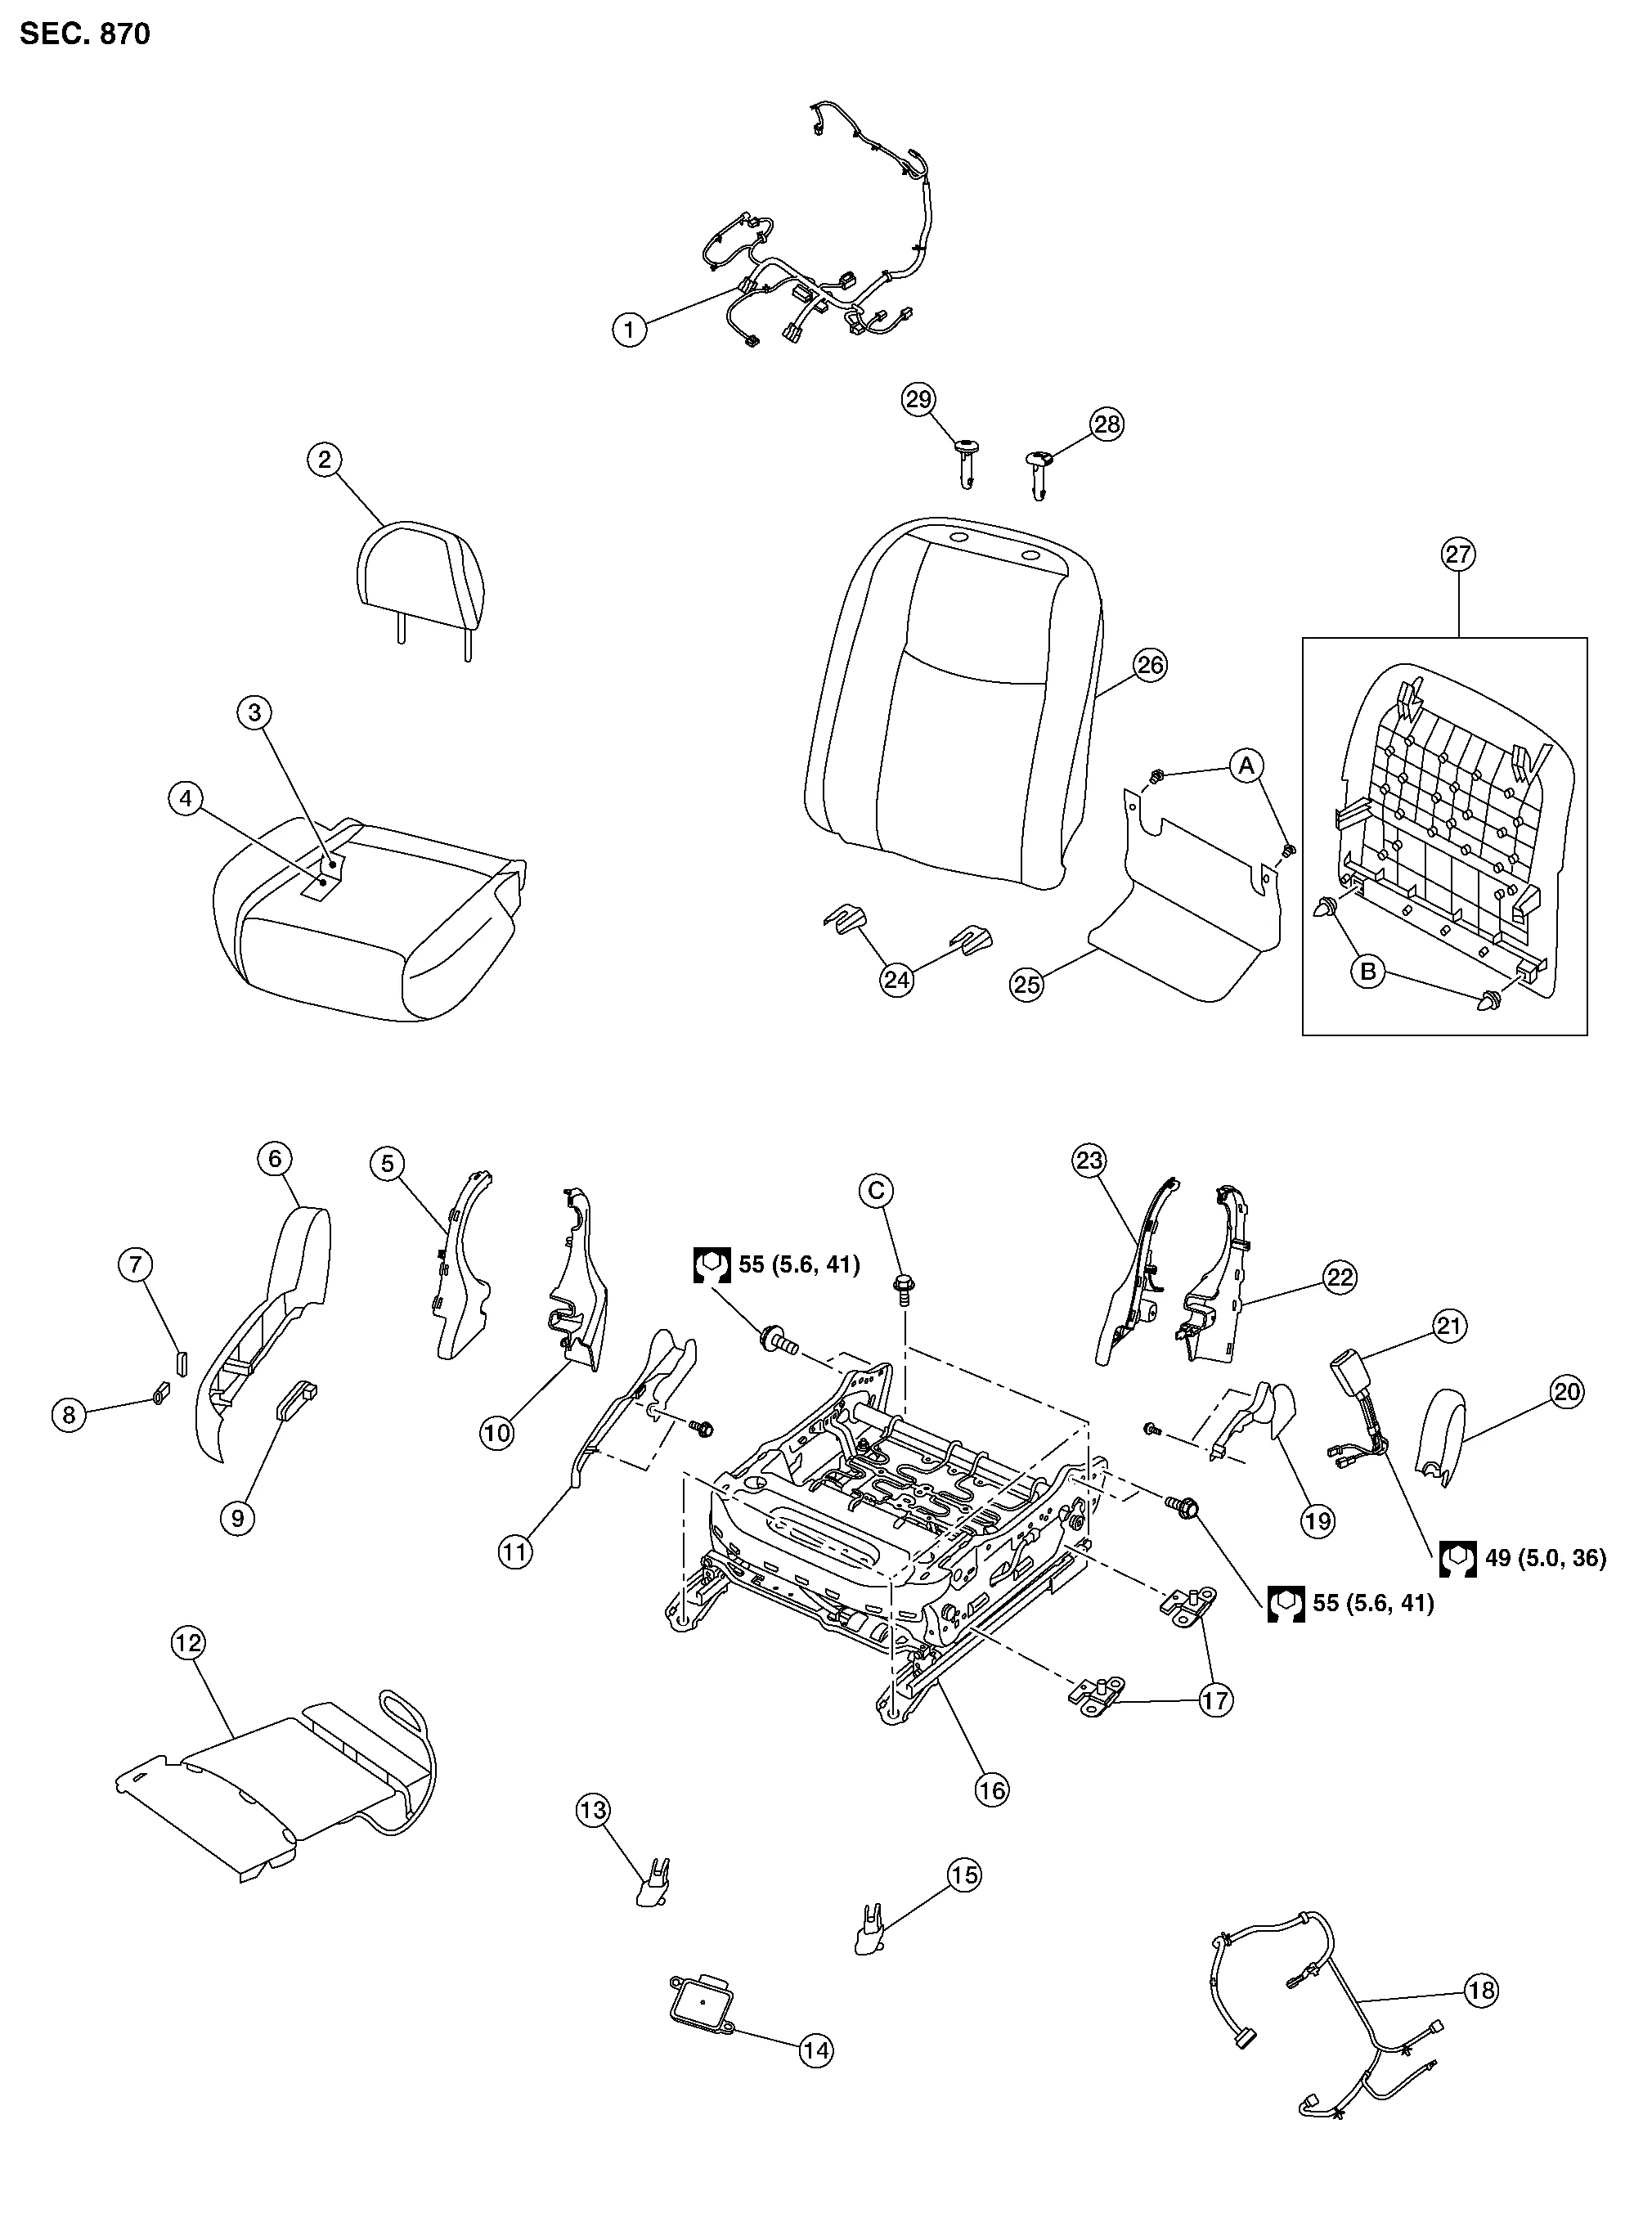
| 1. | Seat harness | 2. | Headrest | 3. | Seat cushion trim |
| 4. | Seat cushion pad | 5. | Seat cushion inner finisher [RH (front)] | 6. | Seat cushion outer finisher (RH) |
| 7. | Seat recline knob | 8. | Seat slide knob | 9. | Power seat switch |
| 10. | Seat cushion inner finisher [RH (rear)] | 11. | Slide finisher outer (RH) | 12. | Front seat heater (if equipped) |
| 13. | Front slide finisher (RH) | 14. | Occupant Classification System control unit | 15. | Front slide finisher (LH) |
| 16. | Seat frame assembly | 17. | Occupant Classification System sensor | 18. | Occupant Classification System harness |
| 19. | Slide finisher outer (LH) | 20. | Seat cushion outer finisher (LH) | 21. | Seat belt buckle |
| 22. | Seat cushion inner finisher [LH (rear)] | 23. | Seat cushion inner finisher [LH (front)] | 24. | Rear slide finisher |
| 25. | Seat hinge cover | 26. | Seatback assembly | 27. | Seatback board |
| 28. | Headrest holder (locked) | 29. | Headrest holder (free) | A. | Rear hinge cover clips |
| B. | Seatback board clips | C. | Refer to Removal and Installation. |
PASSENGER SEAT - MANUAL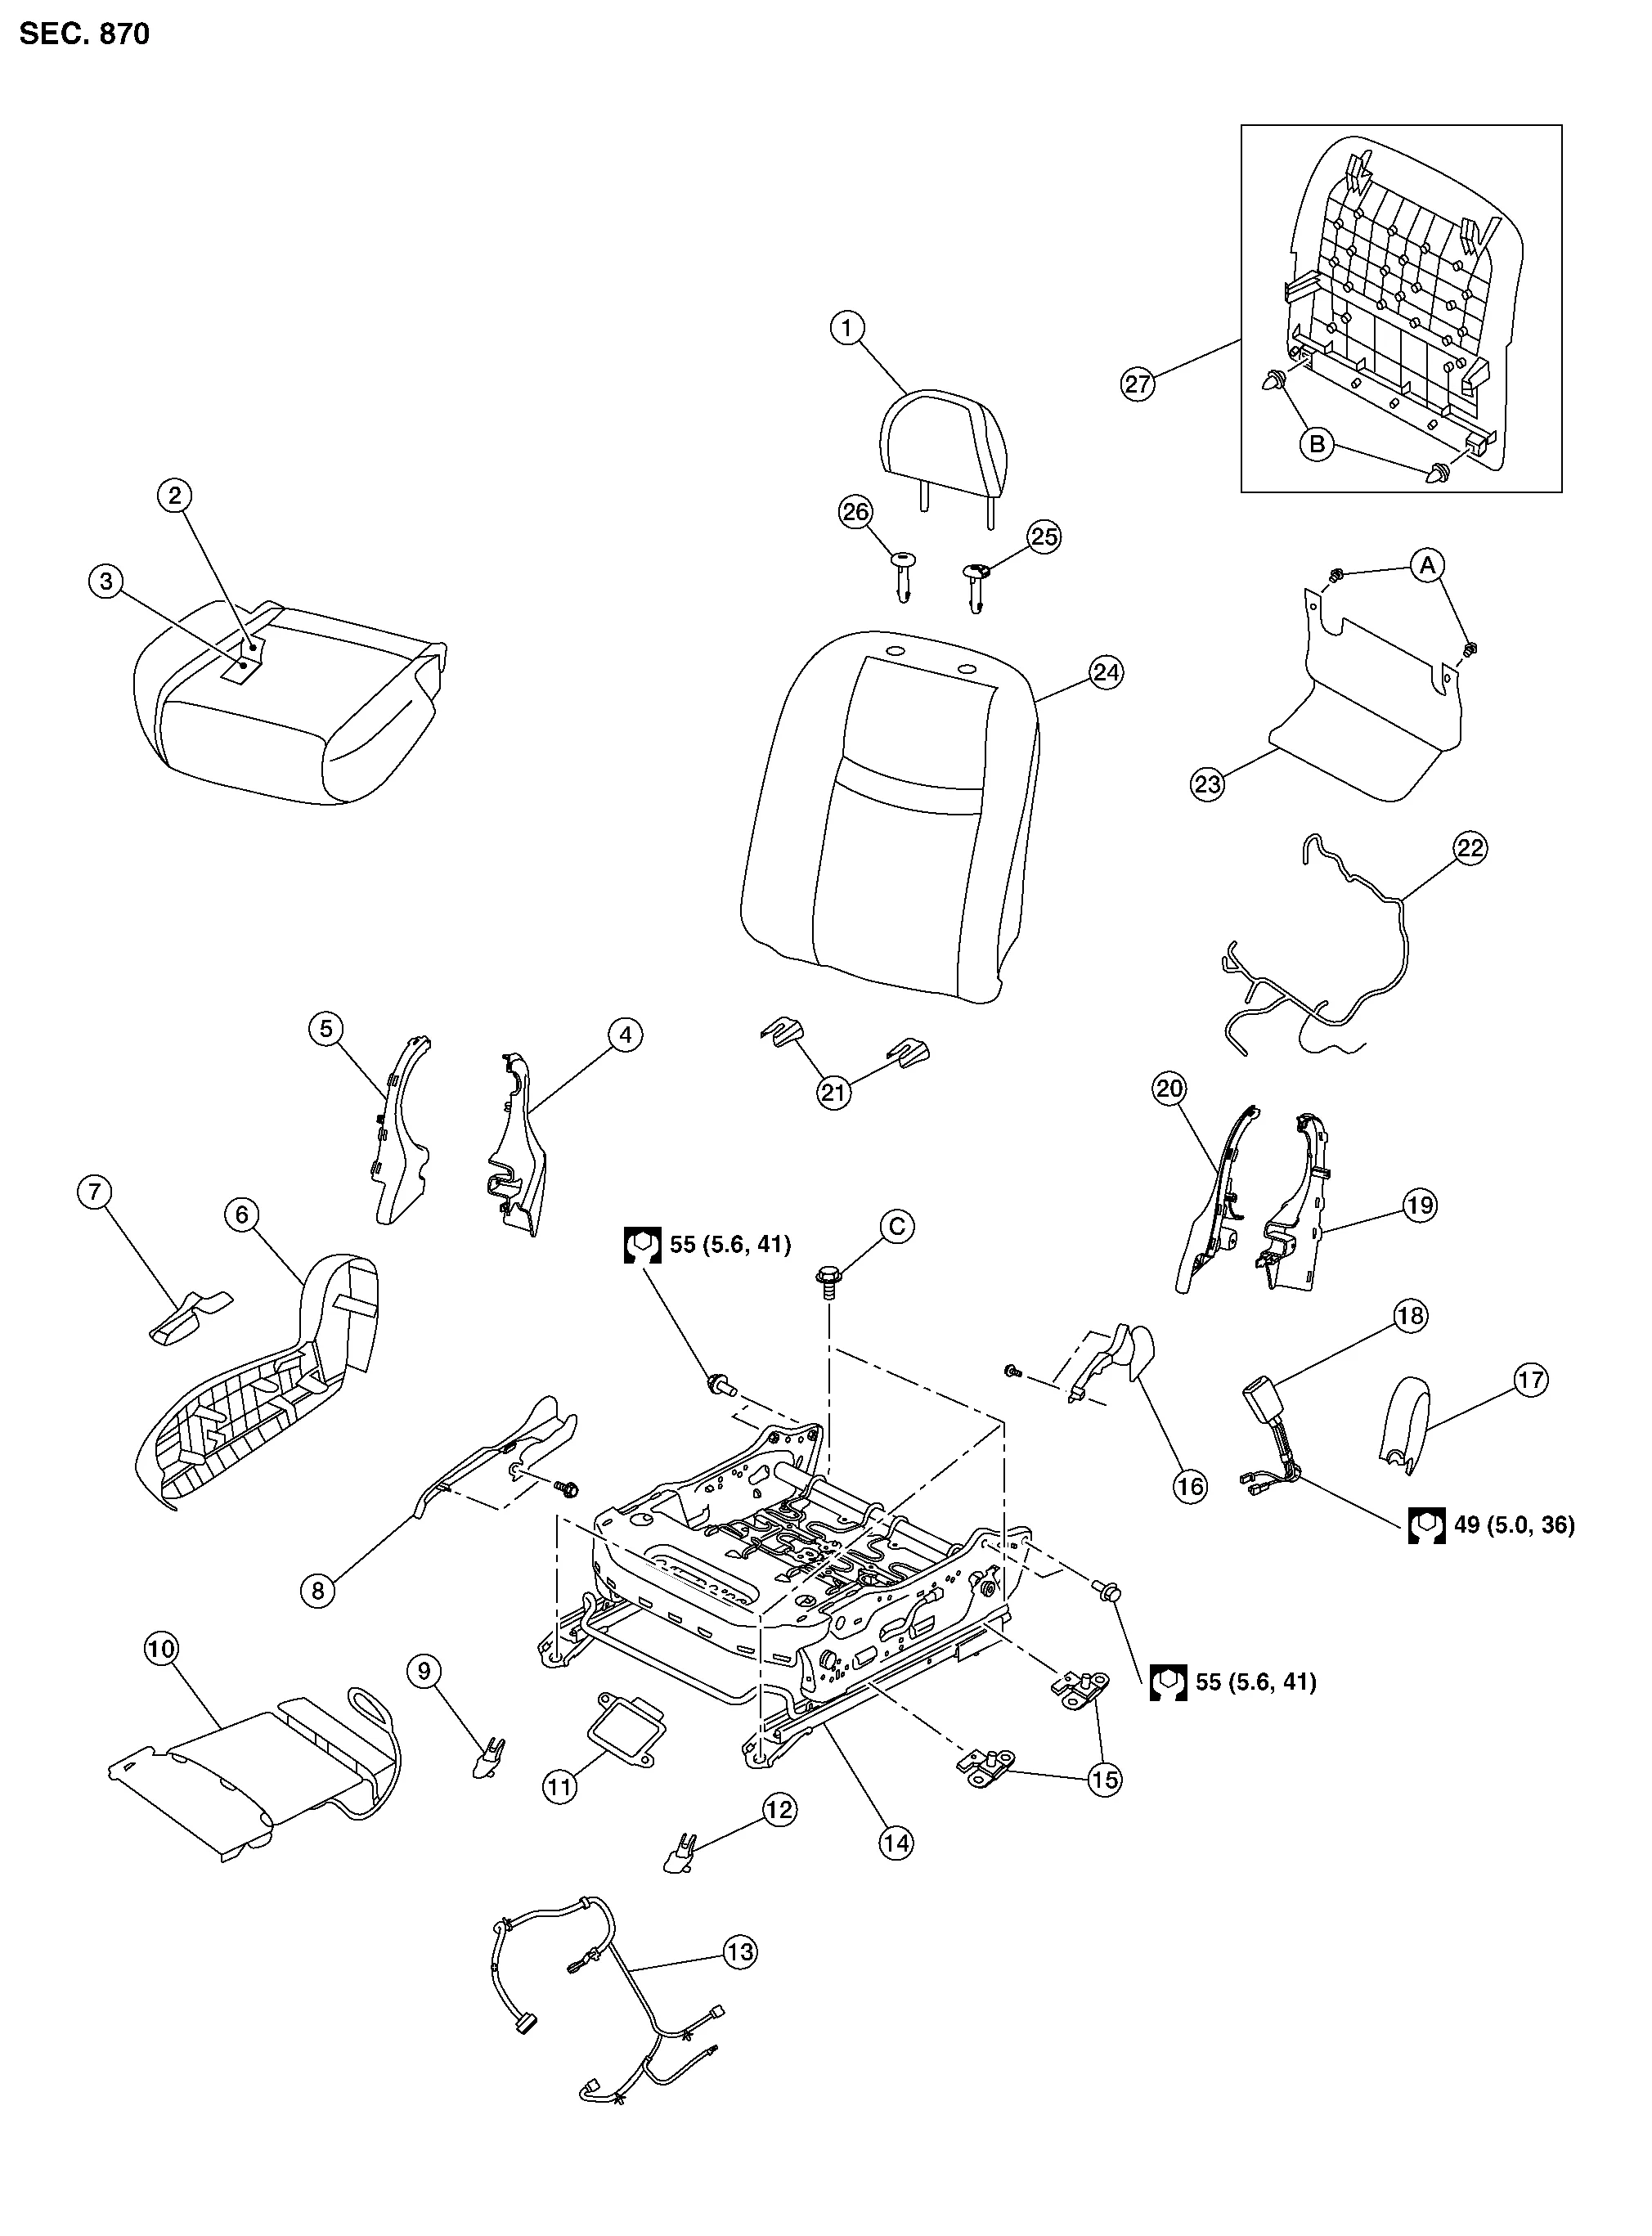
| 1. | Headrest | 2. | Seat cushion trim | 3. | Seat cushion pad |
| 4. | Seat cushion inner finisher [RH (rear)] | 5. | Seat cushion inner finisher [RH (front)] | 6. | Seat cushion outer finisher (RH) |
| 7. | Front slide finisher (RH) | 8. | Slide finisher outer (RH) | 9. | Front slide finisher (RH) |
| 10. | Front seat heater (if equipped) | 11. | Occupant Classification System control unit | 12. | Front slide finisher (LH) |
| 13. | Occupant Classification System harness | 14. | Seat frame assembly | 15. | Occupant Classification System sensor |
| 16. | Slide finisher outer (LH) | 17. | Seat cushion outer finisher (LH) | 18. | Seat belt buckle |
| 19. | Seat cushion inner finisher [LH (rear)] | 20. | Seat cushion inner finisher [LH (front)] | 21. | Rear slide finisher |
| 22. | Seat harness | 23. | Seat hinge cover | 24. | Seatback assembly |
| 25. | Headrest holder (locked) | 26. | Headrest holder (free) | 27. | Seatback board |
| A. | Rear hinge cover clips | B. | Seatback board clips | C. | Refer to Removal and Installation. |
REMOVAL
WARNING:
Do not leave any objects (screwdrivers, tools, etc.) on seat during seatback repair. It can lead to personal injury if side air bag module should accidentally deploy.
CAUTION:
-
When removing or installing seat trim, handle it carefully to keep dirt out and to avoid damage.
-
When checking power seat circuit for continuity using a circuit tester, do not confuse its connector with side air bag module connector. Such an error may cause air bag module to deploy.
-
Do not drop, tilt, or bump side air bag module while installing seat. Always handle it with care.
-
After front side air bag module inflates, front seatback assembly must be replaced.
-
When removing and installing seat, use shop cloths to protect components from damage.
-
Before removing front seat, place ignition switch in the OFF position, disconnect both battery cables then wait at least three minutes.
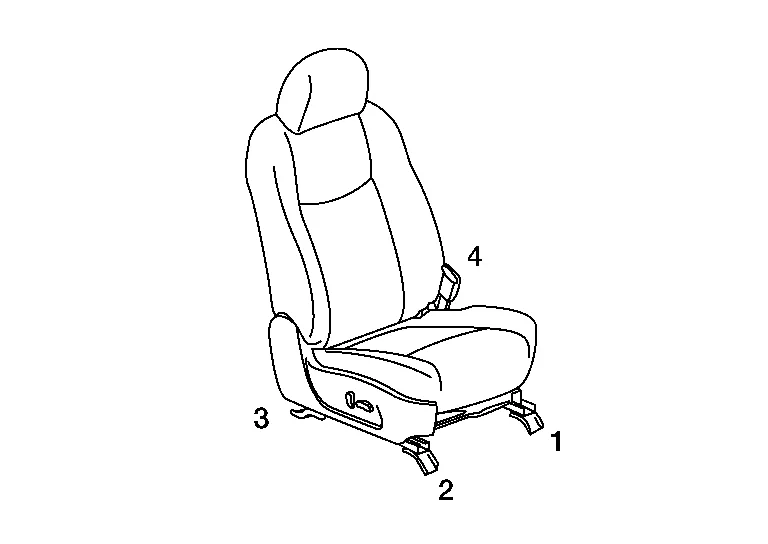
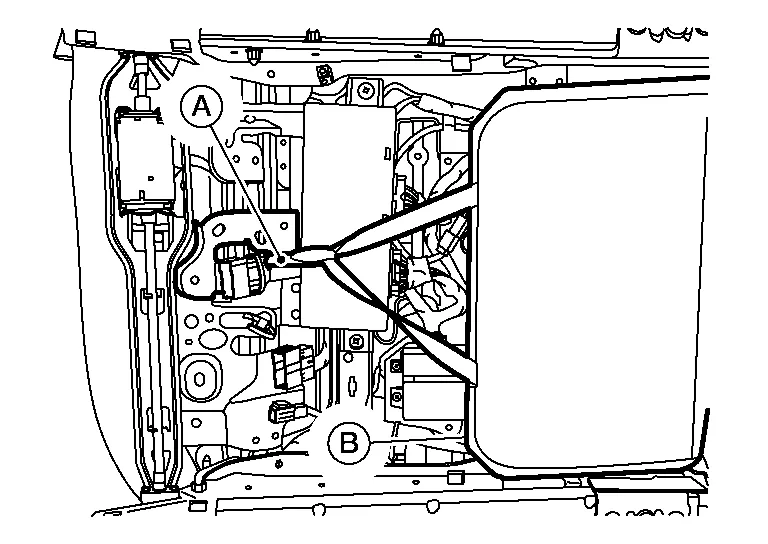
Slide seat to full rearward position.
Disconnect negative and positive battery terminals then wait at least three minutes. Refer to Removal and Installation.
Disconnect harness connector for side air bag module.
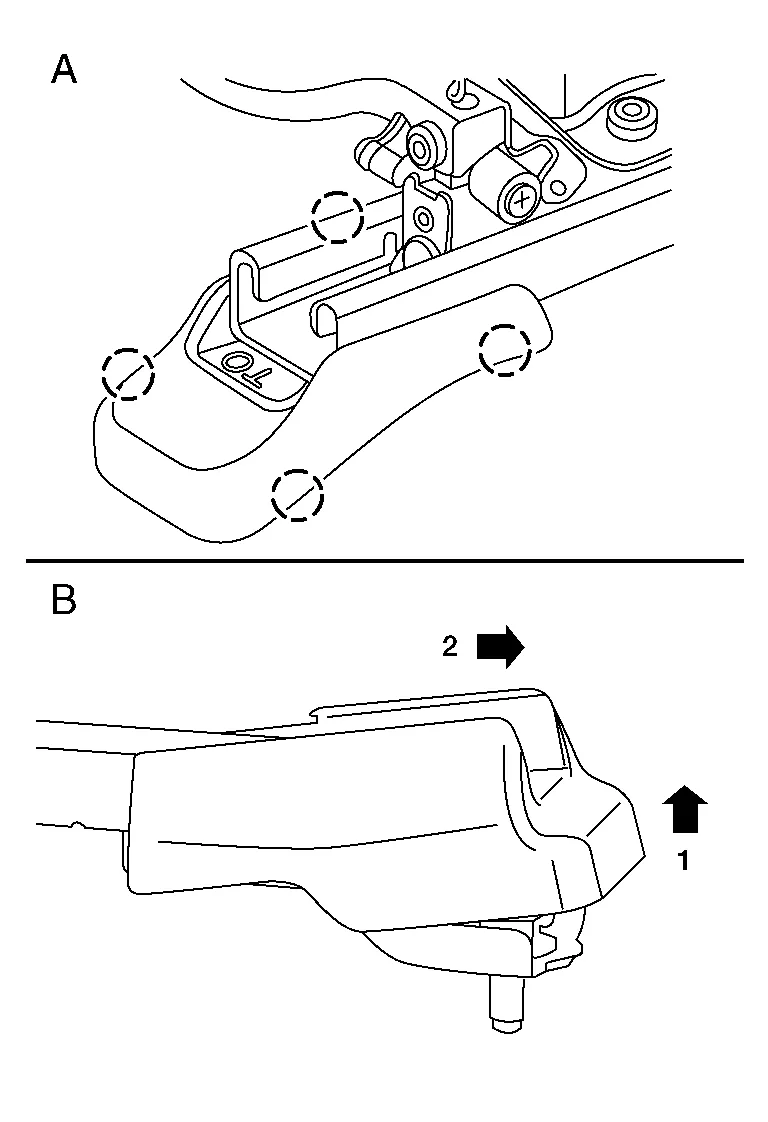
Release pawls using a suitable tool and remove front finishers (LH/RH) (A) then remove seat front bolts.
Connect negative and positive battery terminals then slide seat to full forward position. Refer to Removal and Installation (power seat only).
Disconnect negative and positive battery terminals then wait at least three minutes. Refer to Removal and Installation (power seat only).
Remove rear slide finishers (LH/RH) (B) by lifting up and then pulling rearward, then remove seat rear bolts.
Tilt seat rearward and disconnect harness connectors from seat.
 NOTE:
NOTE:
Take note of harness routing and attachment locations for correct installation.
Remove seat from the Nissan Murano vehicle.
INSTALLATION
Installation is in the reverse order of removal.
WARNING:
-
Perform additional services when installing front passenger seat. Refer to Description.
-
Zero point reset must be performed every time front passenger seat is removed from Nissan Murano vehicle.
-
Zero point reset is done after front passenger seat is installed in vehicle and all bolts are tightened to specification.
CAUTION:
Make sure that the seat harness or the floor carpet is not damaged during installation.
NOTE:
-
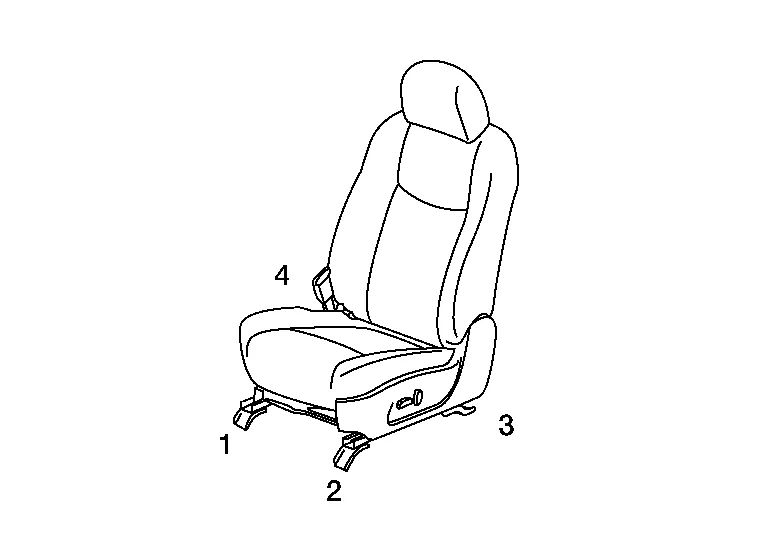
When installing front seat (LH), tighten bolts in the order shown.
-
Tighten seat bolts to specification.
| LH front seat bolt torque | : 49 N·m (5.0 kg-m, 36 lb-ft) |
-
When installing front seat (RH), tighten bolts in the order shown.
-
Tighten seat bolts to specification.
| RH front seat bolt torque | : 49 N·m (5.0 kg-m, 36 lb-ft) |
REMOVAL
WARNING:
Do not leave any objects (screwdrivers, tools, etc.) on seat during seatback repair. It can lead to personal injury if side air bag module should accidentally deploy.
CAUTION:
-
When removing or installing seat trim, handle it carefully to keep dirt out and to avoid damage.
-
Before removing front seat, place ignition switch in the OFF position, disconnect both battery cables then wait at least three minutes.
Disconnect negative and positive battery terminals then wait at least three minutes. Refer to Removal and Installation.
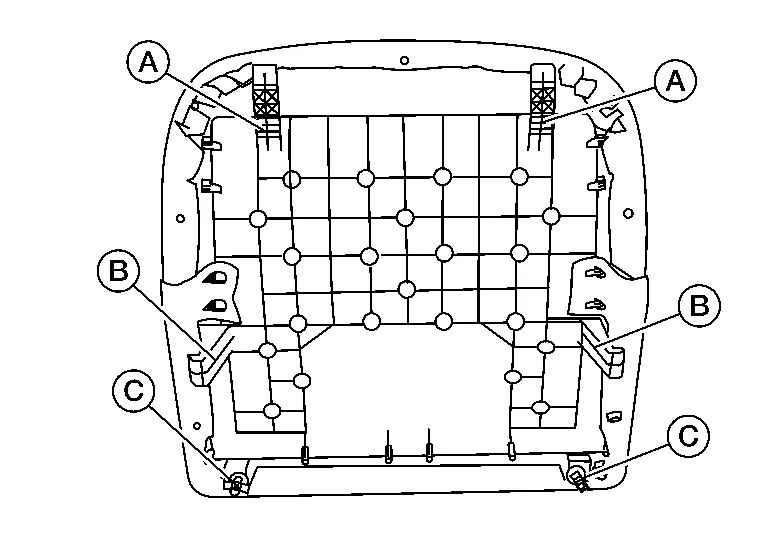
Release seatback board lower clips (C).
CAUTION:
Do not reuse seatback board lower clips.
Reach behind seatback board and press center clips (B) inward and release from seatback frame.
Pull seatback board down releasing upper clips (A) and remove.
INSTALLATION
Installation is in the reverse order of removal.
REMOVAL
WARNING:
Do not leave any objects (screwdrivers, tools, etc.) on seat during seatback repair. It can lead to personal injury if side air bag module should accidentally deploy.
CAUTION:
When removing or installing seat trim, handle it carefully to keep dirt out and to avoid damage.
Remove seatback board. Refer to Seatback Board.
Release seatback trim J-hooks.
 : J-hook
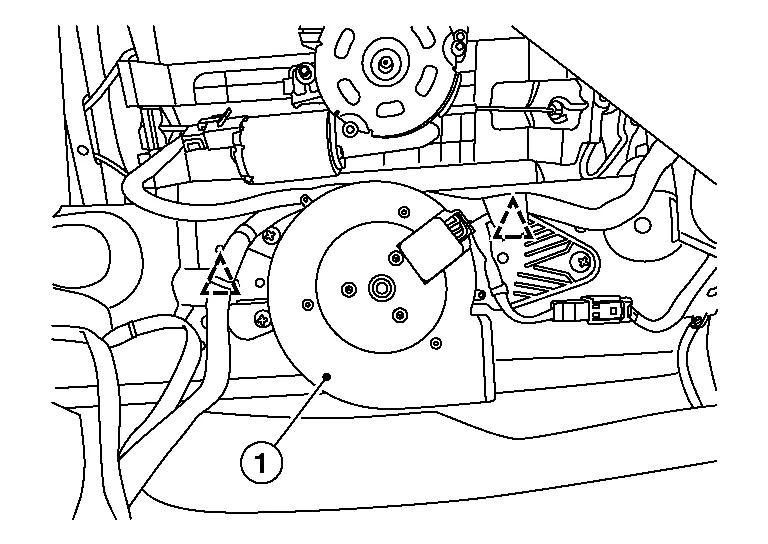
Release two J-hook retainers (A) from seat frame assembly.
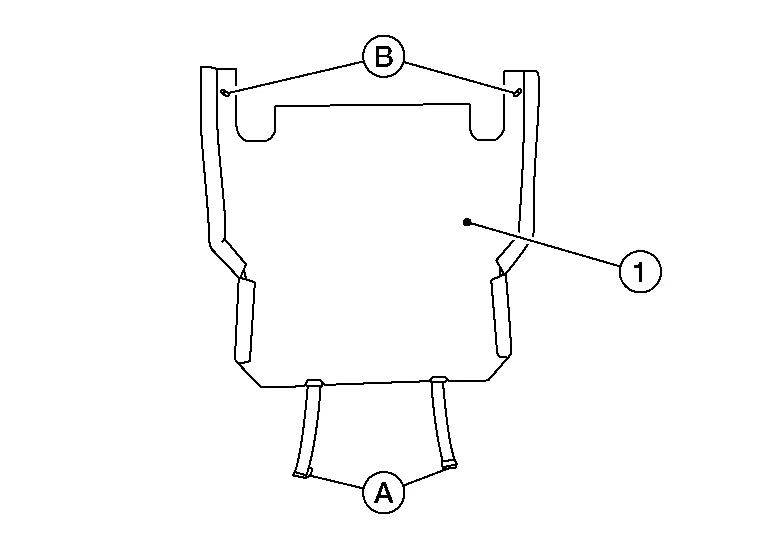
Release seat hinge cover clips (B) then remove seat hinge cover (1).
INSTALLATION
Installation is in the reverse order of removal.
REMOVAL
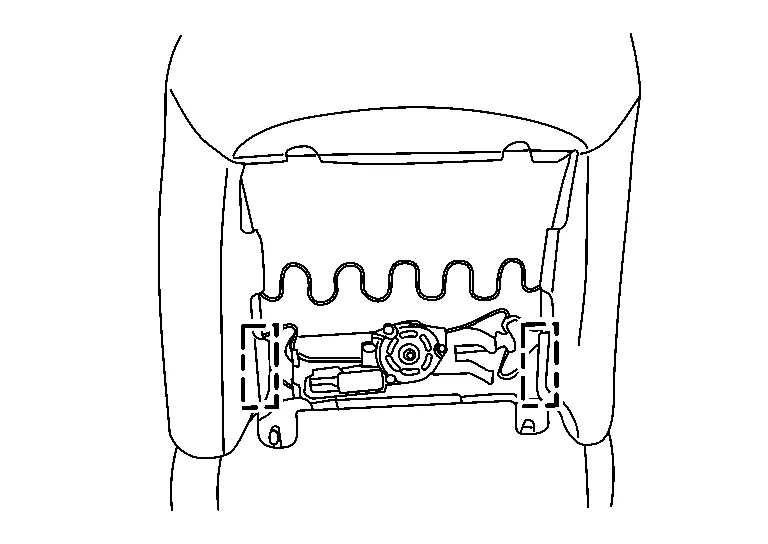
NOTE:
Driver side shown; passenger side similar.
Remove front seat. Refer to Removal and Installation.
Release seatback J-hook (A) and position seatback flap (B) aside.
Disconnect harness connector (A) and remove screws (B) from the seat cushion blower.
Release clips and remove seat cushion blower (1).

 |
: Clip |
INSTALLATION
Installation is in the reverse order of removal.
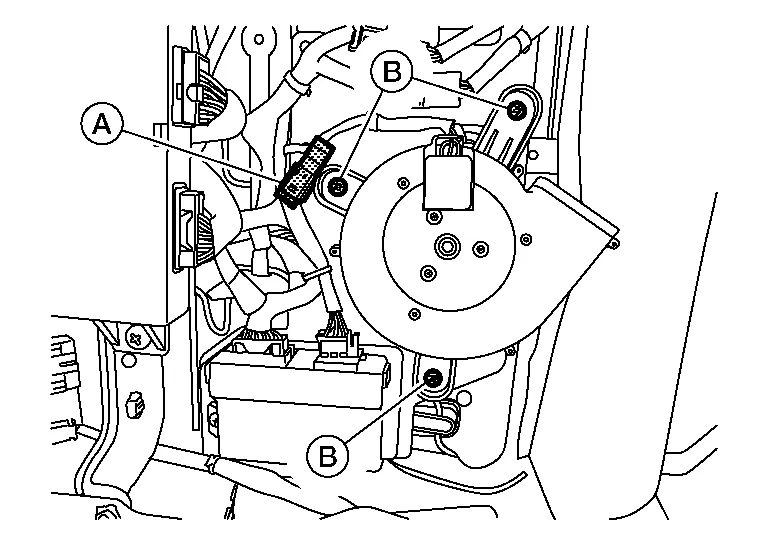
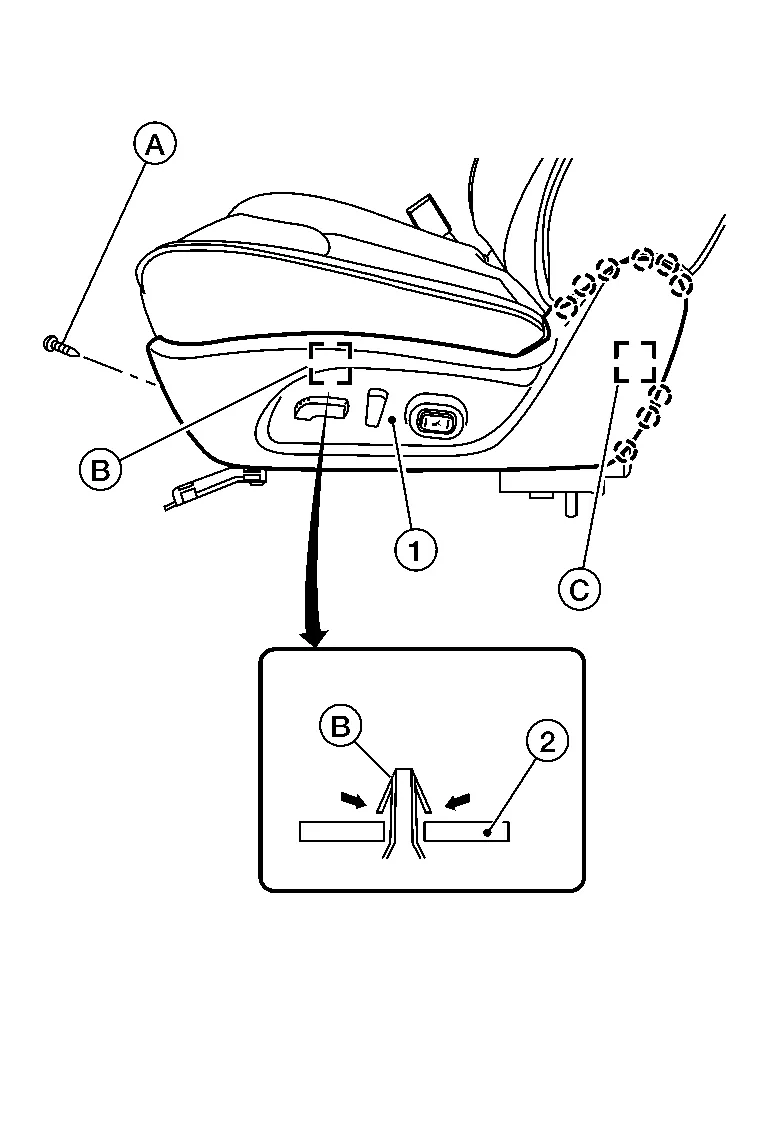
REMOVAL
NOTE:
Driver side shown; passenger side similar.
Remove front seat. Refer to Removal and Installation.
Release seatback J-hook (A) and position seatback flap (B) aside.
Release seatback zippers (A), and release J-clip retainer (B), then position upper seatback trim aside.
Release J-hooks (A) and position lower seatback trim aside.

Disconnect harness connector (A) and remove screws (B) from seat back blower.

Release clips and remove seat back blower (1).
|
: Clip |
INSTALLATION
Installation is in the reverse order of removal.
REMOVAL
Release clips and pawls using a suitable tool and remove center console side finisher (LH/RH).
Release clips and remove center console upper side finisher (LH/RH).
Release clips and screws and remove center console lower side finisher (LH/RH).
Remove cluster lid C. Refer to Removal and Installation.
Remove shift selector knob. Refer to Exploded View.
Release clips using a suitable tool then disconnect harness connectors and remove shift selector finisher. Refer to Exploded View.
Release pawls using a suitable tool and remove climate controlled seat switch (1, 2).

 :Pawl
:Pawl
INSTALLATION
Installation is in the reverse order of removal.
REMOVAL
Remove front seat. Refer to Removal and Installation.
Release seatback J-hook (A) and position seatback flap (B) aside.
NOTE:
Driver side shown; passenger side similar.
Remove screws (A) and disconnect harness connectors (B), then remove climate controlled seat control unit (1).
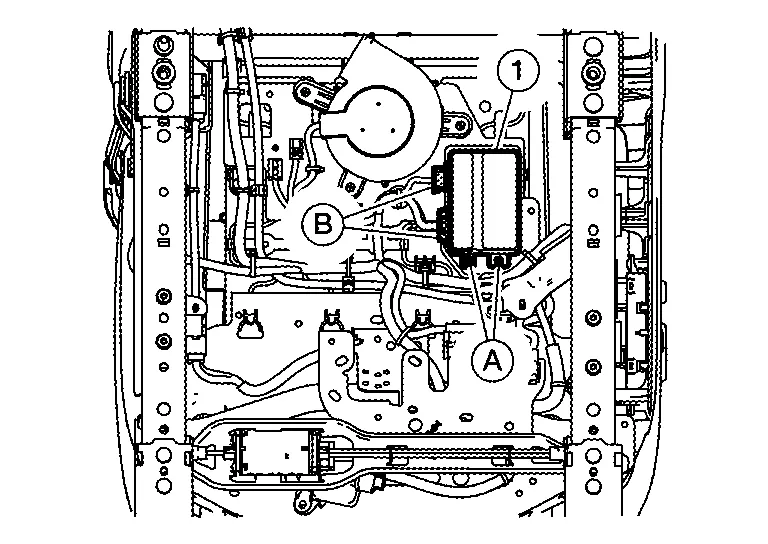
NOTE:
Passenger side shown; driver side similar.
INSTALLATION
Installation is in the reverse order of removal.
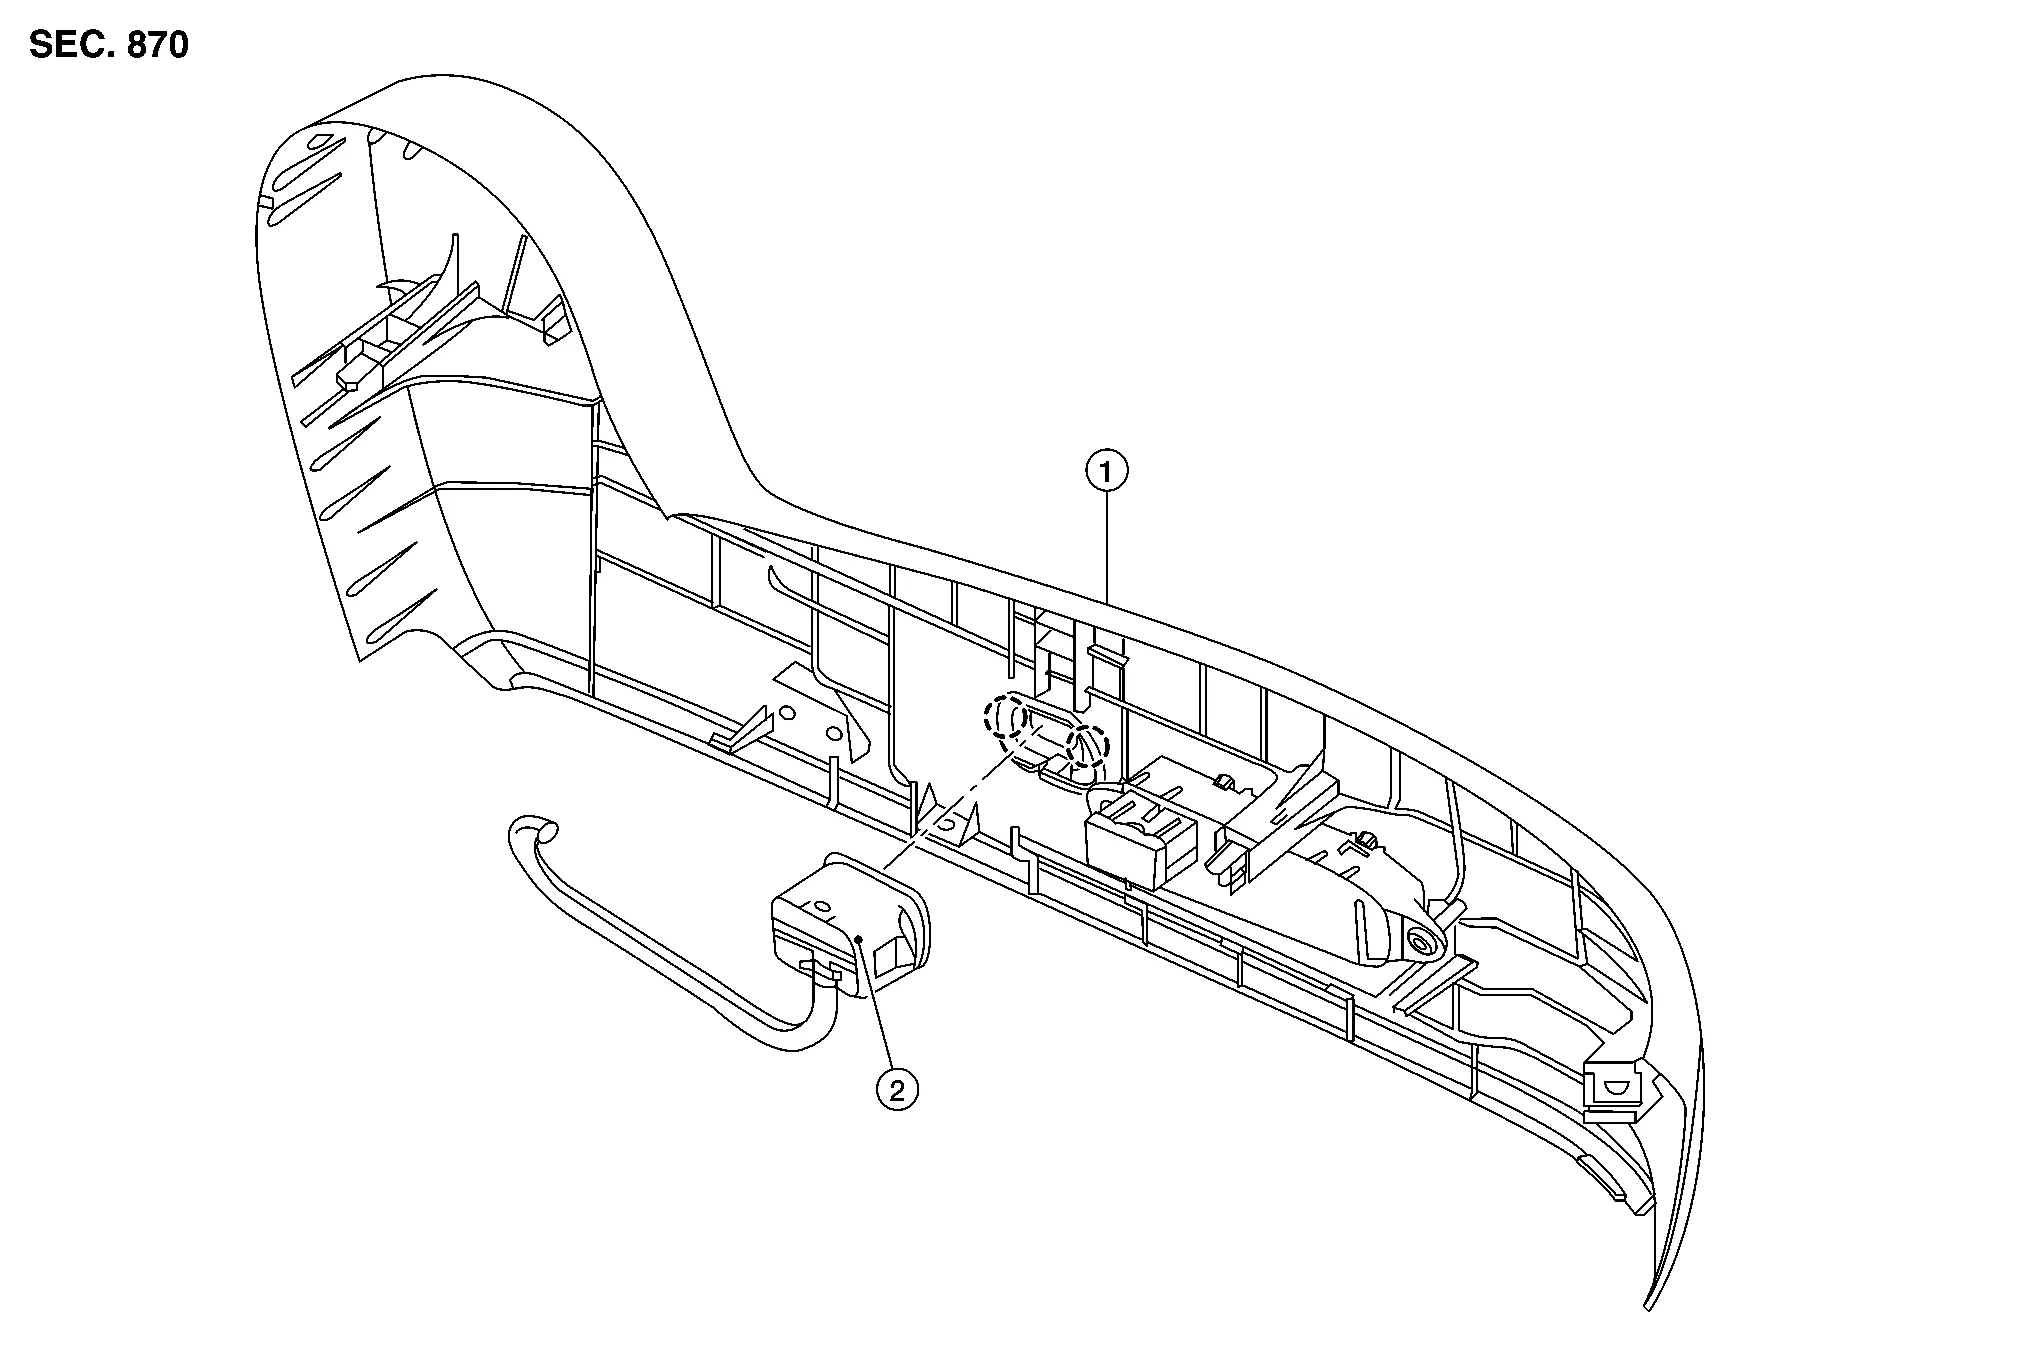
REMOVAL
Release clips and pawls using a suitable tool and remove center console side finisher (LH/RH).
Release clips and remove center console upper side finisher (LH/RH).
Release clips and screws and remove center console lower side finisher (LH/RH).
Remove cluster lid C. Refer to Removal and Installation.
Remove shift selector knob. Refer to Exploded View.
Release clips using a suitable tool then disconnect harness connectors and remove shift selector finisher. Refer to Exploded View.
Release pawls using a suitable tool and remove heated seat switch (1, 2).
:Pawl
INSTALLATION
Installation is in the reverse order of removal.
REMOVAL
Remove seat cushion pad. Refer to Seat Cushion (LH), or Seat Cushion (RH).
Carefully remove front seat heater from seat cushion pad.
CAUTION:
-
Carefully remove seat heater from seat cushion pad.
-
Do not damage seat cushion pad when removing seat heater, if damaged replace seat cushion pad.
INSTALLATION
Peel protective backing from front seat heater and attach to seat cushion pad.
Secure front seat heater harness to seat cushion frame.
Install remaining seat cushion components. Refer to Seat Cushion (LH), or Seat Cushion (RH).
EXPLODED VIEW
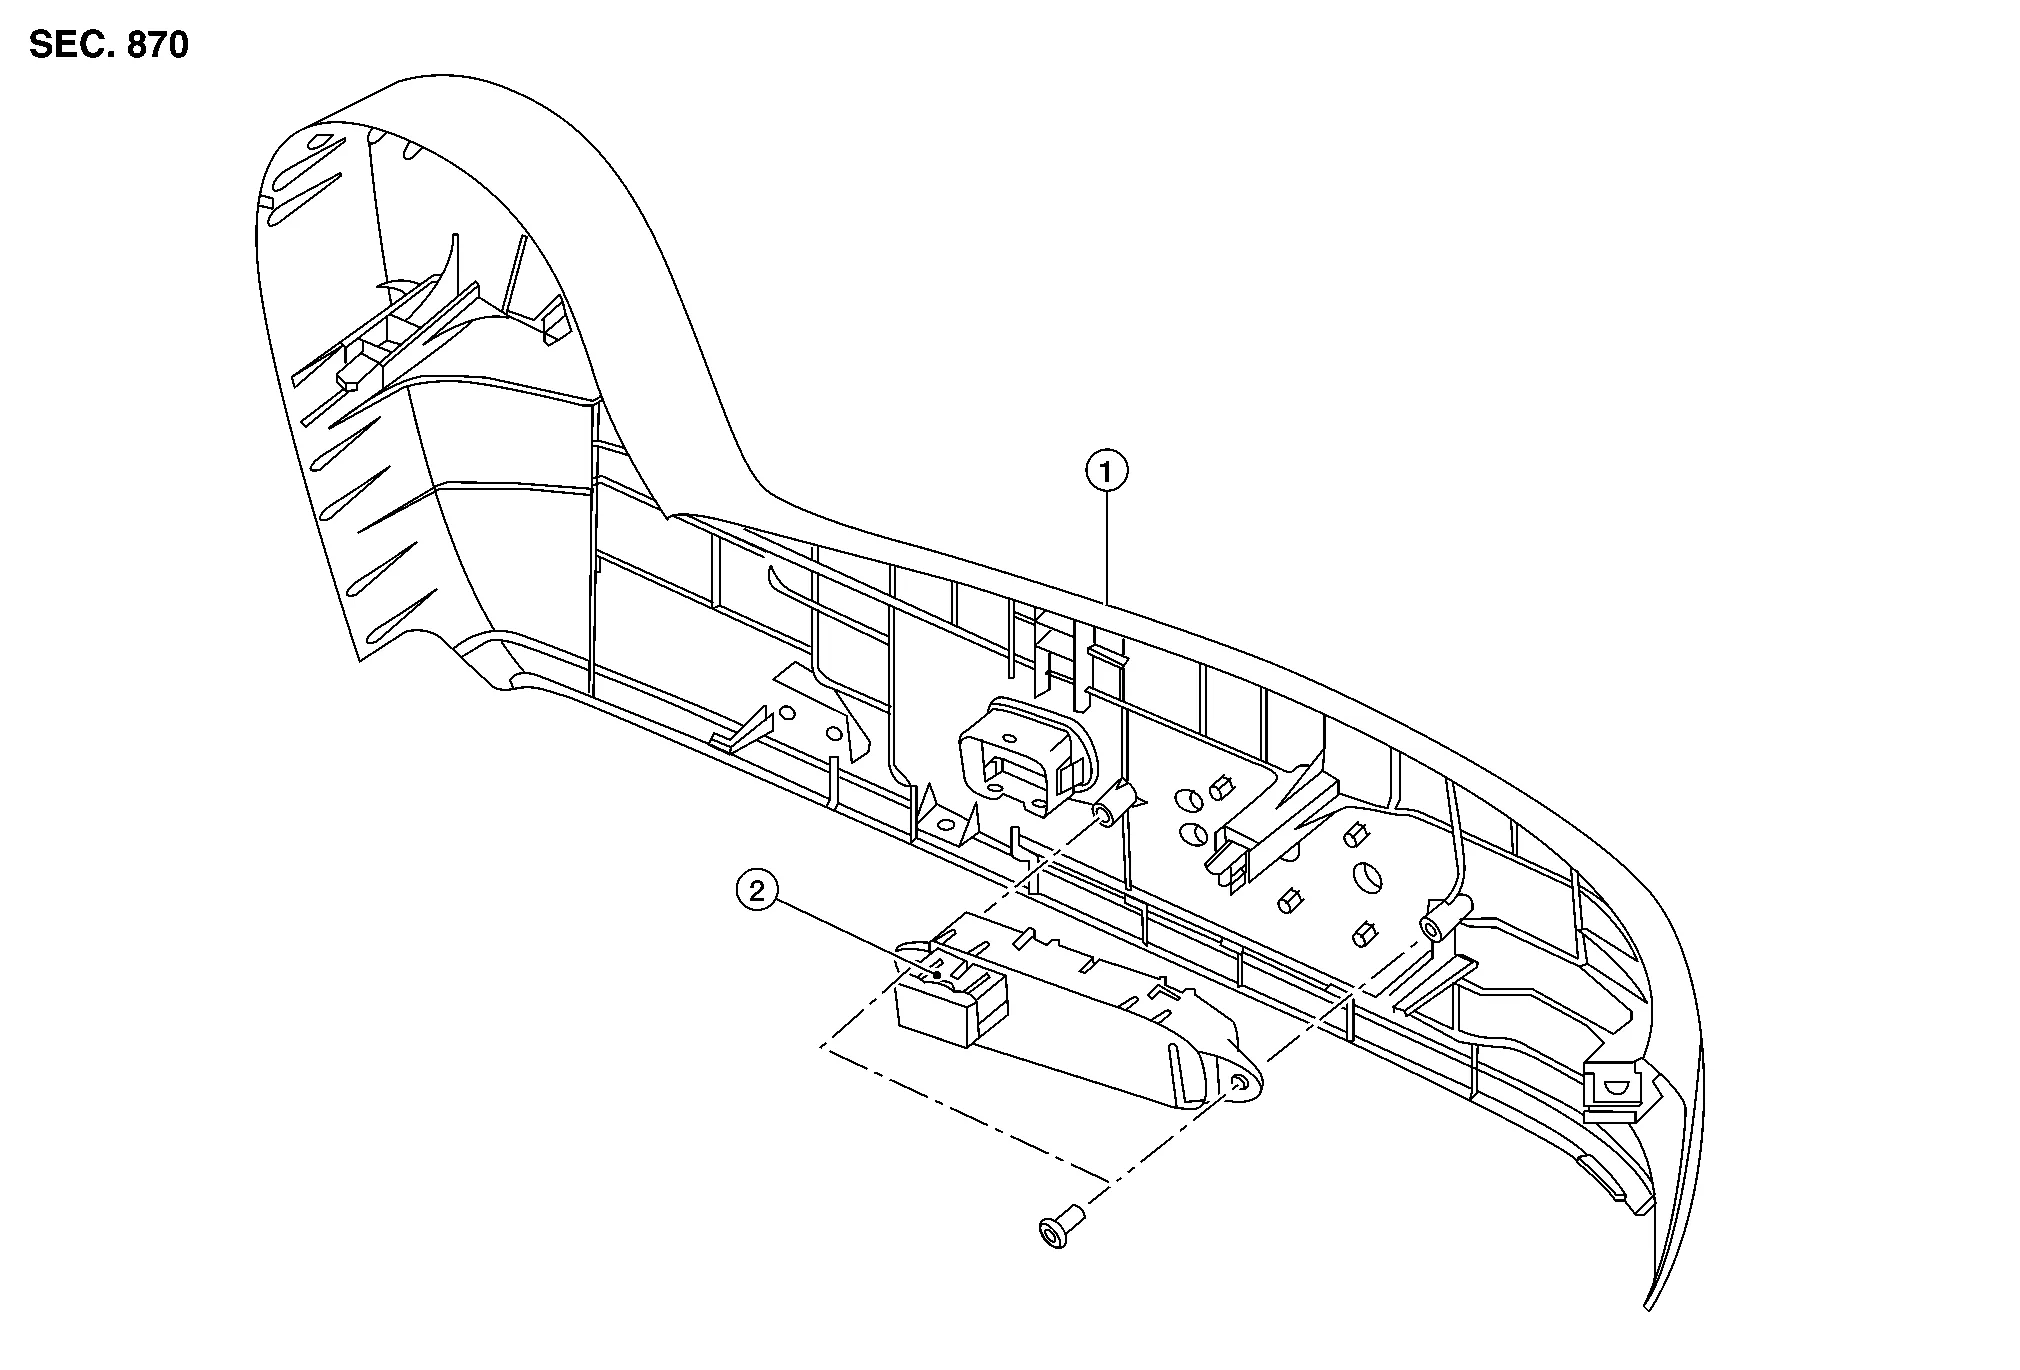
| 1. | Seat cushion outer finisher | 2. | Power seat switch |
REMOVAL
NOTE:
LH shown, RH similar.
Remove seat cushion outer finisher (1).
: Metal clip
: Pawl
: Metal clip
Disconnect harness connector from power seat switch.
Remove screws and power seat switch.
INSTALLATION
Installation is in the reverse order of removal.
CAUTION:
-
Visually check clips for deformation and damage during installation. Replace with new ones if necessary.
-
When installing seat cushion outer finisher, check that clips are securely placed into seat cushion frame holes.
EXPLODED VIEW
| 1. | Seat cushion outer finisher | 2. | Lumbar support switch | |
Pawl |
REMOVAL
Remove seat cushion outer finisher (1).
: Metal clip
: Pawl
: Metal clip
Disconnect harness connector from lumbar support switch.
Using a suitable tool release pawls and remove lumbar support switch.
INSTALLATION
Installation is in the reverse order of removal.
CAUTION:
-
Visually check clips and pawls for deformation and damage during installation. Replace with new ones if necessary.
-
When installing seat cushion outer finisher, check that clips are securely placed into seat cushion frame holes.

 Second Row Seats
Exploded View
LH SEAT — With Heated Seats 1.
Seatback board
2.
Seat cushion trim
3.
Seat cushion pad (with heated seats)
4.
Seat cushion link cover (RH)
5...
Other information:
Nissan Murano (Z52) 2015-2024 Service Manual: C1b5d-97 Feb Ope Count Limit
DTC Description DTC DETECTION LOGIC DTC CONSULT screen items (Trouble diagnosis content) DTC detection condition C1B5D-97 FEB OPE COUNT LIMIT (Forward Emergency Braking operation count limit) Diagnosis condition When ignition switch is ON Signal (terminal) — Threshold Automatic Emergency Braking system operated 3 times within ignition switch ON...
Nissan Murano (Z52) 2015-2024 Service Manual: Front Fog Lamp Aiming Adjustment
Aiming Adjustment PREPARATION BEFORE ADJUSTINGThe fog lamp is a semi-sealed beam type which uses a replaceable halogen bulb. Before performing aiming adjustment procedure, check the following: Ensure all tires are inflated to correct pressure. Place vehicle and screen on level surface...
Categories
- Manuals Home
- Nissan Murano Owners Manual
- Nissan Murano Service Manual
- Power Steering Fluid (PSF)
- Jacking up vehicle and removing the damaged tire
- Rear bench seat adjustment
- New on site
- Most important about car
Seatback pockets
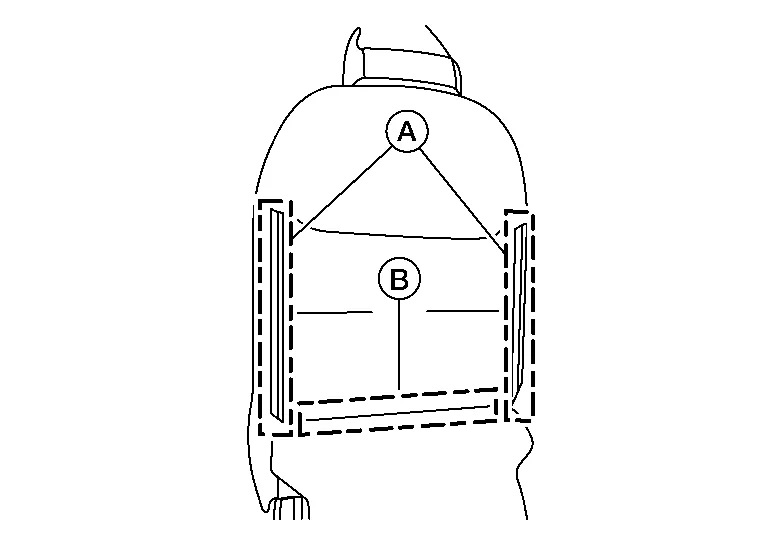
Theremaybe one or two seatback pockets located on the back of the driver and passenger seats. The pockets can be used to store maps.
WARNING