
Nissan Murano: Parking Brake System :: Removal and Installation / Parking Brake Front Cable
REMOVAL
Remove parking brake control. Refer to Removal and Installation.
 NOTE:
It is not necessary to remove parking brake switch.
Remove center console. Refer to Removal and Installation.
Place front floor trim (LH) aside. Refer to Exploded View.
Remove retainers from parking brake front cable mount. Refer to Exploded View.
Pull equalizer (A) on parking brake front cable (1) in a rearward direction and then push upward to separate each parking brake rear cable (2) from parking brake front cable (1).
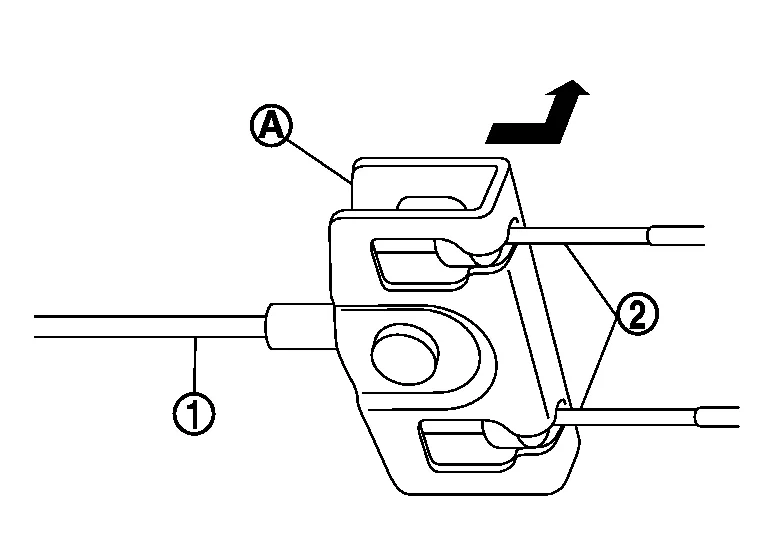
CAUTION:
To prevent damage to the parts, do not bend the parking brake cables.
For AWD Nissan Murano vehicles, remove rear propeller shaft center bearing mounting brackets. Refer to Exploded View.
Remove parking brake front cable.
INSTALLATION
Installation is in the reverse order of removal.
CAUTION:
Do not reuse the adjusting nut.
After installation, inspect and adjust the parking brake pedal. Refer to Inspection and Adjustment.
 Parking Brake Control
Exploded View
1.
Front cable
2.
Parking brake pedal assembly
3.
Parking brake pedal return spring
4.
Parking brake switch
5.
Adjusting nut
6...
 Parking Brake Rear Cable
Removal and Installation
REMOVALRemove center console assembly. Refer to Removal and Installation.
Loosen adjusting nut. Refer to Exploded View.
NOTE:
It is not necessary to remove parking brake front cable...
Other information:
Nissan Murano (Z52) 2015-2024 Service Manual: Preparation. Preparation
Special Service Tools The actual shape of the tools may differ from those illustrated here. Tool number (TechMate No.) Tool name Description KV10111100 (J-37228) Seal cutter Removing chain tensioner cover and water pump cover KV991J0070 (J-45695-A) Coolant refill tool Refilling engine cooling system KV991J0010 (J-23688) Engine coolant refractometer Checking concentration of ethylene glycol in engine coolant — (J-51771) Cooling system pressure test kit — (J-51771-1) Main body — (J-51771-4) Small adapter — (J-51771-5) Pump with quick release — (J-51771-9) Radiator cap assembly with quick coupler Checking cooling system and radiator cap Commercial Service Tools (TechMate No...
Nissan Murano (Z52) 2015-2024 Service Manual: P0127 Iat Sensor
DTC Description DTC DETECTION LOGICRationally incorrect voltage from the sensor is sent to ECM, compared with the voltage signal from engine coolant temperature sensor. DTC CONSULT screen terms (Trouble diagnosis content) DTC detection condition P0127 IAT SENSOR-B1 (Intake air temperature too high) Diagnosis condition — Signal (terminal) Voltage signal transmitted from intake air temperature sensor to ECM Threshold Rationally incorrect voltage from the sensor is sent to ECM, compared with the voltage signal from engine coolant temperature sensor Diagnosis delay time — POSSIBLE CAUSE Harness and connectors (The sensor circuit is open or shorted) Intake air temperature sensor FAIL-SAFENot applicable DTC Confirmation Procedure PRECONDITIONING If DTC Confirmation Procedure has been previously conducted, always perform the following before conducting the next test...
Categories
- Manuals Home
- Nissan Murano Owners Manual
- Nissan Murano Service Manual
- Memory storage function (key-link)
- Indicator lights
- Fuel recommendation
- New on site
- Most important about car
LATCH (Lower Anchors and Tethers for CHildren) system
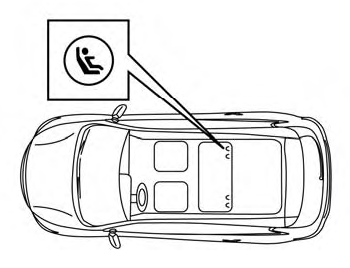
LATCH system lower anchor locations - bench seat
Your vehicle is equipped with special anchor points that are used with LATCH system compatible child restraints. This system may also be referred to as the ISOFIX or ISOFIX compatible system. With this system, you do not have to use a vehicle seat belt to secure the child restraint unless the combined weight of the child and child restraint exceeds 65 lbs. (29.5 kg). If the combined weight of the child and child restraint is greater than 65 lbs. (29.5 kg), use the vehicle’s seat belt (not the lower anchors) to install the child restraint. Be sure to follow the child restraint manufacturer’s instructions for installation.
