
Nissan Murano: Meter, Warning Lamp & Indicator :: System Description / Operation
STEERING SWITCHES
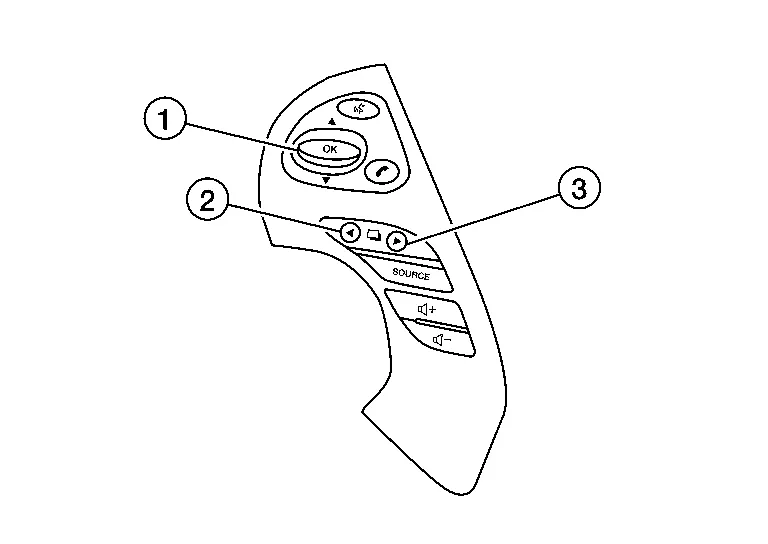
| No. | Switch name | Operation | Description |
|---|---|---|---|
| 1. | Enter/Up/Down switch | Press | The information display settings can be changed. |
| 2. | Back switch | ||
| 3. | Display switch |
METER CONTROL SWITCH
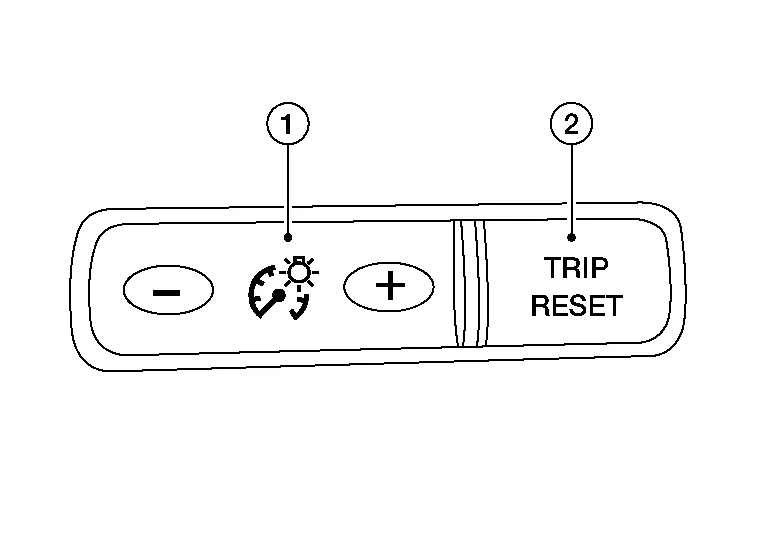
| No. | Switch name | Operation | Description |
|---|---|---|---|
| 1. | Illumination control switch | Press | An illuminance level of the back light of the combination meter can be adjusted. |
| 2. | Trip reset switch | Press |
|
 Information Display
System Description
SYSTEM DIAGRAMFUNCTIONThe information display can indicate the following items:
Outside air temperature
Trip computer
Intelligent Key operation information
Odometer
Warning/Indication messages (door open, back door open, low oil pressure, AWD, Intelligent Key, low fuel, low washer fluid, release parking brake, low tire pressure and loose fuel cap)...
 Diagnosis System (combination Meter)
On Board Diagnosis Function
COMBINATION METER SELF-DIAGNOSIS MODEThe following meter functions can be checked during Combination Meter Self-Diagnosis Mode:
Pointer sweep of speedometer, tachometer and gauges
Illumination of all LCD segments and color patterns for meter displays
Illumination of all lamps/LEDs that are controlled by the combination meter (regardless of switch status)
STARTING COMBINATION METER SELF-DIAGNOSIS MODENOTE:
Check combination meter power supply and ground circuits if self-diagnosis mode does not start...
Other information:
Nissan Murano (Z52) 2015-2024 Service Manual: How to Set Srt Code
Description OUTLINEIn order to set all SRTs, the self-diagnoses as in the “SRT ITEM” table must have been performed at least once. Each diagnosis may require actual driving for a long period of time under various conditions.SRT ITEMThe table below shows required self-diagnostic items to set the SRT to “CMPLT”...
Nissan Murano (Z52) 2015-2024 Service Manual: Front Floor Duct
Removal and Installation - Front Floor Connecting Duct REMOVALRemove the center console side finisher. Refer to Exploded View. Remove the front floor connecting duct.INSTALLATIONInstallation is in the reverse order of removal. Removal and Installation - Front Floor Duct REMOVALRemove the front floor connecting duct...
Categories
- Manuals Home
- Nissan Murano Owners Manual
- Nissan Murano Service Manual
- Jacking up vehicle and removing the damaged tire
- All-Wheel Drive (AWD) (if so equipped)
- GAS STATION INFORMATION
- New on site
- Most important about car

Copyright © 2026 www.nimurano.com