Nissan Murano: Instrument Panel Assembly / Instrument Panel Assembly
CAUTION:
-
Be careful not to scratch instrument panel pad and other parts.
-
Whenever a suitable tool is used, always wrap a cloth around the end of the tool to protect components from damage.
-
Before servicing, turn ignition switch OFF, disconnect both battery terminals then wait at least three minutes.
REMOVAL
Disconnect the negative and positive battery terminals then wait at least three minutes. Refer to Removal and Installation.
Remove dash instrument side finishers (LH/RH). Refer to Removal and Installation.
Remove front pillar finishers (LH/RH). Refer to Removal and Installation.
Remove combination meter. Refer toRemoval and Installation.
Remove cluster lid D. Refer to Removal and Installation.
Remove instrument finisher C. Refer to Removal and Installation.
Remove instrument lower panel LH. Refer to Removal and Installation.
Remove A/C switch assembly. Refer to Removal and Installation.
Remove AV control unit. Refer toRemoval and Installation AV control unit (navigation with bose system) or Removal and Installation AV control unit (navigation without bose system).
Remove glove box assembly. Refer to Removal and Installation.
Remove instrument panel assembly screws and front passenger air bag module screws.
CAUTION:
Do not reuse the front passenger air bag module screws.
Disconnect the harness connectors from the instrument panel assembly and remove.
INSTALLATION
Installation is in the reverse order of removal.
-
If replacing the instrument panel, transfer all the necessary parts to the new instrument panel.
CAUTION:
-
Tighten front passenger air bag screws to specification. Refer to Exploded View.
-
Do not reuse the front passenger air bag module screws.
-
Do not damage the front passenger air bag module harnesses during installation.
-
After installation is complete, check that no system malfunction is detected causing the air bag warning lamp to illuminate.
-
If a malfunction is indicated by the air bag warning lamp after repair or replacement of the malfunctioning parts, perform the SRS final check. Refer to SRS Final Check.
 Instrument Panel Assembly
Exploded View
1.
Sunload sensor
2.
Side defroster grille (LH)
3.
Front speaker grille (LH)
4.
Side ventilator grille (LH)
5.
Instrument side finisher (LH)
6...
 Instrument Finisher a
Removal and Installation
REMOVALRelease clips using a suitable tool and remove instrument finisher A.: Metal clipINSTALLATIONInstallation is in the reverse order of removal...
Other information:
Nissan Murano (Z52) 2015-2024 Service Manual: Intake Manifold
Exploded View 1. Intake manifold 2. Intake manifold gasket A. Refer to Removal and Installation. Removal and Installation REMOVALWARNING: To avoid the danger of being scalded, do not drain the coolant when the engine is hot. NOTE: When removing components such as hoses, tubes/lines, etc...
Nissan Murano (Z52) 2015-2024 Service Manual: P1575 Brake Switch
DTC Description DTC DETECTION LOGIC DTC No. CONSULT screen terms (Trouble diagnosis content) DTC detecting condition P1575 BRAKE SW (Stop lamp switch circuit) Stop lamp switch signal is sent to ECM for extremely long time while the Nissan Murano vehicle is being driven...
Categories
- Manuals Home
- Nissan Murano Owners Manual
- Nissan Murano Service Manual
- Settings
- All-Wheel Drive (AWD) (if so equipped)
- Passenger compartment
- New on site
- Most important about car
Fuel gauge
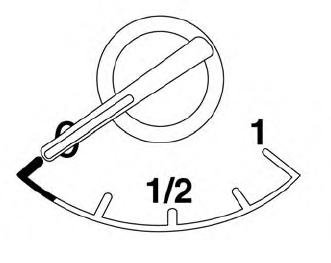
The gauge indicates the approximate fuel level in the tank.
The gauge may move slightly during braking, turning, acceleration, or going up or down hills.
The gauge needle returns to 0 (Empty) after the ignition switch is placed in the OFF position.