Nissan Murano: Heater & Air Conditioning Control System :: Removal and Installation / In-Vehicle Sensor
REMOVAL
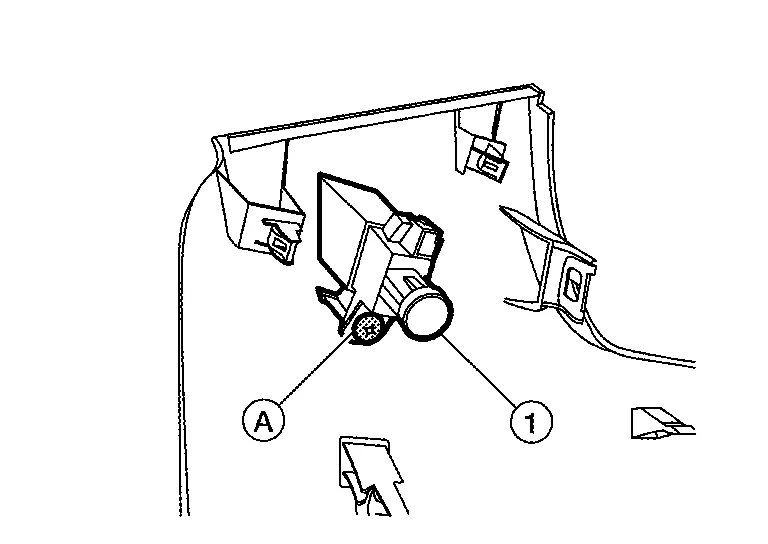
Remove the instrument lower panel LH. Refer to Removal and Installation.
Remove the screw (A) and in-Nissan Murano vehicle sensor (1).
INSTALLATION
Installation is in the reverse order of removal.
CAUTION:
Make sure that the aspirator hose is securely attached to the in-vehicle sensor when installing the instrument lower panel LH.
 Ambient Sensor
Removal and Installation
REMOVALRemove the front bumper fascia. Refer to Removal and Installation.
Disconnect the harness connector (A) from the ambient sensor (1)...
 Sunload Sensor
Removal and Installation
REMOVALRelease the pawls using a suitable tool, then remove sunload sensor (1) from the instrument panel (2).
: Pawl
Disconnect the harness connector from the sunload sensor...
Other information:
Nissan Murano (Z52) 2015-2024 Service Manual: Telematics System
Symptom Table TELEMATICS SYSTEM Symptom Display icon Error message Possible cause Telematics operation not available. — Telematics unit is not connected. Perform self-diagnosis with CONSULT. Refer to CONSULT Function. The connection to the center failed...
Nissan Murano (Z52) 2015-2024 Service Manual: Front Passenger Air Bag Module
Exploded View 1. Steering member assembly 2. Front passenger air bag module A. Front passenger air bag module screws Front Removal and Installation WARNING: Before servicing the SRS, place the ignition switch in the OFF position, disconnect both battery terminals then wait at least three minutes...
Categories
- Manuals Home
- Nissan Murano Owners Manual
- Nissan Murano Service Manual
- Fuel recommendation
- Indicator lights
- Rear bench seat adjustment
- New on site
- Most important about car
Copyright © 2026 www.nimurano.com