Nissan Murano: Transmission & Driveline / Rear Axle :: Preparation. Preparation
|
Tool number (TechMate No.) Tool name | Description | |
|---|---|---|
|
KV40107300 (J-51751) Boot band crimping tool |
|
Installing boot band |
|
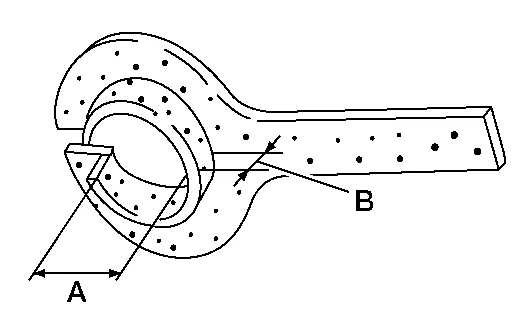
KV38107900 (J–52469–1) Differential side oil seal protector |
|
Installing drive shaft A: 32 mm (1.26 in) dia B: Minimum 23 mm (0.91 in) |

| Tool name | Description | |
| Ball joint remover |
|
Removing wheel stud |
| Power tool |
|
Loosening nuts, screws and bolts |
| Drive shaft joint puller |
|
Removing drive shaft |


 Rear Axle :: Precaution. Precautions
Precaution for Supplemental Restraint System (SRS) "AIR BAG" and "SEAT BELT PRE-TENSIONER"
The Supplemental Restraint System such as “AIR BAG” and “SEAT BELT PRE-TENSIONER”, used along with a front seat belt, helps to reduce the risk or severity of injury to the driver and front passenger for certain types of collisions...
 Rear Axle :: Symptom Diagnosis. Noise, Vibration and Harshness (nvh) Troubleshooting
NVH Troubleshooting Chart
Use chart below to find the cause of the symptom. If necessary, repair or replace these parts. Reference — Disassembly and Assembly — Exploded View — NVH Troubleshooting Chart NVH Troubleshooting Chart NVH Troubleshooting Chart Inspection NVH Troubleshooting Chart NVH Troubleshooting Chart Inspection NVH Troubleshooting Chart
Possible cause and SUSPECTED PARTS Excessive joint angle Joint sliding resistance Imbalance Improper installation, looseness Parts interference PROPELLER SHAFT (AWD) DIFFERENTIAL (AWD) REAR SUSPENSION REAR AXLE TIRE WHEEL DRIVE SHAFT (AWD) BRAKE
Symptom
DRIVE SHAFT
Noise
×
×
×
×
×
×
×
×
×
Shake
×
×
×
×
×
×
×
×
REAR AXLE
Noise
×
×
×
×
×
×
×
×
×
Shake
×
×
×
×
×
×
×
×
Vibration
×
×
×
×
×
×
Shimmy
×
×
×
×
×
×
Shudder
×
×
×
×
×
Poor quality ride or handling
×
×
×
×
×
Inspect Rear Axle for cracks or damage...
Other information:
Nissan Murano (Z52) 2015-2024 Service Manual: P1564 Ascd Steering Switch
DTC Description DTC DETECTION LOGIC An excessively high voltage signal from the ASCD steering switch is sent to ECM. ECM detects that input signal from the ASCD steering switch is out of the specified range. ECM detects that the ASCD steering switch is stuck ON...
Nissan Murano (Z52) 2015-2024 Service Manual: When Both Main Power Window and Door Lock/unlock Switch and Power Window and Door Lock/unlock Switch Rh Are Operated
Diagnosis Procedure CHECK POWER WINDOW AND DOOR LOCK/UNLOCK SWITCH RH POWER SUPPLY AND GROUND CIRCUIT Check power window and door lock/unlock switch RH power supply and ground circuit. Refer to Diagnosis Procedure. Is the inspection result normal? YES>> GO TO 2...
Categories
- Manuals Home
- Nissan Murano Owners Manual
- Nissan Murano Service Manual
- Checking engine oil level
- Settings
- Indicator lights
- New on site
- Most important about car
LATCH (Lower Anchors and Tethers for CHildren) system

LATCH system lower anchor locations - bench seat
Your vehicle is equipped with special anchor points that are used with LATCH system compatible child restraints. This system may also be referred to as the ISOFIX or ISOFIX compatible system. With this system, you do not have to use a vehicle seat belt to secure the child restraint unless the combined weight of the child and child restraint exceeds 65 lbs. (29.5 kg). If the combined weight of the child and child restraint is greater than 65 lbs. (29.5 kg), use the vehicle’s seat belt (not the lower anchors) to install the child restraint. Be sure to follow the child restraint manufacturer’s instructions for installation.