Nissan Murano: Engine Cooling System :: Vq35de / Periodic Maintenance. Engine Coolant
WARNING:
-
Do not remove the radiator cap or reservoir tank cap when the engine is hot. Serious burns could occur from high-pressure engine coolant escaping from the cooling system.
-
When removing the radiator cap or reservoir tank cap, wrap a thick cloth around the cap and slowly turn it a quarter turn to allow built-up pressure to escape. Then carefully remove the cap by turning it all the way.
CHECKING COOLING SYSTEM HOSES
Check hoses for the following:
-
Improper attachment
-
Leaks
-
Cracks
-
Dents
-
Bulges
-
Internal obstruction
-
Damage
-
Loose connections
-
Chafing
-
Deterioration
CHECKING RESERVOIR LEVEL
-
Check if the reservoir tank coolant level is within MIN to MAX when the engine is cool.
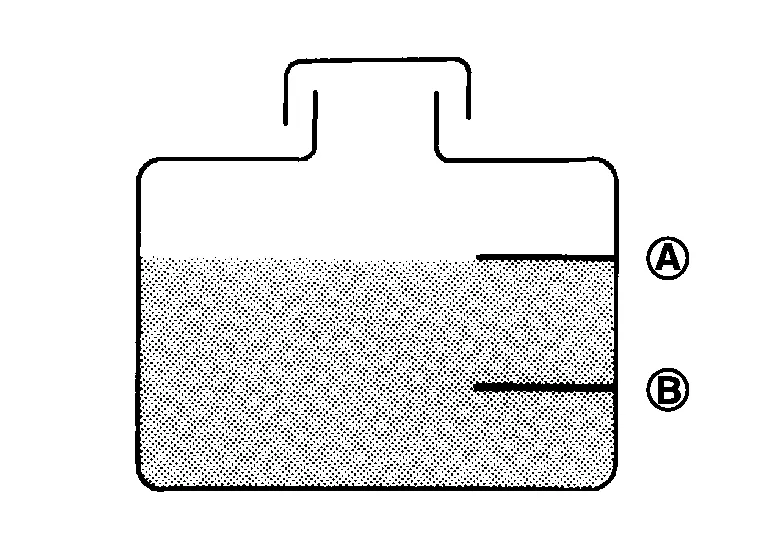
| (A) | : MAX |
| (B) | : MIN |
-
Adjust coolant level (if necessary), to ensure that the engine coolant level is within the MIN to MAX range.
CAUTION:
Refill Genuine NISSAN Long Life Antifreeze/Coolant (blue) or equivalent in its quality mixed with water (distilled or demineralized). Refer to Fluids and Lubricants.
CHECKING COOLING SYSTEM FOR LEAKS
WARNING:
-
Do not remove the radiator cap or reservoir tank cap when the engine is hot. Serious burns could occur from high-pressure engine coolant escaping from the cooling system.
-
When removing the radiator cap or reservoir tank cap, wrap a thick cloth around the cap and slowly turn it a quarter turn to allow built-up pressure to escape. Then carefully remove the cap by turning it all the way.
To check the cooling system for leaks, apply pressure to the cooling system using Tools (A), (B), (C) and (D).
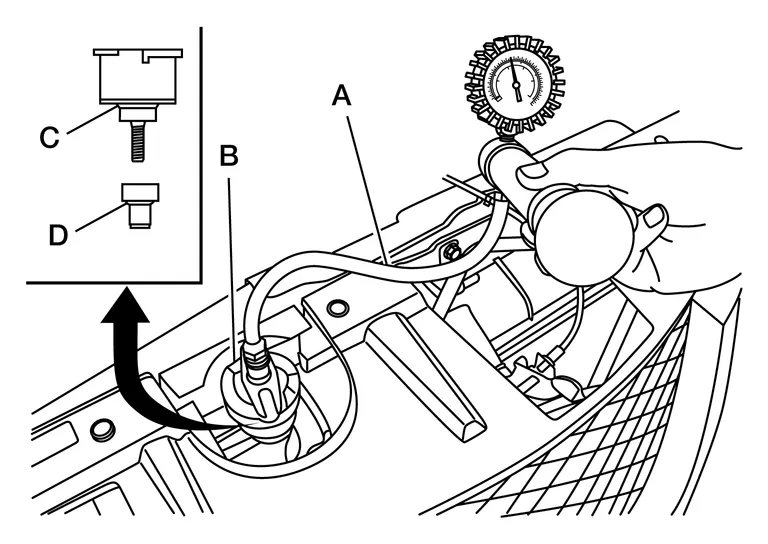
| Tool number (A) | : — (J-51771-5) |
| Tool number (B) | : — (J-51771-9) |
| Tool number (C) | : — (J-51771-1) |
| Tool number (D) | : — (J-51771-4) |
| Leakage test pressure | : Refer to Radiator. |
CAUTION:
Higher testing pressure than specified may cause radiator damage.
 NOTE:
NOTE:
-
If engine coolant decreases, replenish radiator with engine coolant. Refer to Fluids and Lubricants.
-
If anything is found, repair or replace damaged parts.
CHECKING RADIATOR CAP
WARNING:
-
Do not remove the radiator cap or reservoir tank cap when the engine is hot. Serious burns could occur from high-pressure engine coolant escaping from the cooling system.
-
When removing the radiator cap or reservoir tank cap, wrap a thick cloth around the cap and slowly turn it a quarter turn to allow built-up pressure to escape. Then carefully remove the cap by turning it all the way.
-
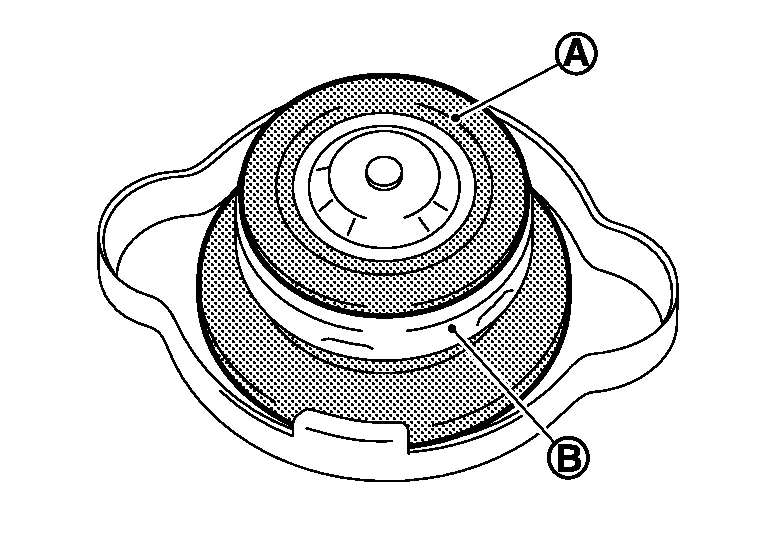
Check the pressure valve of the radiator cap.
-
Replace the radiator cap if the metal plunger (B) on the pressure valve cannot be seen around the edge of the rubber gasket (A).
-
Replace the radiator cap if there is damage or deposits of foreign material on the rubber gasket or pressure valve.
CAUTION:
Thoroughly wipe out the radiator filler neck to remove any waxy residue or foreign material.
-
-
Check the negative-pressure valve of the radiator cap.
-
Replace the radiator cap if the negative-pressure valve does not close completely when pulled open and released.
-
Replace the radiator cap if there is damage or deposits of foreign material on the valve seat of the negative-pressure valve.
-
Replace the radiator cap if there is an abnormality in the operation of the negative-pressure valve.
-
-
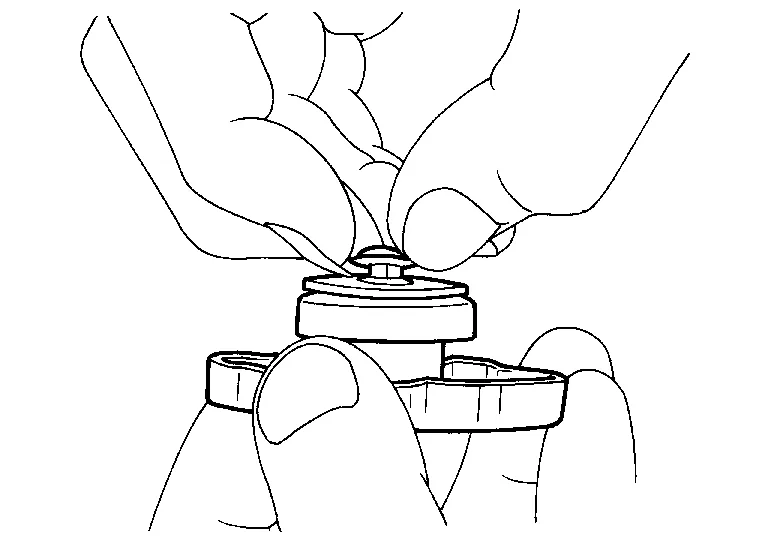
Check radiator cap relief pressure.
-
Check the radiator cap relief pressure using Tools (A) and (B), and suitable tool (C).

Tool number (A) : — (J-51771-5) Tool number (B) : — (J-51771-9) Tool number (C)
(commercially available): — (J-33984-A or equivalent) Radiator cap relief
pressure: Refer to Radiator. -
When connecting the radiator cap to suitable tool (C), apply water or coolant to the radiator cap seal surface.
-
Replace the radiator cap if the radiator cap relief pressure is outside of specification.
-
CHECKING RADIATOR
Check radiator for mud or clogging. If necessary, clean radiator as follows:
CAUTION:
-
Be careful not to bend or damage the radiator fins.
-
When radiator is cleaned on-Nissan Murano vehicle, remove surrounding parts in order to access the radiator core. Tape the harness and electrical connectors to prevent water from entering.
-
Spray water to the back side of the radiator core using a side-to-side motion from the top down.
-
Stop spraying when debris no longer flows from radiator core.
-
Blow air into the back side of radiator core using a side-to-side motion from the top down.
-
Use compressed air lower than 490 kPa (5 kg/cm2, 71 psi) and keep a distance of more than 30 cm (11.8 in).
-
-
Continue to blow air until no water sprays out.
-
Check for coolant leaks. Repair as necessary.
WARNING:
Do not remove the radiator cap when the engine is hot. Serious burns could occur from high-pressure engine coolant escaping from the radiator. Wrap a thick cloth around the cap. Slowly push down and turn it a quarter turn to allow built-up pressure to escape. Carefully remove the cap by pushing it down and turning it all the way.
DRAINING ENGINE COOLANT
Remove the front under cover. Refer to Removal and Installation.
Open the radiator drain plug at the bottom of the radiator and remove the radiator filler cap. This is the only step required when partially draining the cooling system (radiator only).
CAUTION:
-
Do not allow the coolant to contact the drive belts.
-
Perform this step when engine is cold.
Follow this step for heater core removal/replacement only. Disconnect the upper heater hose at the engine side and apply moderate air pressure [103.46 kPa (1.055 kg/cm2, 15 psi) maximum air pressure] into the hose for 30 seconds to blow the excess coolant out of the heater core.
When draining all of the coolant in the system, remove the reservoir tank and drain the coolant then clean the reservoir tank before installation.
CAUTION:
-
Do not allow the coolant to contact the drive belts.
-
Perform this step when engine is cold.
When performing a complete cooling system drain, remove the water drain plug (A) and (D), connector bolt (E) from the cylinder block.
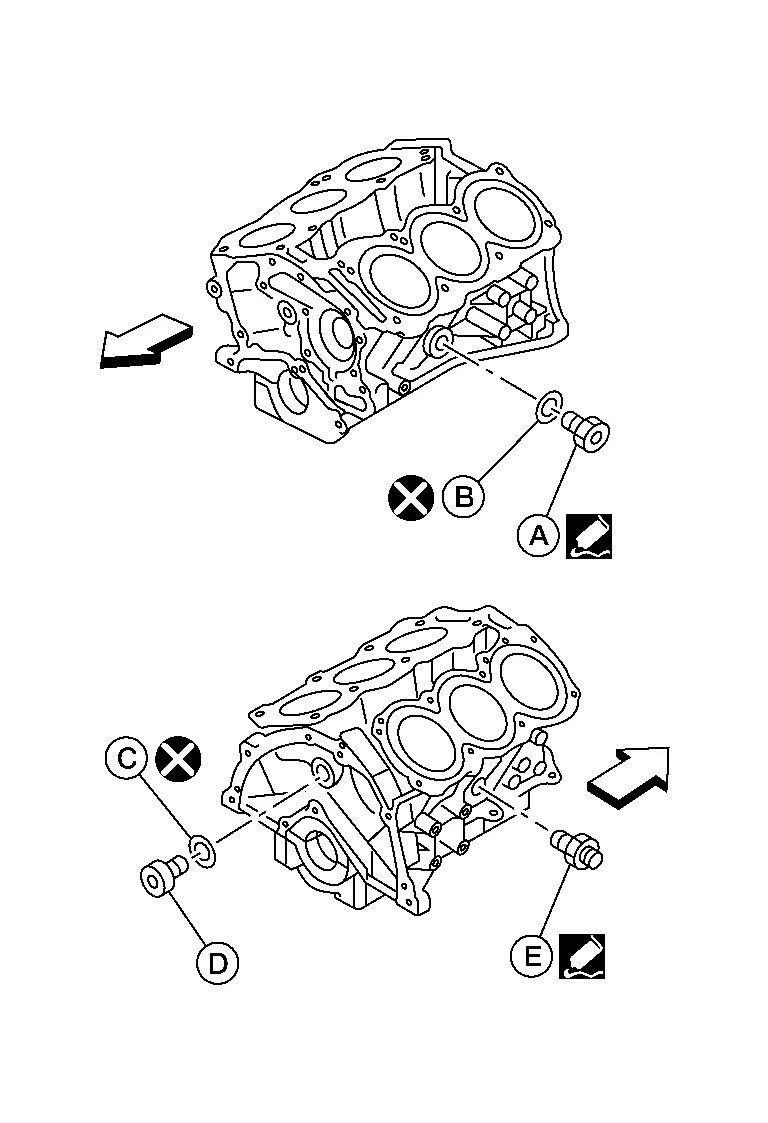
CAUTION:
-
Do not reuse copper sealing washers (B) and (C).
-
Do not reuse metal washer (if equipped).
NOTE:
-
Drain plug (D) can be equipped with a copper sealing washer or metal washer.
-
For Canada, (A) may not be plug but block heater.
| : Engine front |
Check the drained coolant for contaminants, such as rust, corrosion or discoloration.
If the coolant is contaminated, flush the engine cooling system.
REFILLING ENGINE COOLANT
Install the following, if removed:
-
Cylinder block drain plugs, refer to Exploded View.
-
Reservoir tank, refer to Exploded View.
-
Cooling system hoses, refer to Exploded View.
-
Radiator drain plug, refer to Exploded View.
Set the Nissan Murano vehicle heater controls to the full HOT and heater ON positions. Turn the vehicle ignition ON with the engine OFF as necessary to activate the heater mode.
Fill the cooling system with engine coolant using Tool (A), following the manufacturer’s instructions included with the tool.
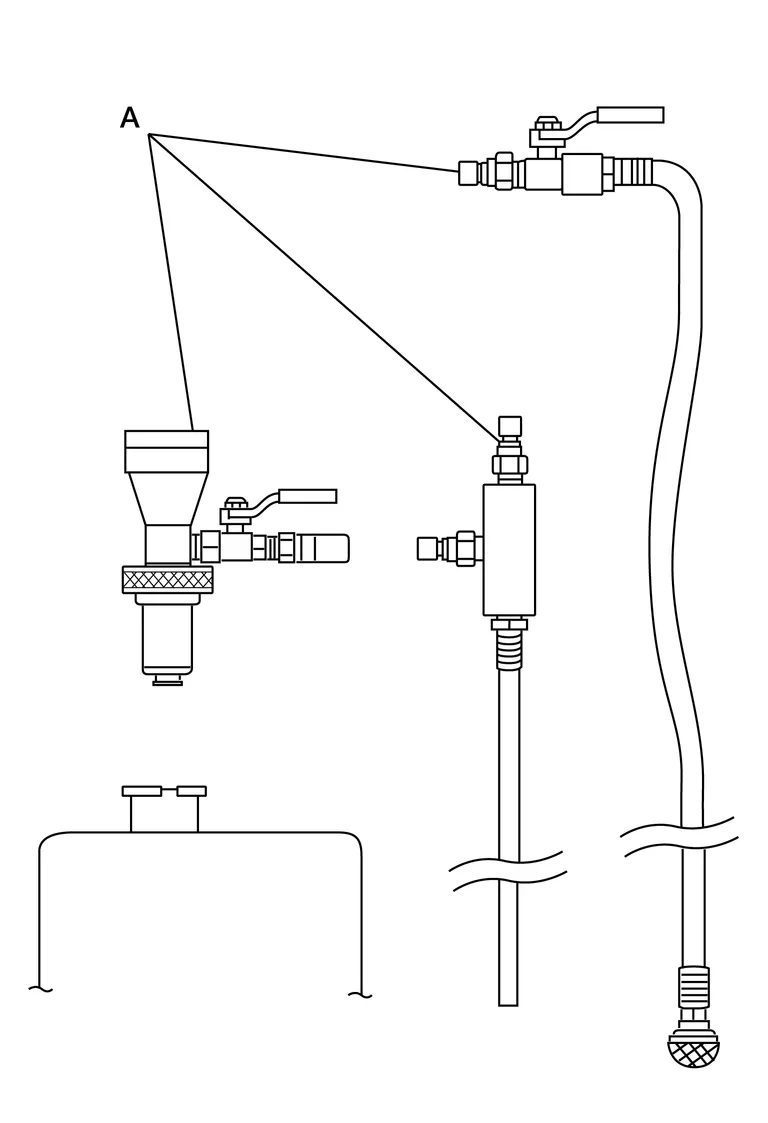
| Tool number (A) | : KV991J0070 (J-45695-A) |
| Engine Coolant | : Refer to Fluids and Lubricants. |
CAUTION:
-
Use recommended coolant or equivalent.
-
Do not use any cooling system additives such as radiator sealer. Additives may clog the cooling system and cause damage to the engine, transmission or cooling system.
-
The compressed air supply must be equipped with an air dryer.
Remove the Tool (A) and top off the cooling system with engine coolant as necessary.
Install the radiator cap and reservoir tank cap.
Run the engine until it reaches normal operating temperature.
CAUTION:
Do not allow the engine to exceed normal operating temperature or engine damage may occur.
Stop the engine and allow it to cool.
Check the engine coolant level and adjust if necessary.
Install the front under cover. Refer to Removal and Installation.
FLUSHING COOLING SYSTEM
Fill the radiator from the filler neck above the radiator upper hose and reservoir tank with clean water and reinstall radiator filler cap.
Run the engine until it reaches normal operating temperature.
Rev the engine two or three times under no-load.
Stop the engine and wait until it cools down.
Drain the water from the system.
Repeat steps 1-5 until clear water begins to drain from the radiator.
 Cooling System
Cooling Circuit
1.
Cylinder block (bank 1)
2.
Oil cooler
3.
Cylinder head (bank 1)
4.
Water pump
5.
Radiator
6.
Water outlet
7...

Other information:
Nissan Murano (Z52) 2015-2024 Owners Manual: Liftgate release
WARNING Always be sure the liftgate has been closed securely to prevent it from opening while driving. Do not drive with the liftgate open. This could allow dangerous exhaust gases to be drawninto the vehicle. For additional information, refer to “Exhaust gas (carbon monoxide)” in the “Starting and driving” section of this manual...
Nissan Murano (Z52) 2015-2024 Service Manual: Power Supply, Ground & Circuit Elements :: Precaution. Precautions
Precaution for Supplemental Restraint System (SRS) "AIR BAG" and "SEAT BELT PRE-TENSIONER" The Supplemental Restraint System such as “AIR BAG” and “SEAT BELT PRE-TENSIONER”, used along with a front seat belt, helps to reduce the risk or severity of injury to the driver and front passenger for certain types of collisions...
Categories
- Manuals Home
- Nissan Murano Owners Manual
- Nissan Murano Service Manual
- How to enable/disable the LDW system
- High Beam Assist (if so equipped)
- System malfunction
- New on site
- Most important about car
Unfastening the seat belts. Checking seat belt operation
Unfastening the seat belts
To unfasten the seat belt, press the button
on the buckle  . The seat belt
automatically
retracts.
. The seat belt
automatically
retracts.