Nissan Murano: Dtc/circuit Diagnosis / P0443 Evap Canister Purge Volume Control Solenoid Valve
DTC DETECTION LOGIC
-
The canister purge flow is detected during the vehicle is stopped while the engine is running, even when EVAP canister purge volume control solenoid valve is completely closed.
-
The canister purge flow is detected during the specified driving conditions, even when EVAP canister purge volume control solenoid valve is completely closed.
| DTC |
CONSULT screen terms (Trouble diagnosis content) |
DTC detection condition | ||
| P0443 |
PURG VOLUME CONT/V (Evaporative emission system purge control valve circuit) |
1 | Diagnosis condition | — |
| Signal (terminal) | — | |||
| Threshold | The canister purge flow is detected during the Nissan Murano vehicle is stopped while the engine is running, even when EVAP canister purge volume control solenoid valve is completely closed | |||
| Diagnosis delay time | — | |||
| 2 | Diagnosis condition | — | ||
| Signal (terminal) | — | |||
| Threshold | The canister purge flow is detected during the specified driving conditions, even when EVAP canister purge volume control solenoid valve is completely closed | |||
| Diagnosis delay time | — | |||
POSSIBLE CAUSE
DTC P0443 - 1
-
EVAP control system pressure sensor
-
EVAP canister purge volume control solenoid valve
(The valve is stuck open.)
-
EVAP canister vent control valve
-
EVAP canister
-
Hoses
(Hoses are connected incorrectly or clogged.)
DTC P0443 - 2
-
EVAP control system pressure sensor
-
EVAP canister purge volume control solenoid valve
(The valve is stuck open.)
-
EVAP canister vent control valve
-
EVAP canister
-
Hoses
(Hoses are connected incorrectly or clogged.)
FAIL-SAFE
Not applicable
PRECONDITIONING
If DTC Confirmation Procedure has been previously conducted, always perform the following procedure before conducting the next test.
-
Turn ignition switch OFF and wait at least 10 seconds.
-
Turn ignition switch ON.
-
Turn ignition switch OFF and wait at least 10 seconds.
TESTING CONDITION:
-
Perform “DTC CONFIRMATION PROCEDURE” when the fuel level is between 1/4 and 3/4 full, and Nissan Murano vehicle is placed on flat level surface.
-
Always perform test at a temperature of 5 to 60°C (41 to 140°F).
-
Cool the Nissan Murano vehicle so that engine coolant temperature becomes same level as ambient temperature.
Do you have CONSULT
YES>>GO TO 2.
NO>>GO TO 4.
PERFORM DTC CONFIRMATION PROCEDURE 1
 With CONSULT
-
Turn ignition switch ON.
-
Check that the following condition are met.
FUEL T/TMP SE: 0 - 35°C (32 - 95°F)
-
Start engine and wait at least 60 seconds.
-
Check 1st trip DTC.
IS 1st trip DTC detected?
YES>>Proceed to Diagnosis Procedure.
NO>>GO TO 3.
PERFORM DTC CONFIRMATION PROCEDURE 2
With CONSULT
-
Start engine and warm it up to normal operating temperature.
-
Turn ignition switch OFF and wait at least 10 seconds.
-
Turn ignition switch ON.
-
Turn ignition switch OFF and wait at least 10 seconds.
-
Turn ignition switch ON.
-
Select “PURG VOL CN/V P1444” of “EVAPORATIVE SYSTEM” in “DTC WORK SUPPORT” mode with CONSULT.
-
Touch “START”.
-
Start engine and let it idle until “TESTING” on CONSULT changes to “COMPLETED”. (It will take approximately 10 seconds.)
If “TESTING” is not displayed after 5 minutes, retry from step 2.
-
Touch “SELF-DIAG RESULTS”.
Which is displayed on CONSULT screen?
YES>>INSPECTION END
NO>>Proceed to Diagnosis Procedure.
PERFORM DTC CONFIRMATION PROCEDURE 1
 With GST
-
Turn ignition switch ON.
-
Set voltmeter probes to ECM harness connector terminals.
ECM Voltage (V) Connector + – Terminal E32 128 148 3.1 - 4.0 -
Start engine and wait at least 60 seconds.
-
Check 1st trip DTC.
Is 1st trip DTC detected?
YES>>Proceed to Diagnosis Procedure.
NO>>GO TO 5.
PERFORM DTC CONFIRMATION PROCEDURE 2
With GST
-
Start engine and warm it up to normal operating temperature.
-
Turn ignition switch OFF and wait at least 10 seconds.
-
Turn ignition switch ON.
-
Turn ignition switch OFF and wait at least 10 seconds.
-
Start engine and let it idle for at least 20 seconds.
-
Check 1st trip DTC.
Is 1st trip DTC displayed?
YES>>Proceed to Diagnosis Procedure.
NO>>To check malfunction symptom before repair: Refer to Intermittent Incident.
NO>>Confirmation after repair: INSPECTION END
CHECK EVAP CANISTER PURGE VOLUME CONTROL SOLENOID VALVE POWER SUPPLY
-
Turn ignition switch OFF.
-
Disconnect EVAP canister purge volume control solenoid valve harness connector.
-
Turn ignition switch ON.
-
Check the voltage between EVAP canister purge volume control solenoid valve harness connector and ground.
EVAP canister purge volume control solenoid valve Ground Voltage Connector Terminal F16 1 Ground Battery voltage
Is the inspection result normal?
YES>>GO TO 2.
NO>>Perform the trouble diagnosis for power supply circuit.
CHECK EVAP CANISTER PURGE VOLUME CONTROL SOLENOID VALVE OUTPUT SIGNAL CIRCUIT
-
Turn ignition switch OFF.
-
Disconnect ECM harness connector.
-
Check the continuity between EVAP canister purge volume control solenoid valve harness connector and ECM harness connector.
EVAP canister purge volume control solenoid valve ECM Continuity Connector Terminal Connector Terminal F16 2 F78 54 Existed -
Also check harness for short to ground and short to power.
Is the inspection result normal?
YES>>GO TO 3.
NO>>Repair open circuit, short to ground or short to power in harness or connectors.
CHECK EVAP CONTROL SYSTEM PRESSURE SENSOR CONNECTOR
-
Disconnect EVAP control system pressure sensor harness connector.
-
Check that water is not inside connectors.
Is the inspection result normal?
YES>>GO TO 4.
NO>>Replace EVAP control system pressure sensor. Refer to Removal and Installation.
CHECK EVAP CONTROL SYSTEM PRESSURE SENSOR
Check EVAP control system pressure sensor. Refer to Component Inspection.
Is the inspection result normal?
YES>>With CONSULT: GO TO 5.
YES>>Without CONSULT: GO TO 6.
NO>>Replace EVAP control system pressure sensor. Refer to Removal and Installation.
CHECK EVAP CANISTER PURGE VOLUME CONTROL SOLENOID VALVE
With CONSULT
-
Turn ignition switch OFF.
-
Reconnect harness connectors disconnected.
-
Start engine.
-
Perform “PURG VOL C/V” in “ACTIVE TEST” mode with CONSULT. Check that engine speed varies according to the valve opening.
Does engine speed vary according to the valve opening?
YES>>GO TO 7.
NO>>GO TO 6.
CHECK EVAP CANISTER PURGE VOLUME CONTROL SOLENOID VALVE
Check EVAP canister purge volume control solenoid valve. Refer to Component Inspection.
Is the inspection result normal?
YES>>GO TO 7.
NO>>Replace EVAP canister purge volume control solenoid valve. Refer to Component Parts Location.
CHECK RUBBER TUBE FOR CLOGGING
-
Disconnect rubber tube connected to EVAP canister vent control valve.
-
Check the rubber tube for clogging.
Is the inspection result normal?
YES>>GO TO 8.
NO>>Clean the rubber tube using an air blower.
CHECK EVAP CANISTER VENT CONTROL VALVE
Check EVAP canister vent control valve. Refer to Component Inspection.
Is the inspection result normal?
YES>>GO TO 9.
NO>>Replace EVAP canister vent control valve. Refer to Removal and Installation.
CHECK IF EVAP CANISTER IS SATURATED WITH WATER
Remove EVAP canister with EVAP canister vent control valve and EVAP control system pressure sensor attached. Refer to Removal and Installation.
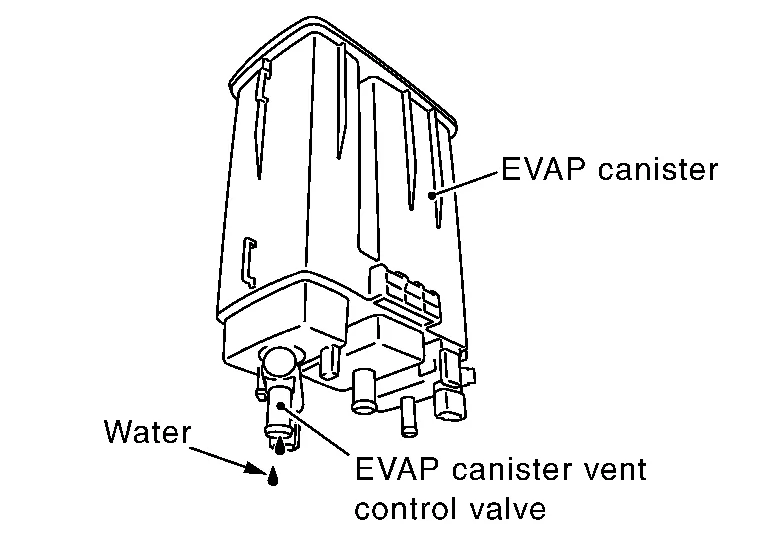
Does water drain from the EVAP canister?
YES>>GO TO 10.
NO>>INSPECTION END
CHECK EVAP CANISTER
Weigh the EVAP canister with the EVAP canister vent control valve and EVAP control system pressure sensor attached.
The weight should be less than 2.1 kg (4.6 lb).
Is the inspection result normal?
YES>>INSPECTION END
NO>>GO TO 11.
DETECT MALFUNCTIONING PART
Check the following.
-
EVAP canister for damage
-
EVAP hose between EVAP canister and Nissan Murano vehicle frame for clogging or poor connection
>>
Repair hose or replace EVAP canister. Refer to Removal and Installation.
CHECK EVAP CANISTER PURGE VOLUME CONTROL SOLENOID VALVE
With CONSULT
-
Turn ignition switch OFF.
-
Reconnect all harness connectors disconnected.
-
Disconnect EVAP purge hoses connected to EVAP canister purge volume control solenoid valve.
-
Start engine.
-
Select “PURG VOL C/V” in “ACTIVE TEST” mode with CONSULT.
-
Touch “Qd” and “Qu” on CONSULT screen to adjust “PURG VOL C/V” opening and check air passage continuity of EVAP canister purge volume control solenoid valve under the following conditions.

|
Condition (PURG VOL C/V value) |
Air passage continuity between and and  |
|---|---|
| 100% | Existed |
| 0% | Not existed |
 Without CONSULT
-
Turn ignition switch OFF.
-
Disconnect EVAP canister purge volume control solenoid valve harness connector.
-
Disconnect EVAP purge hoses connected to EVAP canister purge volume control solenoid valve.
-
Check air passage continuity of EVAP canister purge volume control solenoid valve under the following conditions.
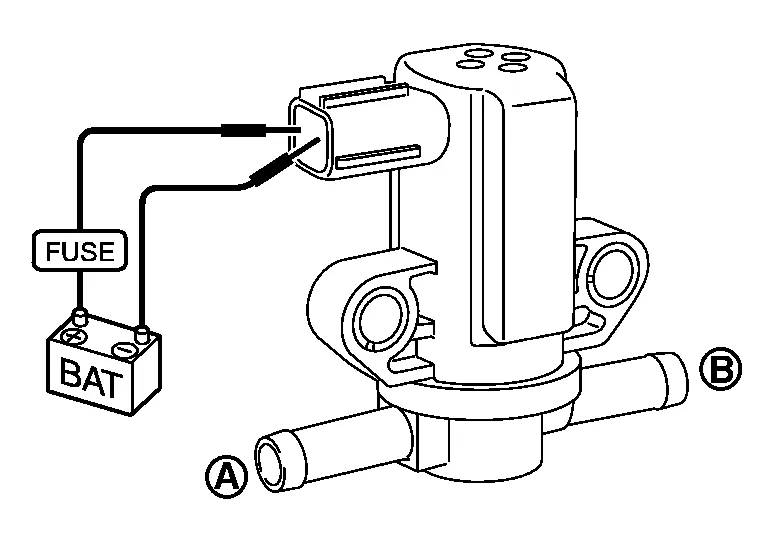
| Condition |
Air passage continuity between and |
|---|---|
| 12 V direct current supply between terminals 1 and 2 | Existed |
| No supply | Not existed |
Is the inspection result normal?
YES>>INSPECTION END
NO>>Replace EVAP canister purge volume control solenoid valve. Refer to Component Parts Location.
 P0441 Evap Control System
DTC Description
DTC DETECTION LOGICIn this evaporative emission (EVAP) control system, purge flow occurs during non-closed throttle conditions. Purge volume is related to air intake volume...
 P0444 Evap Canister Purge Volume Control Solenoid Valve
DTC Description
DTC DETECTION LOGIC
An excessively low voltage signal is sent to ECM through the valve.
An excessively high voltage signal is sent to ECM through the valve...
Other information:
Nissan Murano (Z52) 2015-2024 Service Manual: Condenser Pipe Assembly
Removal and Installation REMOVALDischarge the refrigerant. Refer to Recycle Refrigerant. Remove the core support cover. Refer to Exploded View. Remove the front grille. Refer to Removal and Installation. Remove the bolt that retains the condenser pipe assembly to the condenser...
Nissan Murano (Z52) 2015-2024 Service Manual: C1a0c Adas Message Counter Failure
DTC Description DTC DETECTION LOGIC DTC No. CONSULT terms DTC detection condition C1A0C (82, 83) ADAS MSG COUNTER Diagnosis condition When ignition switch is ON. Signal (terminal) — Threshold Distance sensor (ICC sensor) detects an error signal via ITS communication from the ADAS control unit...
Categories
- Manuals Home
- Nissan Murano Owners Manual
- Nissan Murano Service Manual
- Power Steering Fluid (PSF)
- All-Wheel Drive (AWD) (if so equipped)
- System malfunction
- New on site
- Most important about car
Fuel gauge
The gauge indicates the approximate fuel level in the tank.
The gauge may move slightly during braking, turning, acceleration, or going up or down hills.
The gauge needle returns to 0 (Empty) after the ignition switch is placed in the OFF position.