Nissan Murano: Body Side Trim / Front Pillar Finisher
REMOVAL
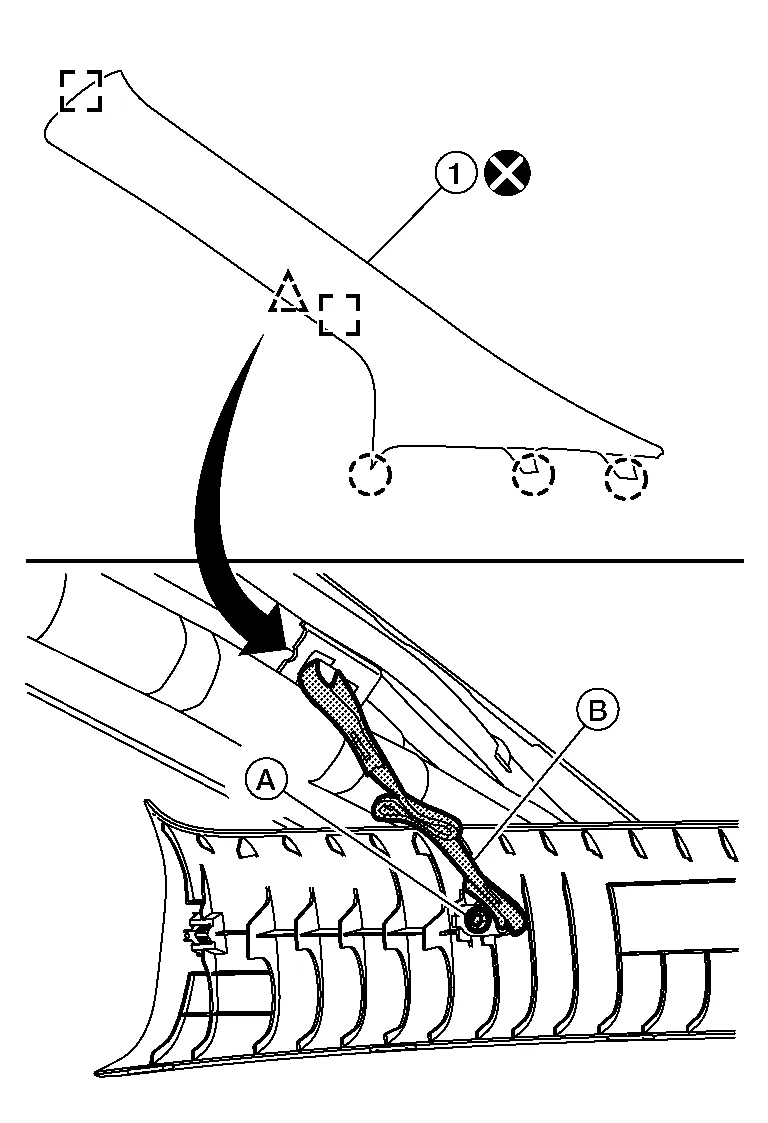
Partially remove front door welt. Refer to Exploded View.
Using a suitable tool, release metal clips and pawls from front pillar finisher (1).
 |
: Metal clip |
 |
: Clip |
 |
: Pawl |
Remove screw (A) from front pillar finisher (B).
Disconnect the harness connector (if equipped) from the front pillar finisher and remove.
CAUTION:
Do not reuse front pillar finisher. Replace with new part after removal.
INSTALLATION
Installation is in the reverse order of removal.
CAUTION:
-
Do not reuse front pillar finisher. Replace with new part for installation.
-
Visually check metal clip for deformation and damage during installation. Replace with new one if necessary.
-
When installing front pillar finisher, check that metal clip, tether and pawls are securely placed into body panel holes.
 Body Side Trim
Exploded View
1.
Center pillar upper finisher
2.
Front door welt
3.
Front pillar finisher
4.
Dash side finisher
5.
Front outer kicking plate
6...
 Center Pillar Upper Finisher
Removal and Installation
REMOVALRemove center pillar lower finisher. Refer to Removal and Installation.
Release pawls, using a suitable tool (A) and remove seat belt height adjuster bolt cover (LH)...
Other information:
Nissan Murano (Z52) 2015-2024 Service Manual: Additional Service When Replacing Can Gateway. 3ch Can Gateway
Description For work procedure, refer to Work Procedure.BEFORE REPLACEMENTWhen replacing 3CH CAN gateway, save or print current vehicle specification (Type ID) with CONSULT configuration before replacement.NOTE: If “Before Replace ECU” of “Read / Write Configuration” can not be used, use the “Manual Configuration” after replacing 3CH CAN gateway...
Nissan Murano (Z52) 2015-2024 Service Manual: Door Does Not Lock/unlock and Engine Does Not Start (one I-Key/req Sw/push Sw)
Diagnosis Procedure All doors do not lock/unlock using door request switch or back door does not open using back door opener request switch, Intelligent Key, and engine does not start when ignition switch is pressed while carrying Intelligent Key. (One Intelligent Key has the symptom, other keys operate normally...
Categories
- Manuals Home
- Nissan Murano Owners Manual
- Nissan Murano Service Manual
- Checking engine oil level
- Power Steering Fluid (PSF)
- Tire rotation
- New on site
- Most important about car