Nissan Murano: Engine Maintenance (vq35de) / Engine Oil
ENGINE OIL LEVEL
 NOTE:
NOTE:
-
Before starting the engine, check the engine oil level. If the engine is already started, stop it and allow 10 minutes before checking.
-
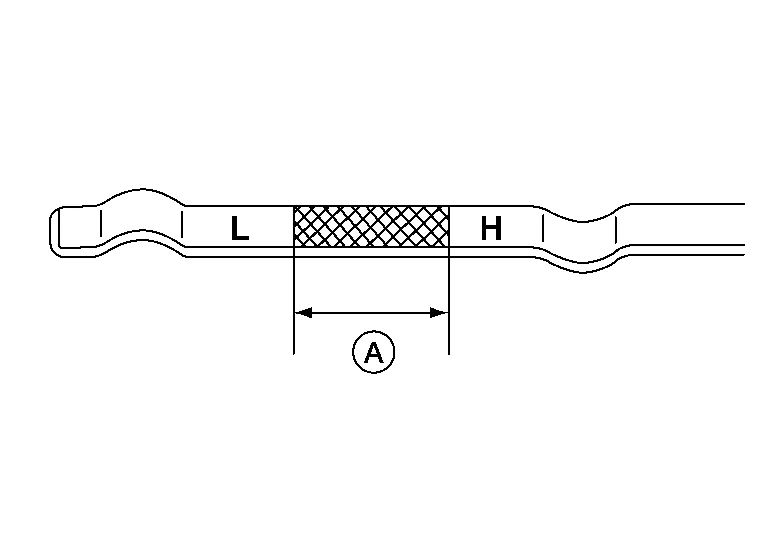
Check that the engine oil level is within the range as indicated on the dipstick.
-
If it is out of range (A), add engine oil as necessary until the dipstick indicates the correct level.
ENGINE OIL APPEARANCE
-
Check engine oil for white milky appearance or excessive contamination.
-
If engine oil becomes milky, it is highly probable that it is contaminated with engine coolant. Repair or replace damaged parts.
ENGINE OIL LEAKS
Check for engine oil leaks around the following areas:
-
Oil pan
-
Oil pan drain plug
-
Oil pressure switch
-
Oil filter
-
Oil cooler
-
Intake valve timing control cover
-
Front timing chain cover
-
Mating surface between cylinder block and cylinder head
-
Mating surface between cylinder head and rocker cover
-
Front oil seal
-
Rear oil seal
ENGINE OIL PRESSURE CHECK
WARNING:
-
Be careful not to burn yourself, as engine oil may be hot.
-
When checking engine oil pressure, shift selector position should be “P”, and apply parking brake securely.
Check the engine oil level. Refer to ENGINE OIL LEVEL.
Remove fender protector side cover. Refer to Exploded View.
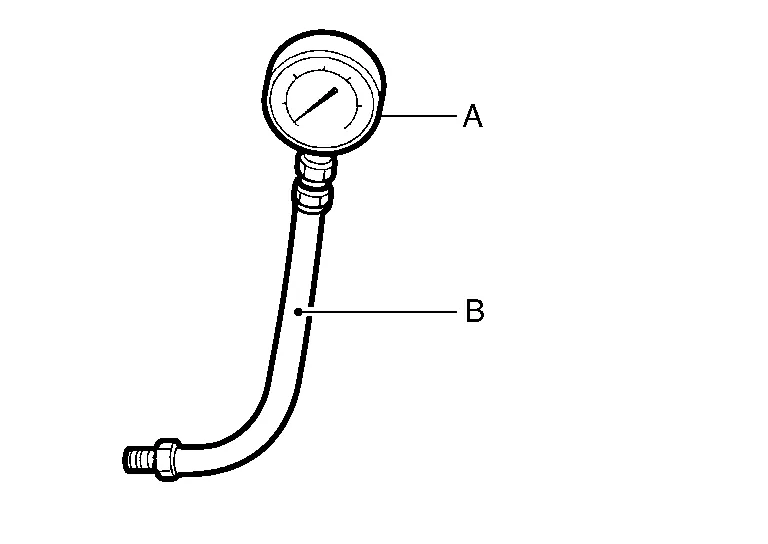
Disconnect the harness connector from the oil pressure switch. Remove oil pressure switch using suitable tool and install suitable tools (A/B).
CAUTION:
Do not drop or shock oil pressure switch.
Start the engine and warm it up to normal operating temperature.
Check oil pressure with engine running under no-load, using suitable tool.
NOTE:
-
When engine oil temperature is low, engine oil pressure becomes high.
-
If difference is extreme, check oil passage and oil pump for oil leaks.
| Engine oil pressure | : Refer to Oil Pressure. |
After the inspections, install the oil pressure switch using suitable tool as follows:Remove the old sealant adhering to oil pressure switch and engine. Apply thread sealant and tighten the oil pressure switch to specification.
Use Genuine High Performance Thread Sealant, or equivalent. Refer to Recommended Chemical Products and Sealants.
| Oil pressure switch | : Refer to Exploded View. |
Install fender protector side cover. Refer to Exploded View.
WARNING:
-
Be careful not to burn yourself, as the engine oil may be hot.
-
Prolonged and repeated contact with used engine oil may cause skin cancer; try to avoid direct skin contact with used engine oil. If skin contact is made, wash thoroughly with soap or hand cleaner as soon as possible.
Position the vehicle so it is level on the hoist.
Warm up the engine and check for engine oil leaks from the engine.
Stop engine and wait for 10 minutes.
Remove the oil pan drain plug (1) and oil filler cap.
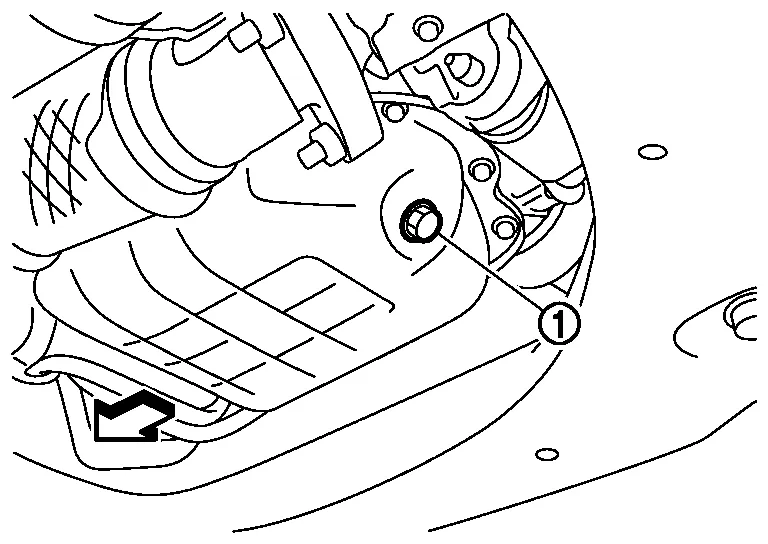
| : Front |
Drain the engine oil.
Install the oil pan drain plug (1) with a new washer and refill the engine with new engine oil.
| Oil specification and viscosity | : Refer to Engine Oil Recommendation. |
CAUTION:
-
Be sure to clean the oil pan drain plug and install with a new washer.
-
The refill capacity depends on the oil temperature and drain time. Use these specifications for reference only. Always use the dipstick to determine when the proper amount of oil is in the engine.
Warm up the engine and check around the oil pan drain plug and oil filter for oil leaks.
Stop engine and wait for 10 minutes.
Check the engine oil level using the oil level gauge.
CAUTION:
Do not overfill the engine with engine oil.
 Fuel Lines
Inspection
Inspect fuel lines, fuel filler cap, and fuel tank for improper attachment, leaks, cracks, damage, loose connections, chafing or deterioration...
 Oil Filter
Removal and Installation
REMOVALDrain engine oil. Refer to Changing Engine Oil.
Remove front fender protector side cover RH. Refer to Exploded View.
Remove the oil filter using suitable tool (A) as shown...
Other information:
Nissan Murano (Z52) 2015-2024 Service Manual: Crash Zone Sensor
Exploded View 1. Crash zone sensor A. Crash zone sensor harness connector Removal and Installation WARNING: Before servicing SRS, place the ignition switch in the OFF position, disconnect both battery terminals then wait at least three minutes...
Nissan Murano (Z52) 2015-2024 Service Manual: Additional Service When Replacing Lane Camera Unit
Work Procedure DescriptionAlways perform the lane camera unit configuration and adjust the camera aiming after; Removing and installing the lane camera unit Replacing the lane camera unit Replacing windshield glass Refer to Work Procedure.CAUTION: The system does not operate normally unless the camera aiming adjustment is performed...
Categories
- Manuals Home
- Nissan Murano Owners Manual
- Nissan Murano Service Manual
- Warning lights
- Rear bench seat adjustment
- Power Steering Fluid (PSF)
- New on site
- Most important about car
Driver and passenger supplemental knee air bag
Driver’s side
The knee air bag is located in the knee bolster, on the driver’s and passenger’s side. All of the information, cautions and warnings in this manual apply and must be followed. The knee air bag is designed to inflate in higher severity frontal collisions, although it may inflate if the forces in another type of collision are similar to those of a higher severity frontal impact. It may not inflate in certain collisions.
Passenger’s side