
Nissan Murano: Removal and Installation / Ecm

| 1. | ECM bracket | 2. | ECM | 3. | ECM cover |
 |
Front |
CAUTION:
Perform ADDITIONAL SERVICE WHEN REPLACING ECM. Refer to Description.
REMOVAL
Remove front air duct. Refer to Removal and Installation.
Remove battery. Refer to Removal and Installation.
Disconnect the harness connectors from ECM. Refer to Harness Connector.
Remove ECM nuts. Refer to Exploded View.
Remove the ECM.
INSTALLATION
Installation is in the reverse order of removal.

 Fuel Pump Control Module
Exploded View
1.
Fuel pump control module (FPCM)
2.
FPCM bracket
Front
Removal and Installation
REMOVALLift luggage floor rear finisher and locate fuel pump control module (FPCM) behind luggage mask...
Other information:
Nissan Murano (Z52) 2015-2024 Owners Manual: Antenna
The vehicle is equipped with a shark fin antenna and an antenna pattern is printed inside the rear window. CAUTION Do not place metalized film near the rearwindowglass or attach any metal parts to it. Thismaycause poor reception or noise. When cleaning the inside of the rear window, be careful not to scratch or damage the rear window antenna...
Nissan Murano (Z52) 2015-2024 Service Manual: Symptom Diagnosis. Cvt Control System
Symptom Table The diagnosis item number indicates the order of check. Start checking in the order from 1. Perform diagnoses of symptom table 1 before symptom table 2. Symptom Table 1 Symptom Engine system CAN communication line Transmission range switch (P0705, P0706) Input speed sensor (P0715, P0716, P0717) Primary speed sensor (P0791, P0792, P0793) Secondary speed sensor (P2765, P2766, P2767) CVT fluid temperature sensor (P0711, P0712, P0713) Primary pressure sensor (P084C, P084D) Secondary pressure sensor (P0841, P0847, P0848) Torque converter clutch solenoid valve (P0740, P0743, P0744) Manual mode switch Stall test CVT position Power supply Control valve CVT fluid level and state Ignition switch and starter Work Flow DTC Index Work Procedure Inspection and Adjustment Diagnosis Procedure Removal and Installation (front wheel drive) or Removal and Installation (all wheel drive) Inspection Wiring Diagram, Wiring Diagram - IGNITION POWER SUPPLY - Shift Shock Large shock (N→ D position) 1 4 8 3 6 2 9 5 Large shock (N→ R position) 1 4 8 3 6 2 9 5 Shock is too large for lock-up...
Categories
- Manuals Home
- Nissan Murano Owners Manual
- Nissan Murano Service Manual
- How to enable/disable the LDW system
- Turning the AEB system on/off
- Checking engine oil level
- New on site
- Most important about car
LATCH (Lower Anchors and Tethers for CHildren) system
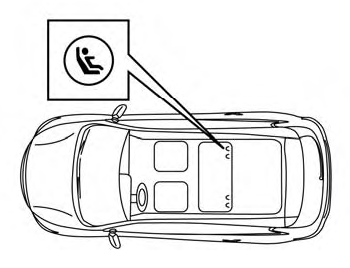
LATCH system lower anchor locations - bench seat
Your vehicle is equipped with special anchor points that are used with LATCH system compatible child restraints. This system may also be referred to as the ISOFIX or ISOFIX compatible system. With this system, you do not have to use a vehicle seat belt to secure the child restraint unless the combined weight of the child and child restraint exceeds 65 lbs. (29.5 kg). If the combined weight of the child and child restraint is greater than 65 lbs. (29.5 kg), use the vehicle’s seat belt (not the lower anchors) to install the child restraint. Be sure to follow the child restraint manufacturer’s instructions for installation.
