Nissan Murano: Removal and Installation / Drive Shaft Oil Seal
| 1. | Transfer case assembly | 2. | Drive shaft oil seal | 3. | Transfer cover oil seal |
REMOVAL
Remove the front drive shaft (RH). Refer to Removal & Installation.
Remove bolts and remove front drive shaft support bracket (RH). Refer to Exploded View.
Using a suitable tool, remove the transfer cover oil seal.
CAUTION:
-
When removing transfer cover oil seal with suitable tool, do not damage the transfer cover.
-
Do not reuse transfer cover oil seal.
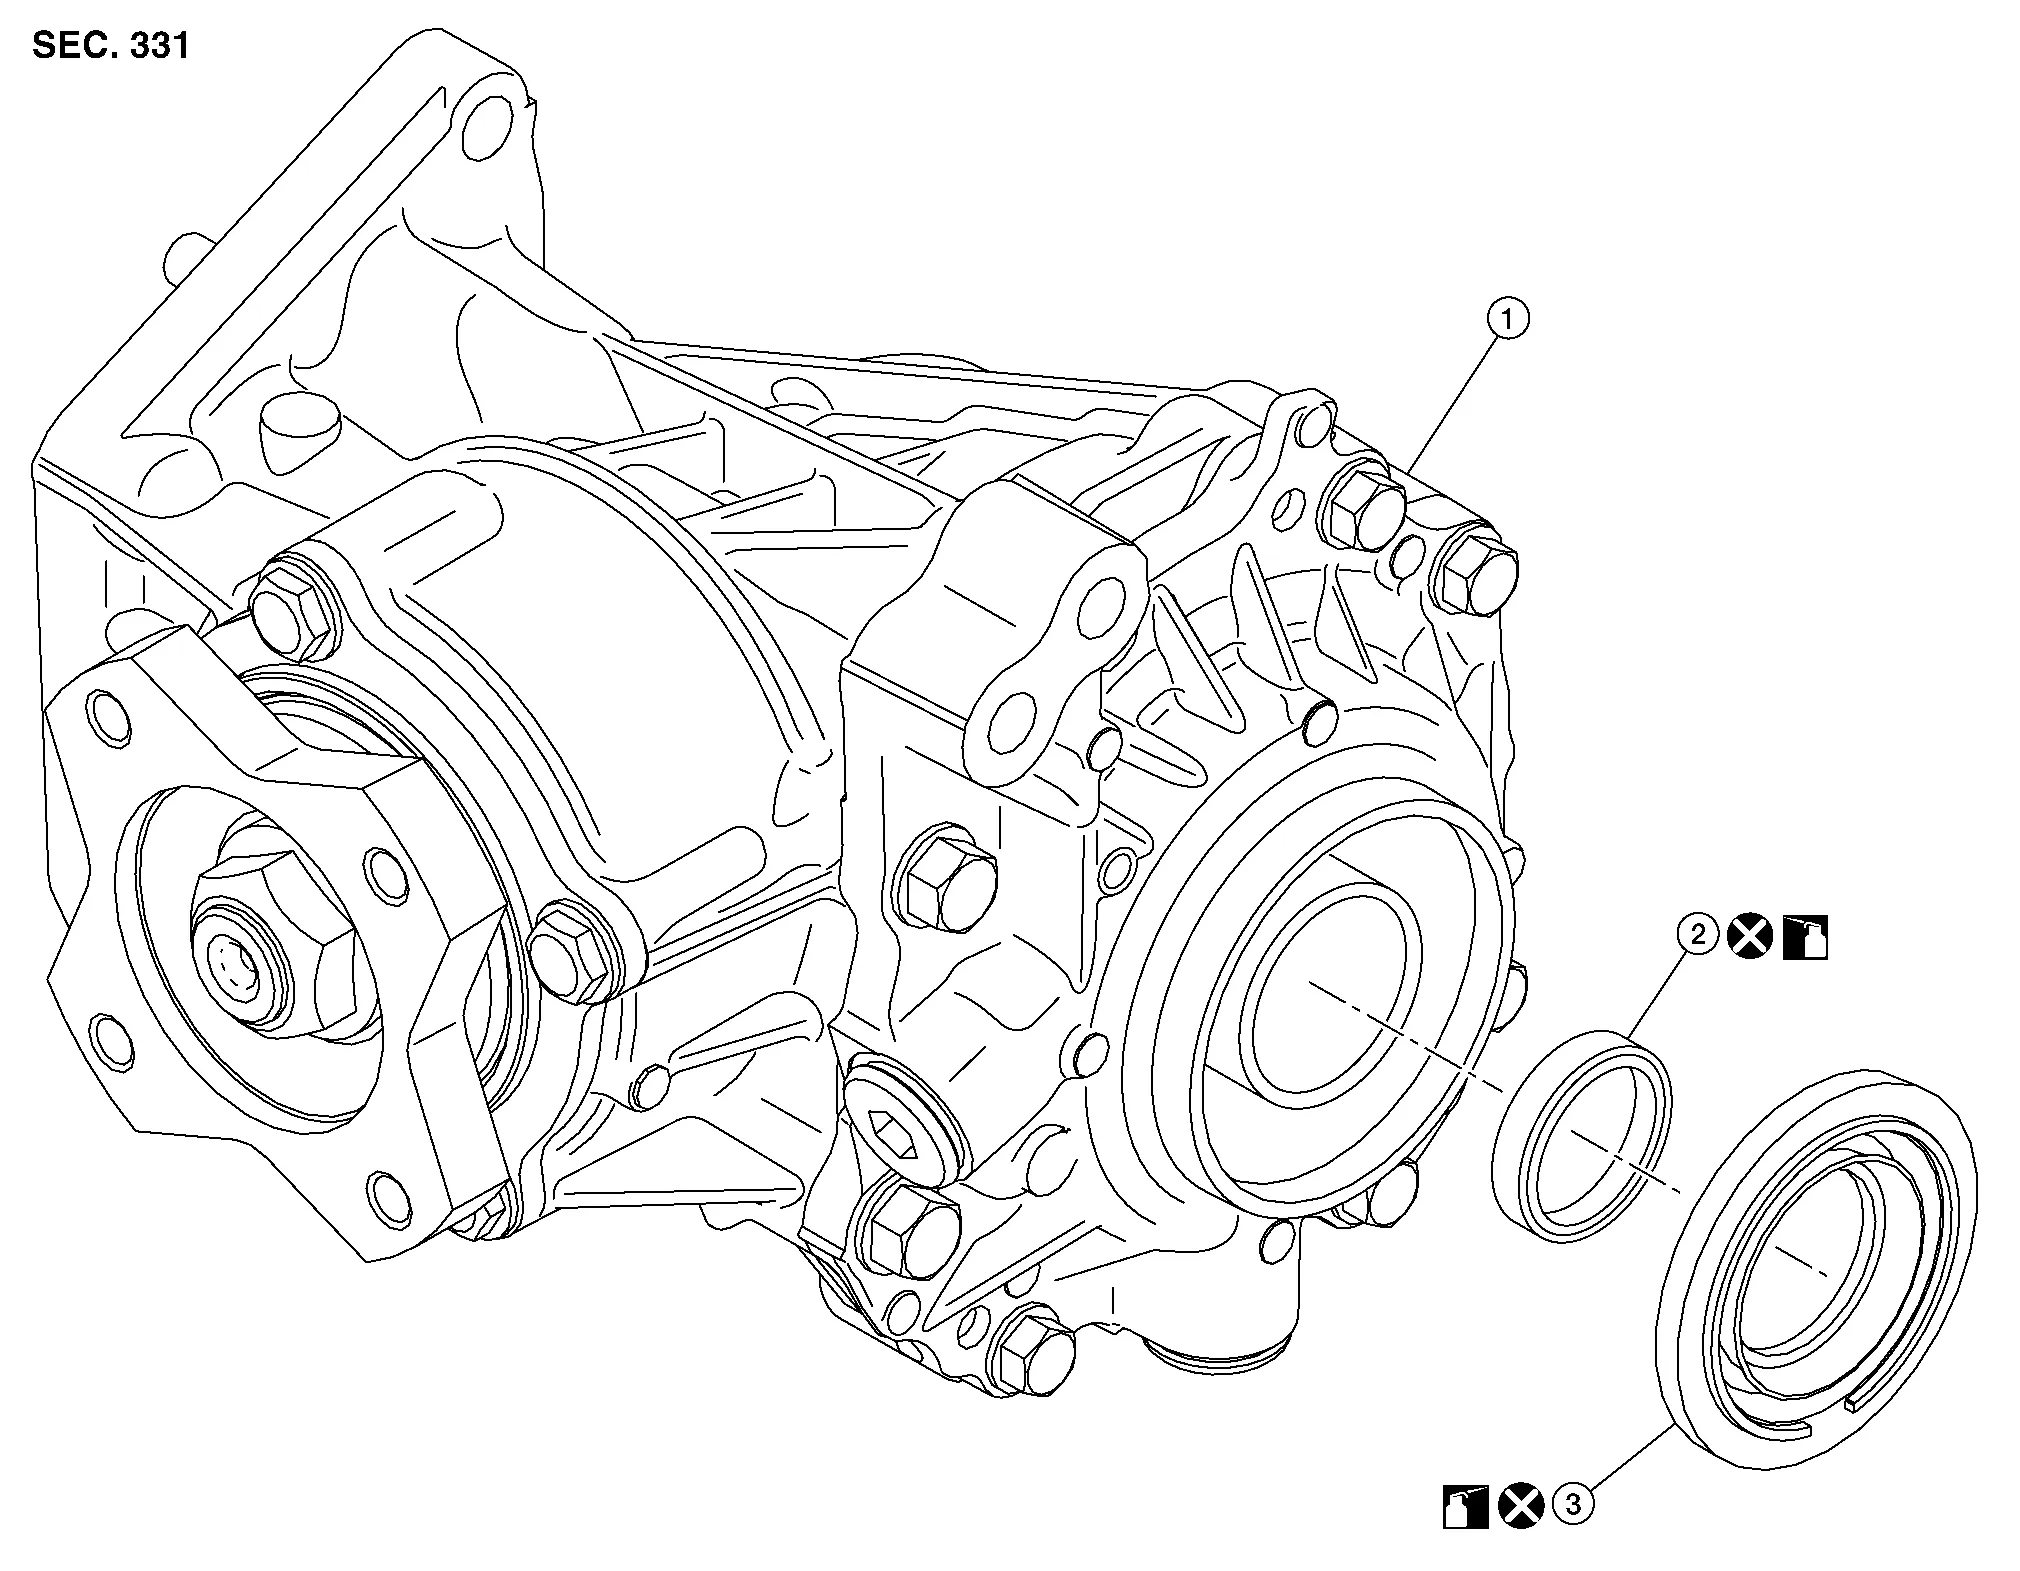
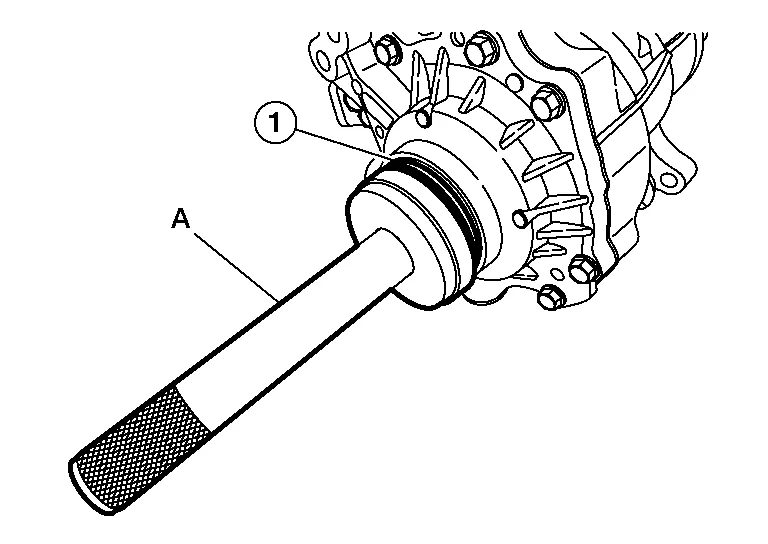
Remove the drive shaft oil seal (1) using suitable tool (A).
CAUTION:
Do not reuse drive shaft oil seal.
INSTALLATION
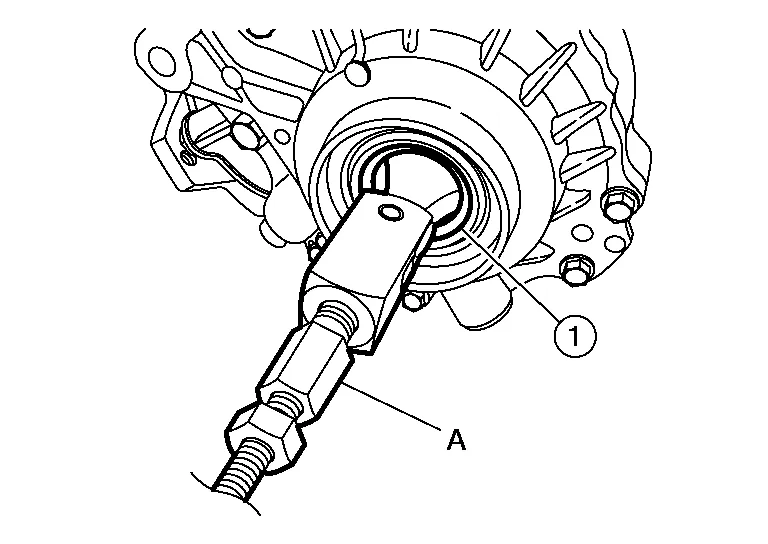
Install drive shaft oil seal (1) onto Tool (A) before installing into transfer case assembly using Tool (B).
CAUTION:
Do not reuse drive shaft oil seal.
| Tool (A) | : — (J-52390) |
| Tool (B) | : — (J-8092) |
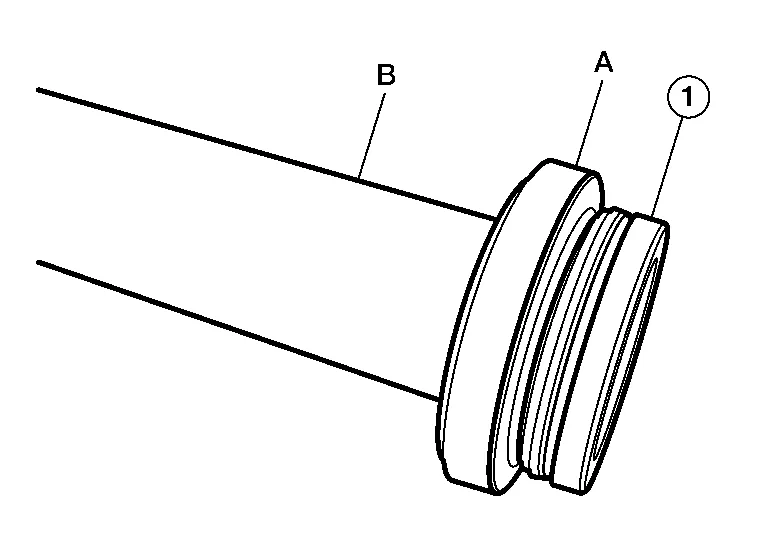
Using two people, install the drive shaft oil seal (1) to the specified depth (A).
| Dimension (A) | : 2.0 - 2.6 mm (0.079 - 0.102 in) |
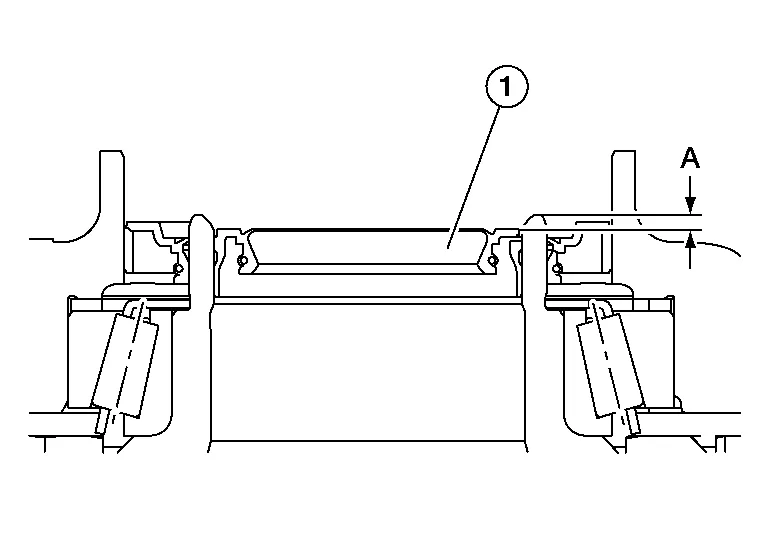
Using two people, install the transfer cover oil seal (1) using suitable tool (A).
CAUTION:
Do not reuse transfer cover oil seal.
Verify the transfer cover oil seal (2) is installed to the correct depth (A).
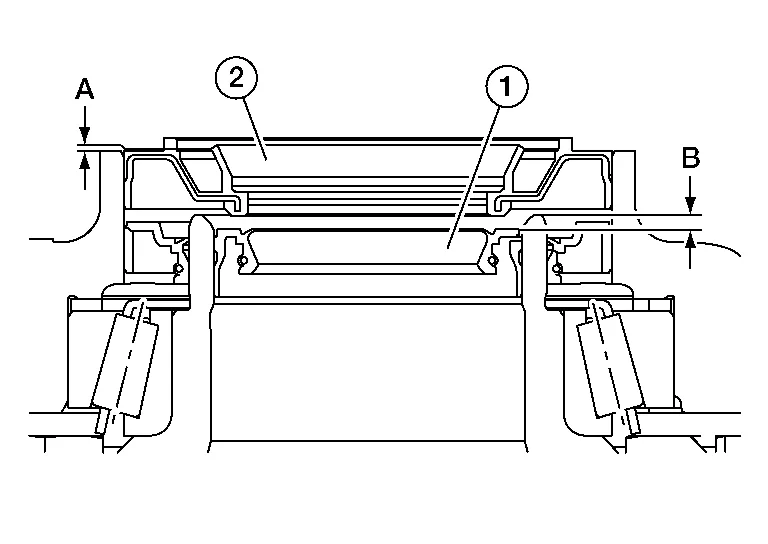
| Dimension (A) | : 0.0 - 0.6 mm (0.000 - 0.024 in) |
| (1) | : Drive shaft oil seal |
| (B) | : Drive shaft oil seal installation depth |
Installation of the remaining components is in the reverse order of removal.
 NOTE:
NOTE:
Lubricate the transfer cover oil seal and drive shaft oil seal lips before installing front drive shaft (RH).
 Transfer Cover Oil Seal
Exploded View
1.
Transfer case assembly
2.
Drive shaft oil seal
3.
Transfer cover oil seal
Removal and Installation
REMOVALRemove the front drive shaft (RH)...
 Unit Removal and Installation. Transfer Assembly
Exploded View
Transfer assembly
Transfer gusset
Rear gusset
: Nissan Murano Vehicle front
: N·m (kg-m, ft-lb)
Removal and Installation
NOTE:
When removing components such as hoses, tubes/lines, etc...
Other information:
Nissan Murano (Z52) 2015-2024 Owners Manual: Front-door pockets. Console side pockets (if so equipped)
F..
Nissan Murano (Z52) 2015-2024 Service Manual: Diagnosis System (lane Camera Unit)
CONSULT Function (LANE CAMERA UNIT) APPLICATION ITEMSCONSULT performs the following functions by communicating with the lane camera unit. Diagnosis mode Description Work support Performs the camera aiming. Self Diagnostic Result Displays the name of a malfunctioning system stored in the lane camera unit Data Monitor Displays lane camera unit input/output data in real time Ecu Identification Displays lane camera unit part number CAN Diag Support Monitor Displays a reception/transmission state of CAN communication Configuration The Nissan Murano vehicle specification that is written in lane camera unit can be displayed or stored The vehicle specification can be written when lane camera unit is replaced SELF DIAGNOSTIC RESULTRefer to DTC Index...
Categories
- Manuals Home
- Nissan Murano Owners Manual
- Nissan Murano Service Manual
- Turning the AEB system on/off
- Intelligent Forward Collision Warning (I-FCW)
- Indicator lights
- New on site
- Most important about car
LATCH (Lower Anchors and Tethers for CHildren) system

LATCH system lower anchor locations - bench seat
Your vehicle is equipped with special anchor points that are used with LATCH system compatible child restraints. This system may also be referred to as the ISOFIX or ISOFIX compatible system. With this system, you do not have to use a vehicle seat belt to secure the child restraint unless the combined weight of the child and child restraint exceeds 65 lbs. (29.5 kg). If the combined weight of the child and child restraint is greater than 65 lbs. (29.5 kg), use the vehicle’s seat belt (not the lower anchors) to install the child restraint. Be sure to follow the child restraint manufacturer’s instructions for installation.