Nissan Murano: Body Side Trim / Dash Side Finisher
REMOVAL
Remove front kicking plate. Refer to Removal and Installation - Front Kicking Plate.
Release metal clips using a suitable tool (A) as shown and remove dash side finisher (1).
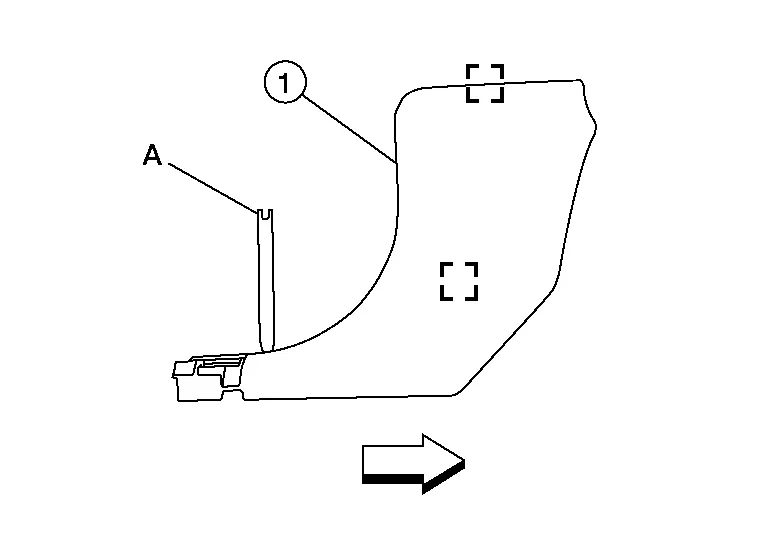
 : Metal clip
 : Front
INSTALLATION
Installation is in the reverse order of removal.
CAUTION:
-
Visually check metal clips for deformation and damage during installation. Replace with new ones if necessary.
-
When installing dash side finisher, check that metal clips are securely placed in body panel holes.
 Kicking Plate
Removal and Installation - Front Kicking Plate
REMOVALKicking Plate - InnerRelease front inner kicking plate (1) pawls by lifting up from both ends of front inner kicking plate as shown...
 Floor Trim
Exploded View
1.
Floor rear spacer (RH)
2.
Floor center spacer (RH)
3.
Floor front spacer (RH)
4.
Floor trim
5.
Floor front spacer (LH)
6...
Other information:
Nissan Murano (Z52) 2015-2024 Service Manual: Road Wheels & Tires :: Precaution. Precautions
Precaution for Supplemental Restraint System (SRS) "AIR BAG" and "SEAT BELT PRE-TENSIONER" The Supplemental Restraint System such as “AIR BAG” and “SEAT BELT PRE-TENSIONER”, used along with a front seat belt, helps to reduce the risk or severity of injury to the driver and front passenger for certain types of collisions...
Nissan Murano (Z52) 2015-2024 Service Manual: Precaution. Precautions
Precaution for Supplemental Restraint System (SRS) "AIR BAG" and "SEAT BELT PRE-TENSIONER" The Supplemental Restraint System such as “AIR BAG” and “SEAT BELT PRE-TENSIONER”, used along with a front seat belt, helps to reduce the risk or severity of injury to the driver and front passenger for certain types of collisions...
Categories
- Manuals Home
- Nissan Murano Owners Manual
- Nissan Murano Service Manual
- GAS STATION INFORMATION
- Indicator lights
- Jacking up vehicle and removing the damaged tire
- New on site
- Most important about car
Luggage hooks
When securing items using luggage hooks located on the back of the seat or side finisher do not apply a load over more than 6.5 lbs. (29 N) to a single hook.
The luggage hooks that are located on the floor should have loads less than 110 lbs. (490 N) to a single hook.