Nissan Murano: Brake Piping / Rear
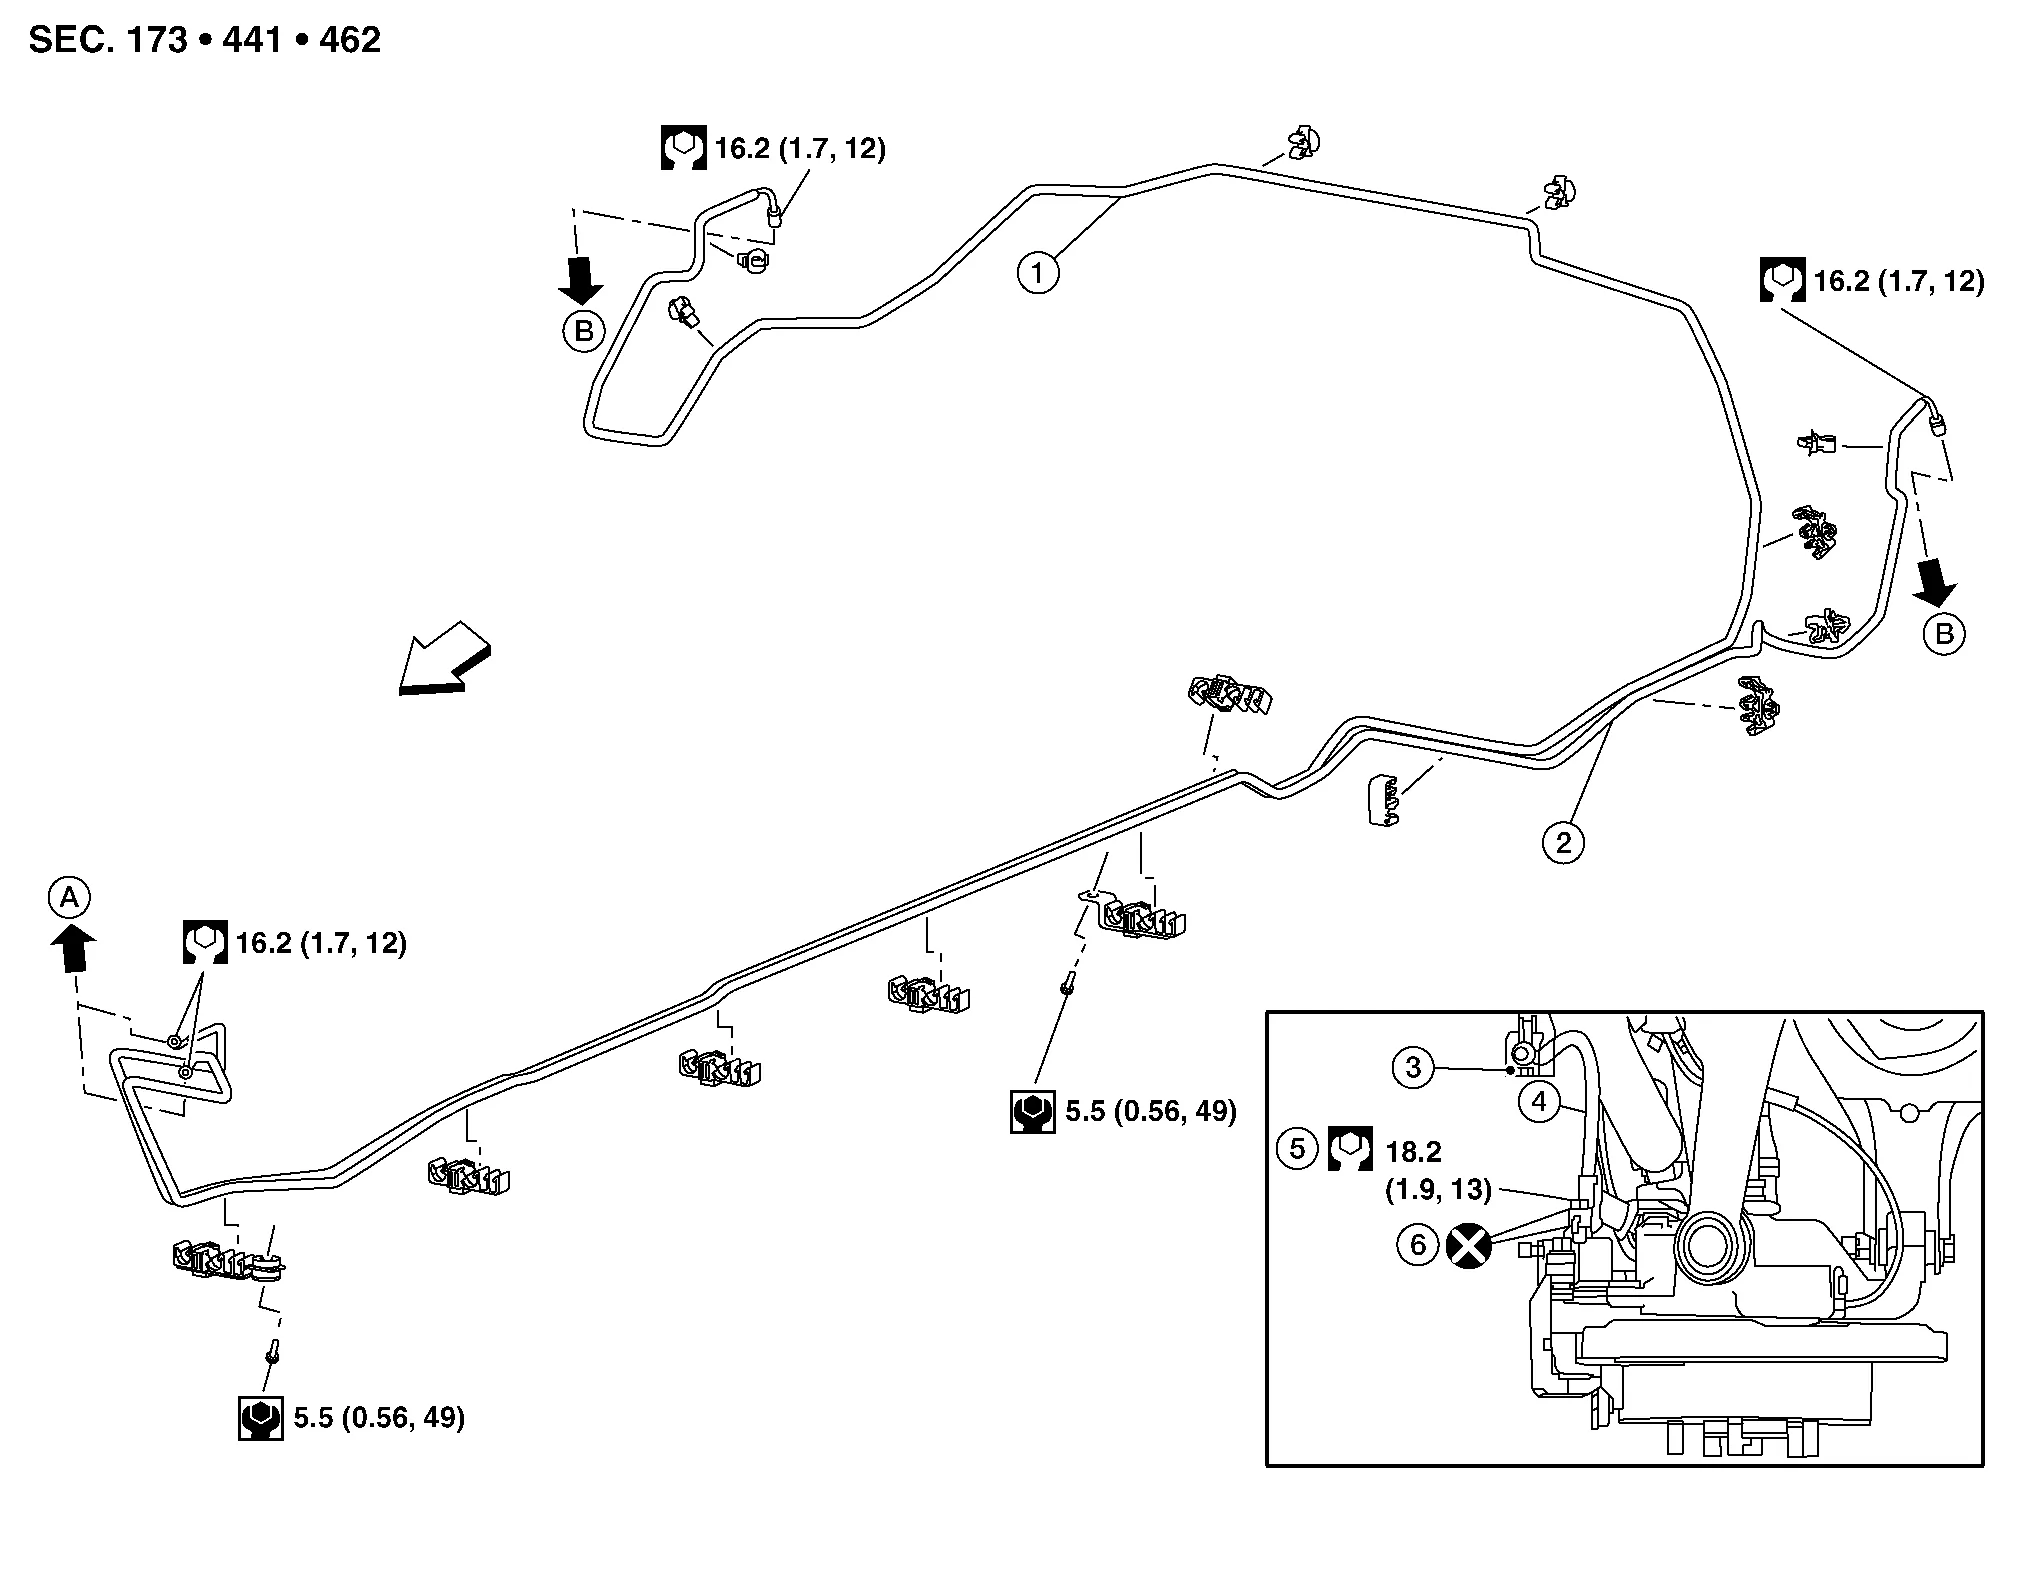
| 1. | Rear brake pipe assembly - RH | 2. | Rear brake pipe assembly - LH | 3. | Lock plate |
| 4. | Rear brake hose | 5. | Union bolt | 6. | Copper sealing washers |
| A. | To brake pipe connector. Refer to Exploded View. | B. | To rear brake hose | Front |
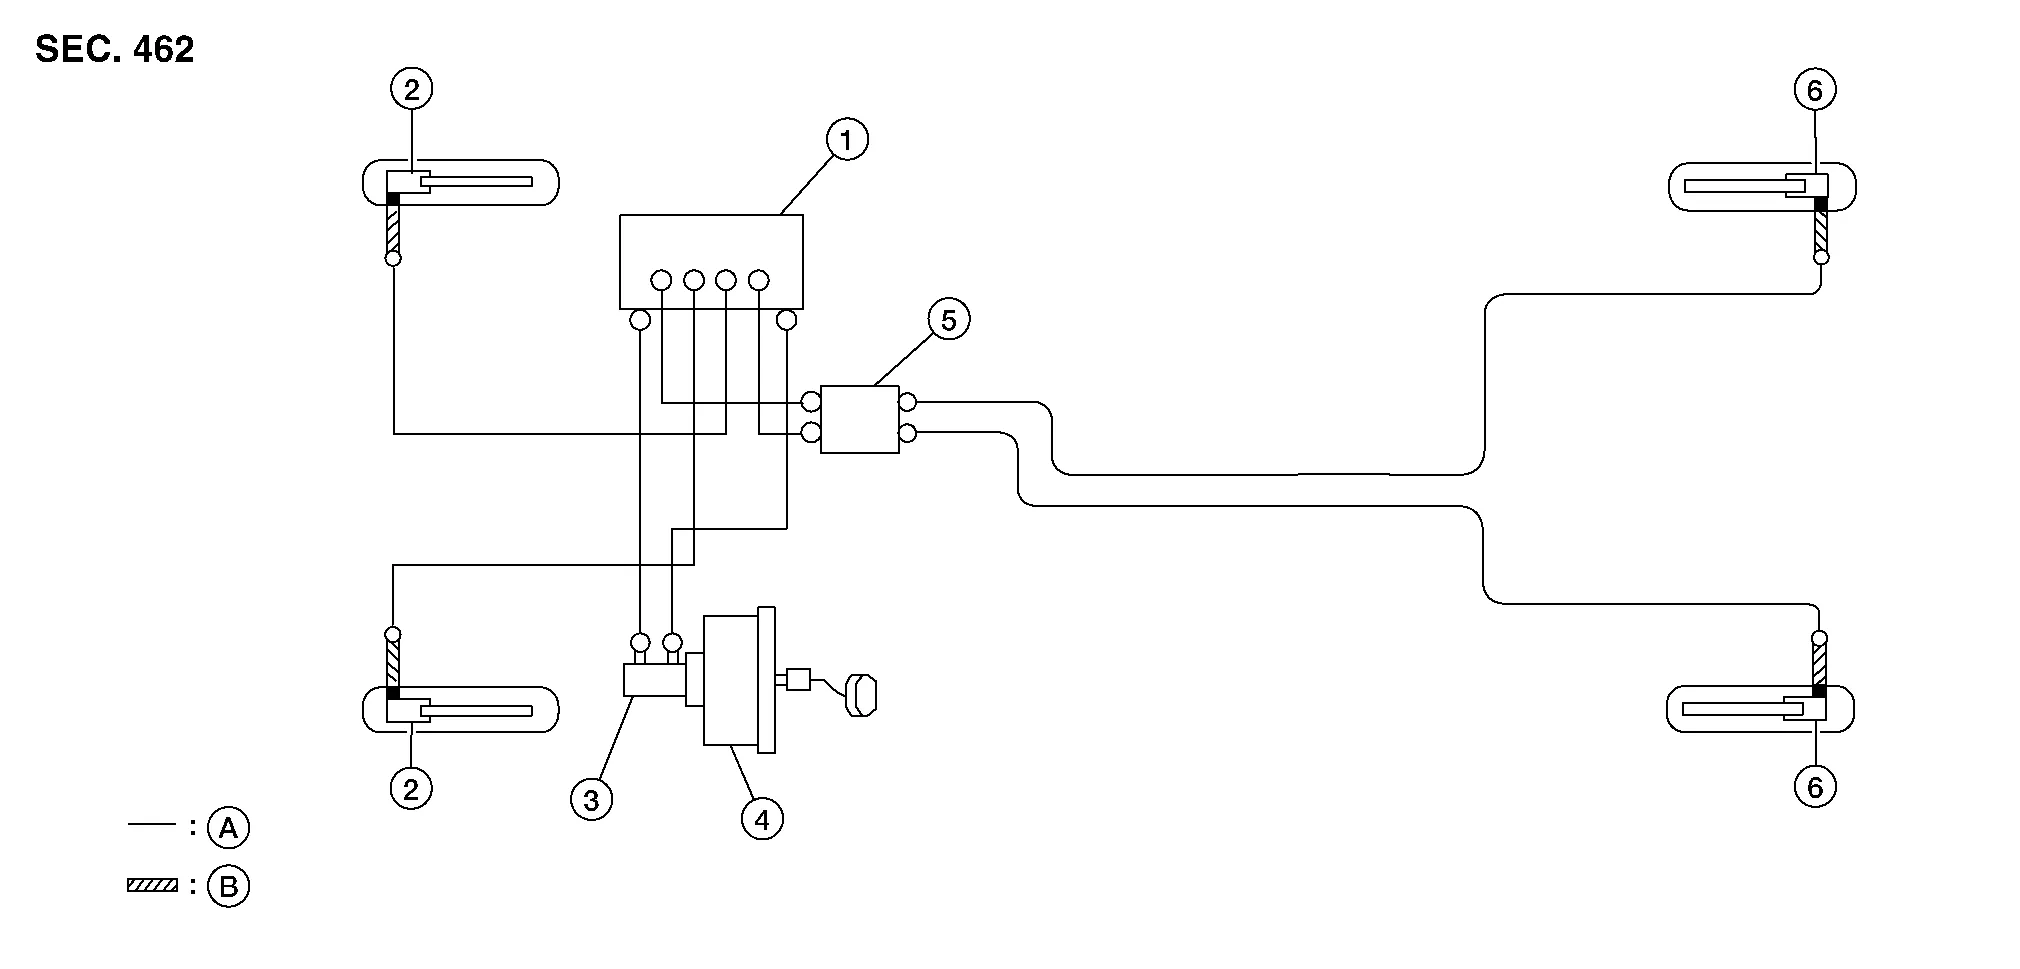
| 1. | ABS actuator and electric unit (control unit) | 2. | Front disc brake | 3. | Master cylinder assembly |
| 4. | Brake booster | 5. | Connector | 6. | Rear disc brake |
| A. | Brake tube | B. | Brake hose | ||
 : Flare nut : Flare nut |
|||||
 : Union bolt : Union bolt |
|||||
CAUTION:
-
All hoses and piping (tubes) must be free from excessive bending, twisting and pulling.
-
The brake piping is an important safety part. If a brake fluid leak is detected, always disassemble the parts. Replace applicable part with a new one, if necessary.
-
Do not spill or splash brake fluid on painted surfaces. Brake fluid may seriously damage paint. Wipe it off immediately and wash with water if it gets on a painted surface.
-
Do not allow foreign matter (e.g. dust) and oils other than brake fluid to enter the reservoir tank.
 NOTE:
NOTE:
When removing components such as hoses, tubes/lines, etc., cap or plug openings to prevent fluid from spilling.
REMOVAL
Remove sub tank cap.
Remove wheels and tires using power tool.
Loosen the flare nut with a flare nut wrench and separate the brake tube from the hose.
CAUTION:
-
Do not scratch the flare nut and the brake pipe.
-
All brake hoses and pipes must be free from excessive bending, twisting and pulling.
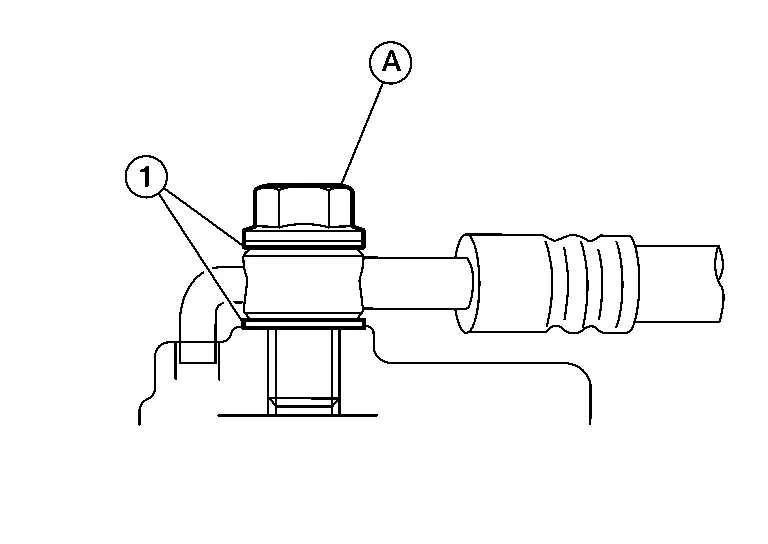
Remove the union bolt (A) and the brake hose from the brake caliper. Remove and discard the copper sealing washers (1).
CAUTION:
Do not reuse copper sealing washers.
Remove the lock plate and remove the brake hose.
INSTALLATION
CAUTION:
Do not allow foreign matter (e.g. dust) and oils other than brake fluid to enter the sub tank and reservoir tank.
Assemble the union bolt (A) and the copper sealing washers (1) to the brake hose and install it as an assembly to the brake caliper. Align the brake hose L-pin by aligning it with the brake caliper hole, and tighten the union bolt (1) to the specified torque.
CAUTION:
Do not reuse copper sealing washers.
Install the brake pipe to the brake hose, temporarily tighten the flare nut by hand until it does not rotate further, and attach the brake hose to the bracket with the lock plate.
CAUTION:
Check that the brake hoses and pipes are not bent or twisted.
Tighten the flare nut to the specified torque with a flare nut crowfoot and a torque wrench.
CAUTION:
Do not scratch the flare nut and the brake pipe.
Refill with new brake fluid and perform the air bleeding. Refer to Bleeding Brake System.
CAUTION:
Do not reuse drained brake fluid.
Install the wheels and tires. Refer to Removal and Installation.
Perform inspection after installation. Refer to Inspection.
 Front
Front
Exploded View
1.
Brake tube (RH)
2.
ABS actuator and electric unit (control unit)
3.
Master cylinder primary to ABS actuator brake tube
4...
 Brake Master Cylinder
Exploded View
1.
Sub tank cap
2.
Sub tank
3.
Sub tank bracket
4.
Clamp
5.
Hose
6.
Clamp
7.
Reservoir tank
8.
Grommet
9...
Other information:
Nissan Murano (Z52) 2015-2024 Service Manual: Precautions
Precautions for Body Repair WARNING: The repair information in this section is intended for trained body repair technicians who have attained a high level of skill and experience (e.g. ASE Collision Repair Certification, I-CAR Professional Development Program [PDP] training, etc...
Nissan Murano (Z52) 2015-2024 Service Manual: Shift Lock System
System Description The shift selector lever cannot be shifted from the “P” position unless the brake pedal is depressed while the ignition switch is set to ON. The shift lock is unlocked by turning the shift lock solenoid ON when the ignition switch is set to ON, the park position switch is turned ON (shift selector lever is in “P” position), and the stop lamp switch is turned ON (brake pedal is depressed) as shown in the operation chart in the figure...
Categories
- Manuals Home
- Nissan Murano Owners Manual
- Nissan Murano Service Manual
- Indicator lights
- High Beam Assist (if so equipped)
- Jacking up vehicle and removing the damaged tire
- New on site
- Most important about car
Luggage hooks
When securing items using luggage hooks located on the back of the seat or side finisher do not apply a load over more than 6.5 lbs. (29 N) to a single hook.
The luggage hooks that are located on the floor should have loads less than 110 lbs. (490 N) to a single hook.