Nissan Murano: Interior :: Removal and Installation / Front Door Finisher
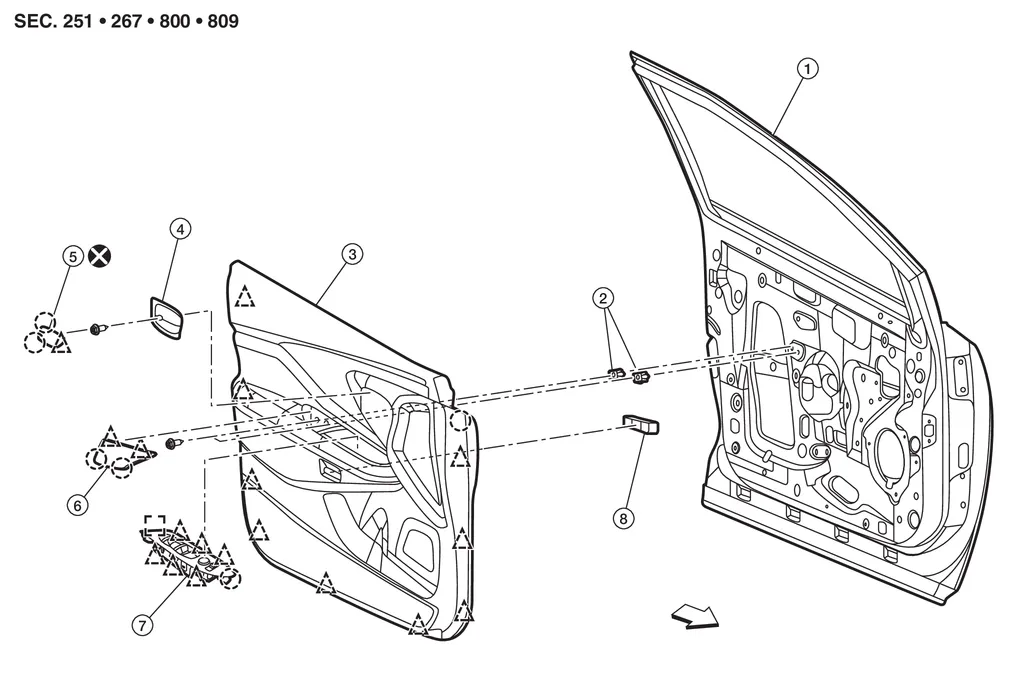
| 1. | Front door | 2. | Front door finisher screw grommet | 3. | Front door finisher |
| 4. | Inside door handle | 5. | Inside door handle escutcheon | 6. | Door pull handle escutcheon |
| 7. | Main power window and door lock/unlock switch LH | 8. | Seat memory switch (if equipped) |  |
Clip |
 |
Pawl |  |
Front |
REMOVAL
Using a suitable tool release pawls and remove pull handle cap then remove front door finisher bolts. Refer to Exploded View.
Using a suitable tool release pawls and remove inside door handle escutcheon then remove front door finisher bolt. Refer to Exploded View.
CAUTION:
Do not reuse inside door handle escutcheon. Replace with new part after removal.
Pull armrest in direction shown ( ) then starting at rear release power window and door lock/unlock switch finisher (1) pawls using a suitable tool (A).
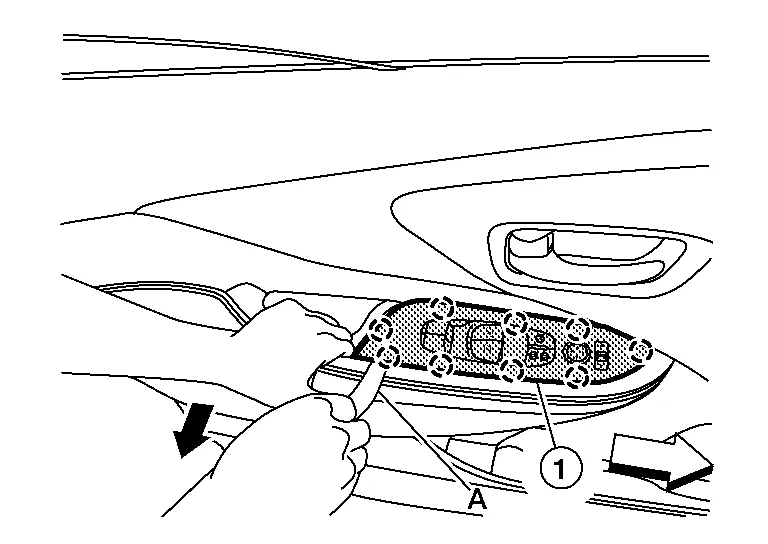
![]() : Front
: Front
: Pawl
 NOTE:
NOTE:
LH Shown, RH similar
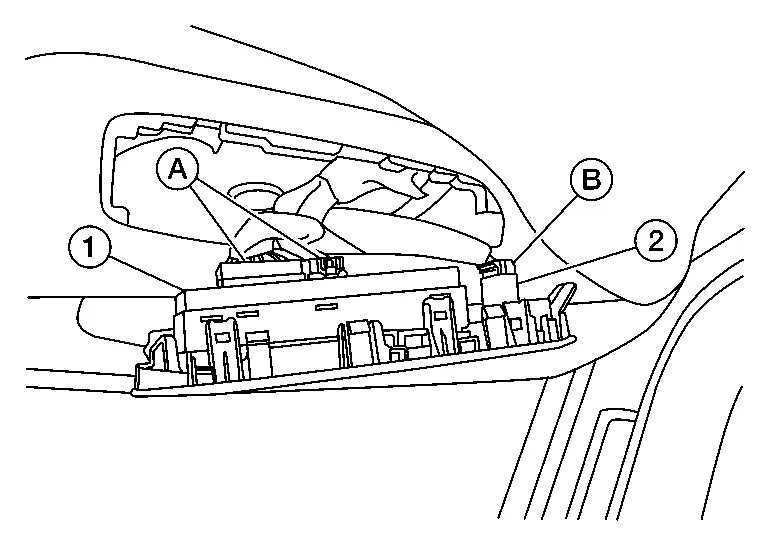
Disconnect the harness connectors (A) from the power window and door lock/unlock switch (1) and harness connector (B) from the door mirror remote control switch (2) and remove.
Using a suitable tool release front door finisher clips. Exploded View.
Disconnect the harness connector from the front door finisher.
Disconnect the door lock cable and inside door handle cable from the front door finisher.
Remove front door finisher.
Remove seat memory switch (if necessary). Refer to Removal and Installation.
INSTALLATION
Installation is in the reverse order of removal.
CAUTION:
-
Do not reuse inside door handle escutcheon. Replace with new part for installation.
-
Visually check clips and pawls for deformation and damage during installation. Replace with new ones if necessary.
-
Before installing front door finisher, align to front door by starting from top front and working rearward.
-
When installing front door finisher, check that clips are securely placed in body panel holes.
NOTE:
When main power window and door lock/unlock switch is removed or replaced, it is necessary to perform initialization procedure. Refer to Description.

 Rear Door Finisher
Exploded View
1.
Rear door
2.
Rear door finisher
3.
Inside door handle escutcheon
4.
Rear power window switch
5.
Pull handle cap
Clip
Pawl
Front
Removal and Installation
REMOVALUsing a suitable tool release pawls and remove pull handle cap then remove rear door finisher bolt...
Other information:
Nissan Murano (Z52) 2015-2024 Owners Manual: Measurement of weights
Secure loose items to prevent weight shifts that could affect the balance of your vehicle.When the vehicle is loaded, drive to a scale and weigh the front and the rear wheels separately to determine axle loads. Individual axle loads should not exceed either of the Gross Axle Weight Ratings (GAWR)...
Nissan Murano (Z52) 2015-2024 Service Manual: U1000 Can Comm Circuit
DTC Description DESCRIPTIONCAN (Controller Area Network) is a serial communication line for real-time application. It is an on-Nissan Murano vehicle multiplex communication line with high data communication speed and excellent error detection ability...
Categories
- Manuals Home
- Nissan Murano Owners Manual
- Nissan Murano Service Manual
- Settings
- All-Wheel Drive (AWD) (if so equipped)
- Intelligent Forward Collision Warning (I-FCW)
- New on site
- Most important about car
Front manual seat adjustment (if so equipped)
Your vehicle seats can be adjusted manually. For additional information about adjusting the seats, refer to the steps outlined in this section.
Forward and backward
