Nissan Murano: Changing a flat tire / Installing the spare tire
Nissan Murano (Z52) 2015-2024 Owners Manual / In case of emergency / Flat tire / Changing a flat tire / Installing the spare tire
The spare tire is designed for emergency use. For additional information, refer to “Wheels and tires” in the “Do-it-yourself” section of this manual.
- Clean any mud or dirt from the surface between the wheel and hub.
- Carefully put the spare tire on and tighten the wheel nuts finger tight.
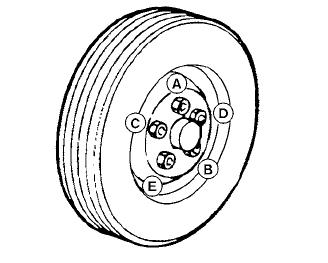
- With the wheel nut wrench, tighten
wheel nuts alternately and evenly in the
sequence illustrated (
 ,
,
 ,
,
 ,
,
 ,
,
 )
until they are tight.
)
until they are tight. - Lower the vehicle slowly until the tire
touches the ground. Then, with the
wheel nut wrench, tighten the wheel
nuts securely in the sequence illustrated
(
 ,
,
 ,
,
 ,
,
 ,
,
 ). Lower the vehicle
completely.
). Lower the vehicle
completely. - Securely store the jack and tools back in their storage compartment. Ensure the jack is expanded and tools snapped into place to prevent rattle noise from happening while driving.
WARNING
- Incorrect wheel nuts or improperly tightened wheel nuts can cause the wheel to become loose or come off. This could cause an accident.
- Do not use oil or grease on the wheel studs or nuts. This could cause the nuts to become loose.
- Retighten the wheel nuts when the vehicle has been driven for 621 miles (1,000 km) (also in cases of a flat tire, etc.).
As soon as possible, tighten the wheel nuts to the specified torque with a torque wrench.
Wheel nut tightening torque:
83 ft-lb (113 N·m)
The wheel nuts must be kept tightened to specification at all times. It is recommended that wheel nuts be tightened to specifications at each lubrication interval.
Adjust tire pressure to the COLD pressure. COLD pressure: After vehicle has been parked for 3 hours or more or driven less than 1 mile (1.6 km).
COLD tire pressures are shown on the tire and loading information label affixed to the driver side center pillar.
 Jacking up vehicle and removing the damaged tire
WARNING
Never get under the vehicle while it is
supported only by the jack. If it is necessary
towork under the vehicle, support
it with safety stands...
 Jump starting
To start your engine with a booster battery,
the instructions and precautions below
must be followed.
WARNING
If done incorrectly, jump starting can
lead to a battery explosion, resulting
in severe injury or death...
Other information:
Nissan Murano (Z52) 2015-2024 Service Manual: Front Side Marker Lamp Circuit
Component Function Check CHECK PARKING LAMP OPERATION Check that the parking lamp is turned ON. Is the inspection result normal? YES>> GO TO 2. NO>> Check parking lamp circuit. Refer to Component Function Check. CHECK FRONT SIDE MARKER LAMP OPERATION CONSULT Select “EXTERNAL LAMPS” in “Active Test” mode of “IPDM E/R”...
Nissan Murano (Z52) 2015-2024 Service Manual: Srs Air Bag :: Precaution. Precautions
Precaution for Supplemental Restraint System (SRS) "AIR BAG" and "SEAT BELT PRE-TENSIONER" The Supplemental Restraint System such as “AIR BAG” and “SEAT BELT PRE-TENSIONER”, used along with a front seat belt, helps to reduce the risk or severity of injury to the driver and front passenger for certain types of collisions...
Categories
- Manuals Home
- Nissan Murano Owners Manual
- Nissan Murano Service Manual
- Warning lights
- High Beam Assist (if so equipped)
- GAS STATION INFORMATION
- New on site
- Most important about car
Copyright © 2026 www.nimurano.com